第一次做ppt怎么弄seo关键词的选择步骤
C++哈希表的实现
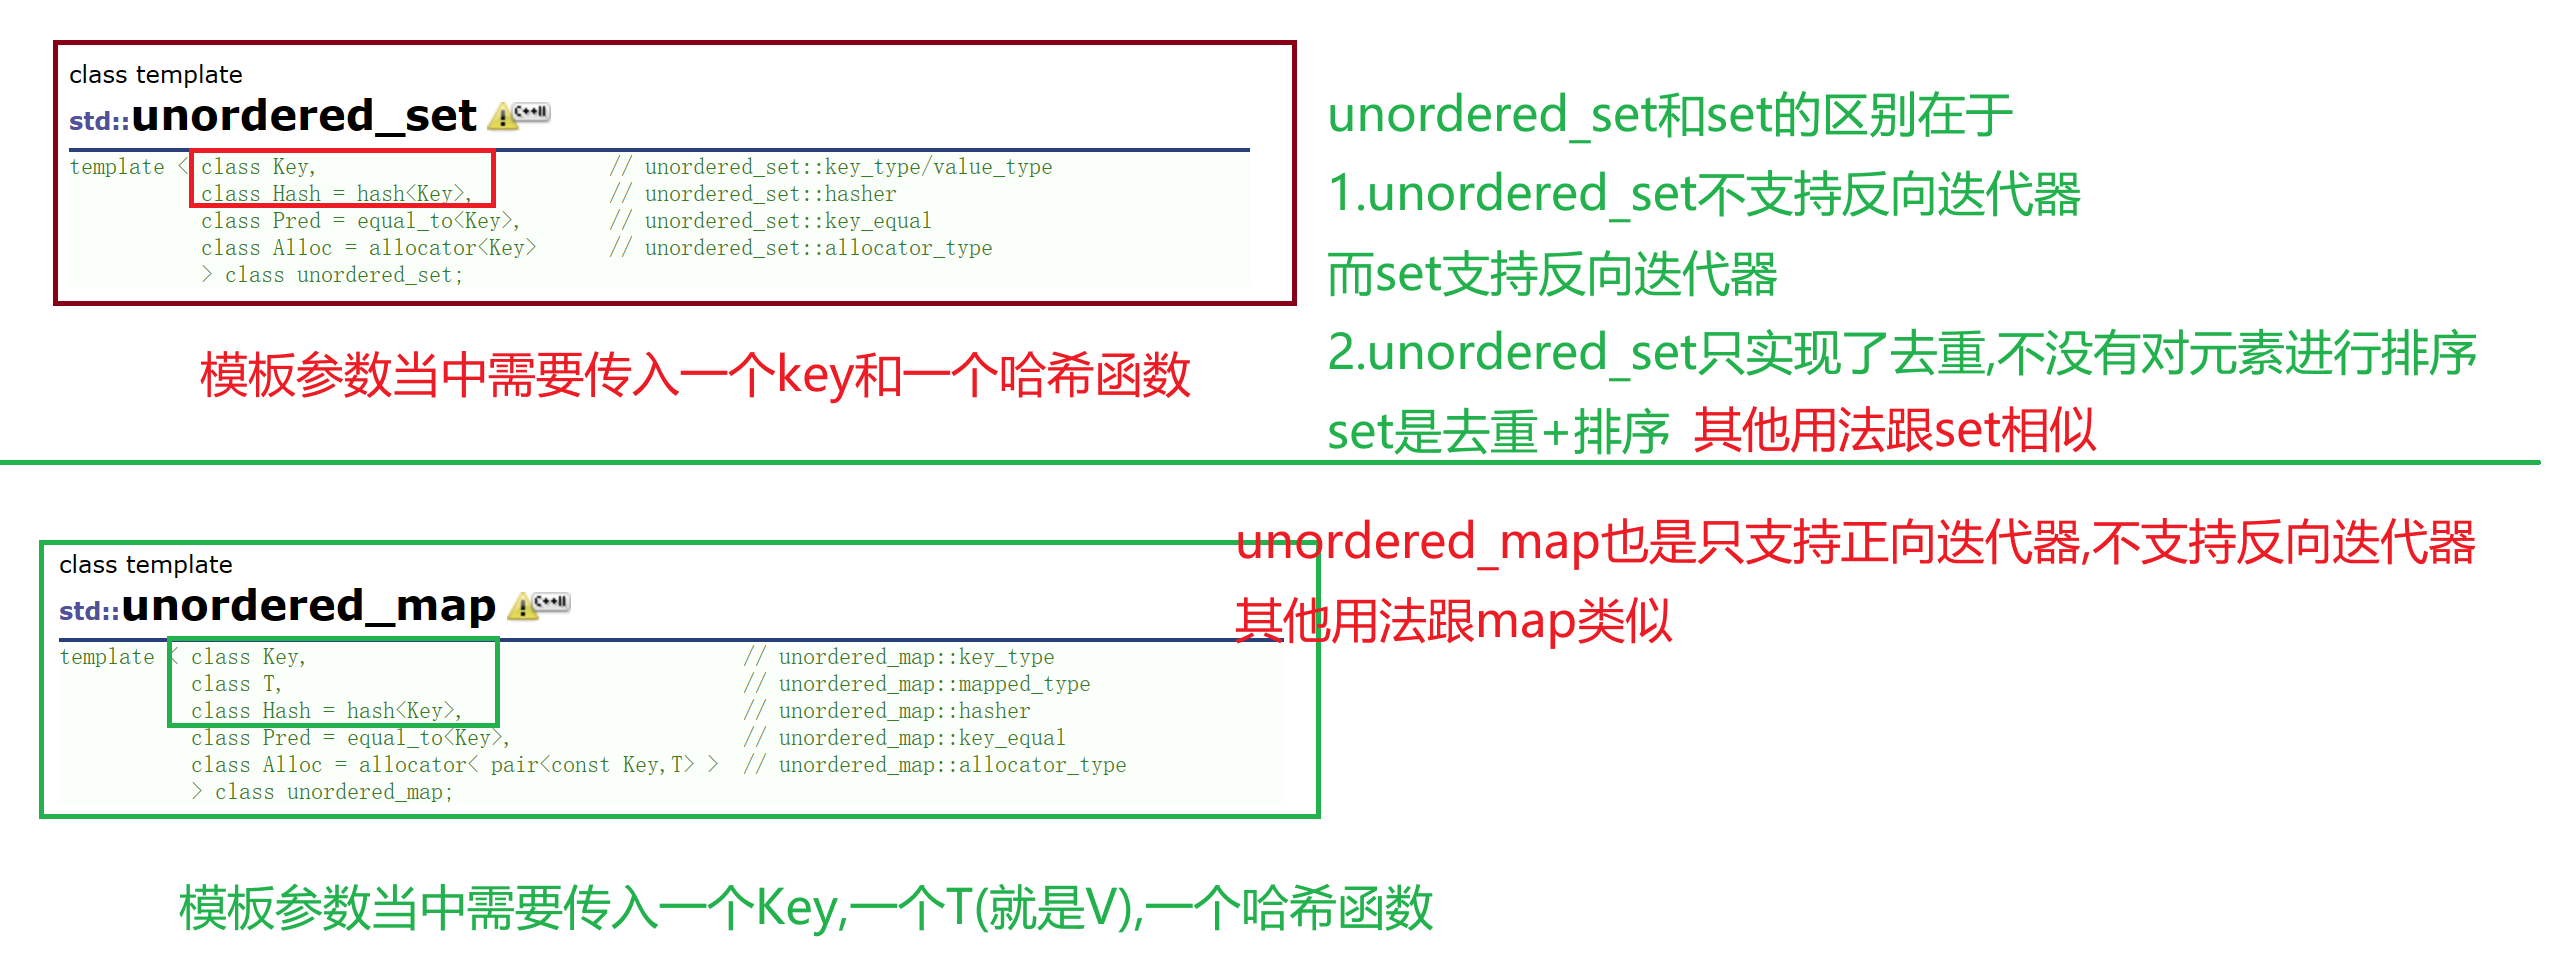
- 一.unordered系列容器的介绍
- 二.哈希介绍
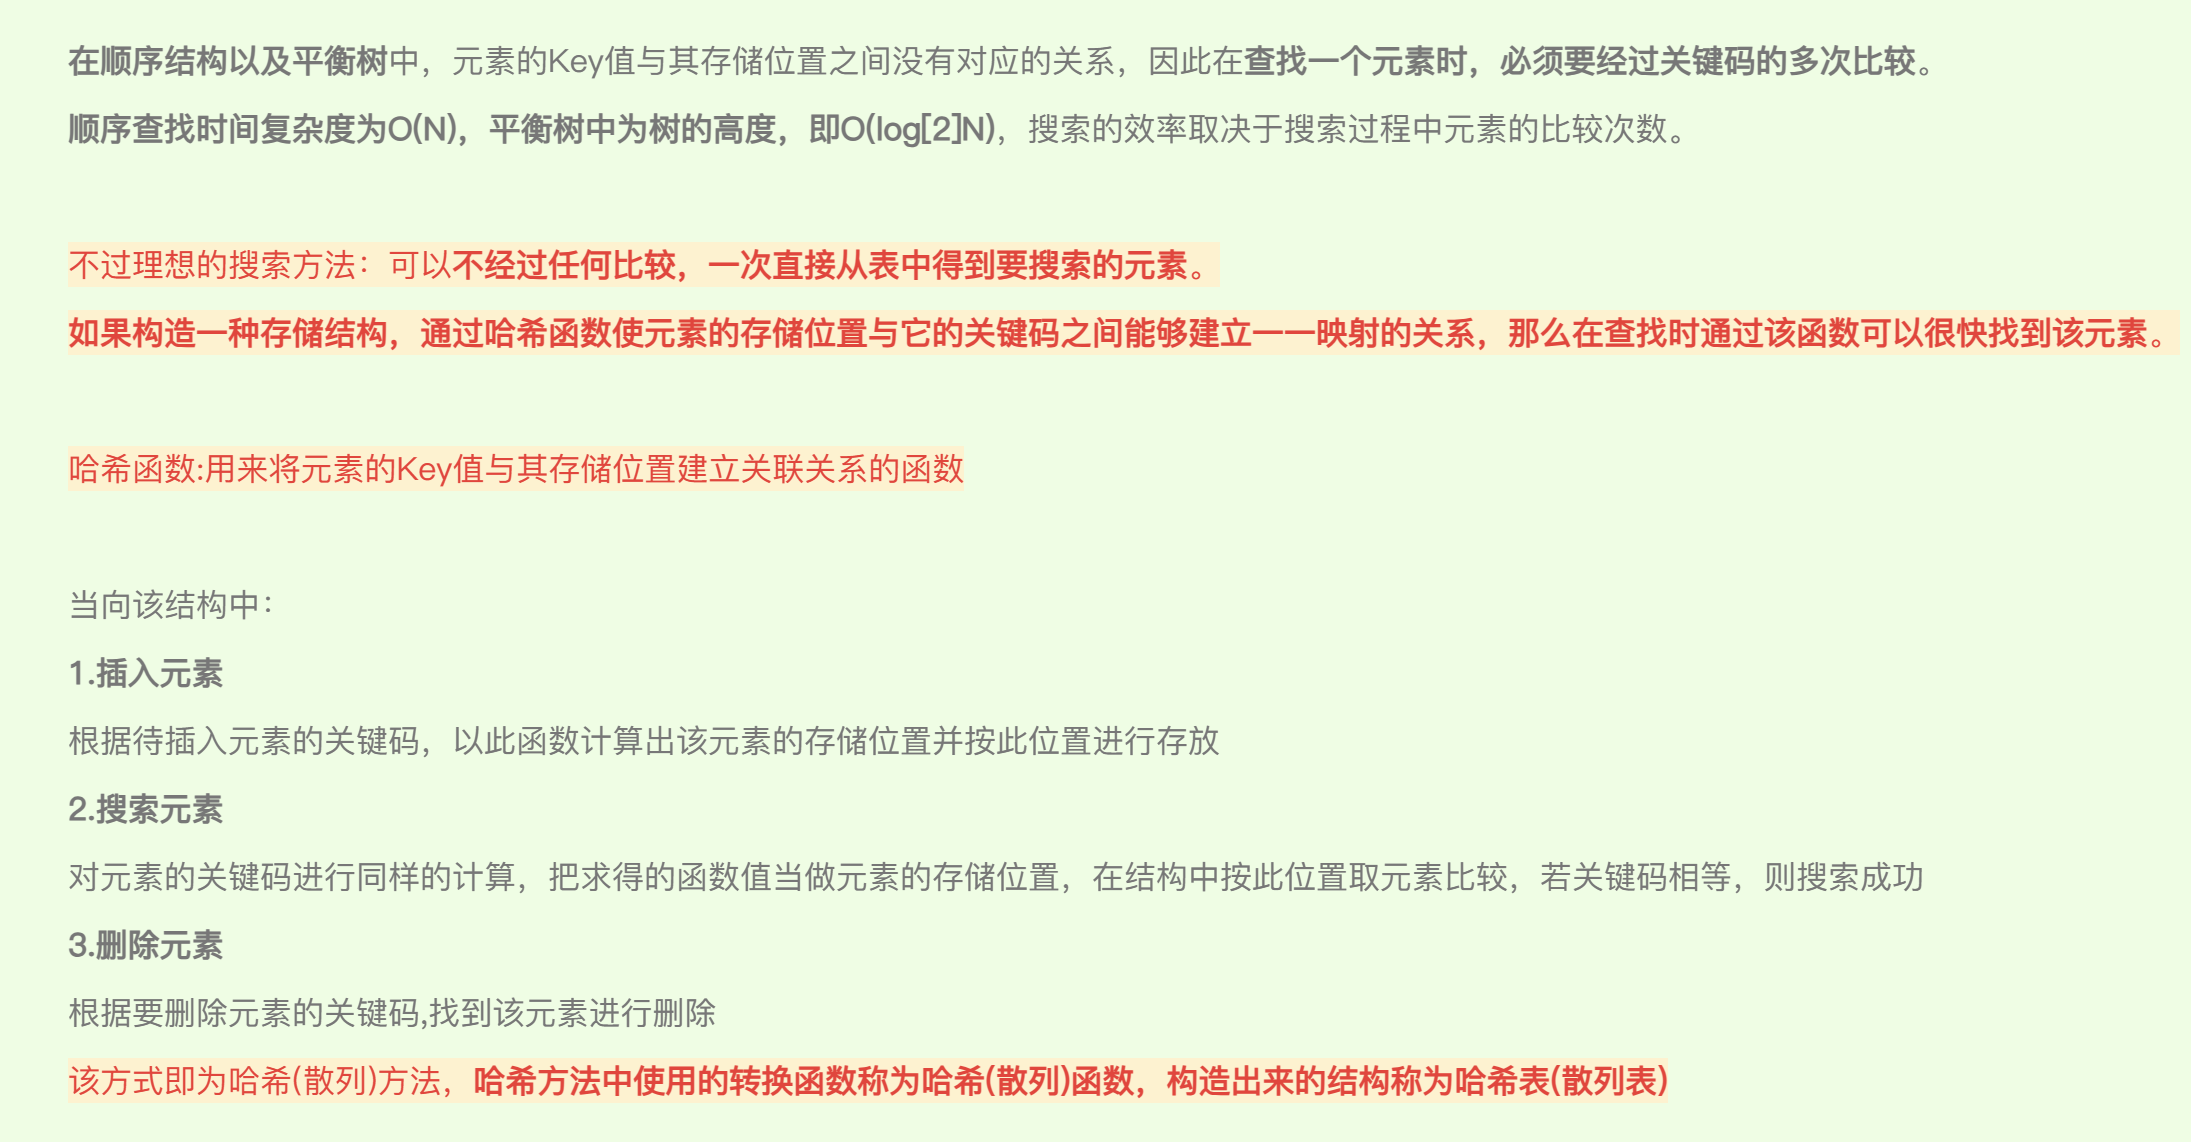
- 1.哈希概念
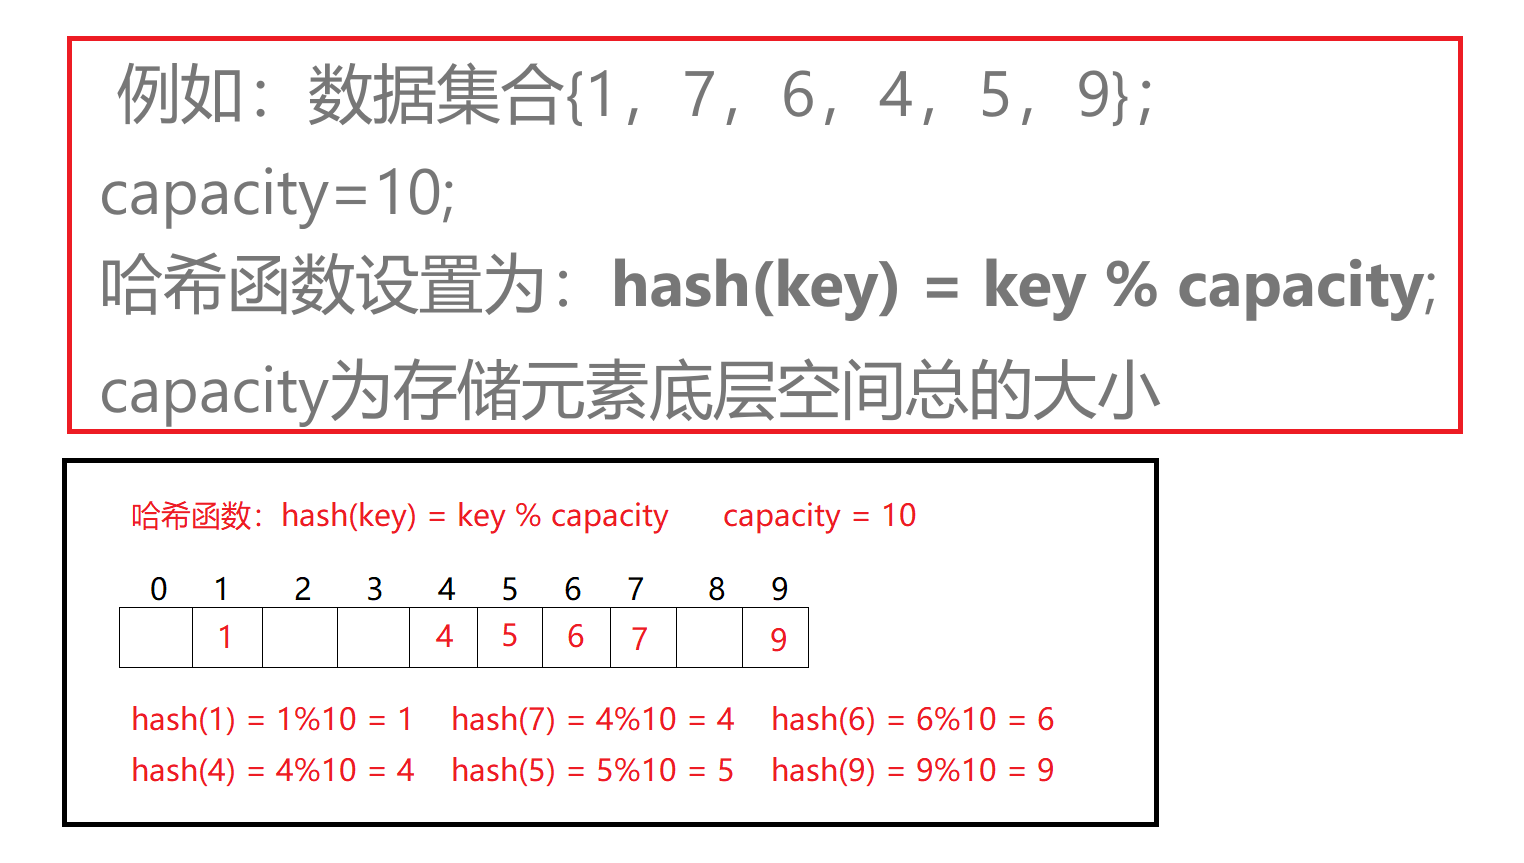
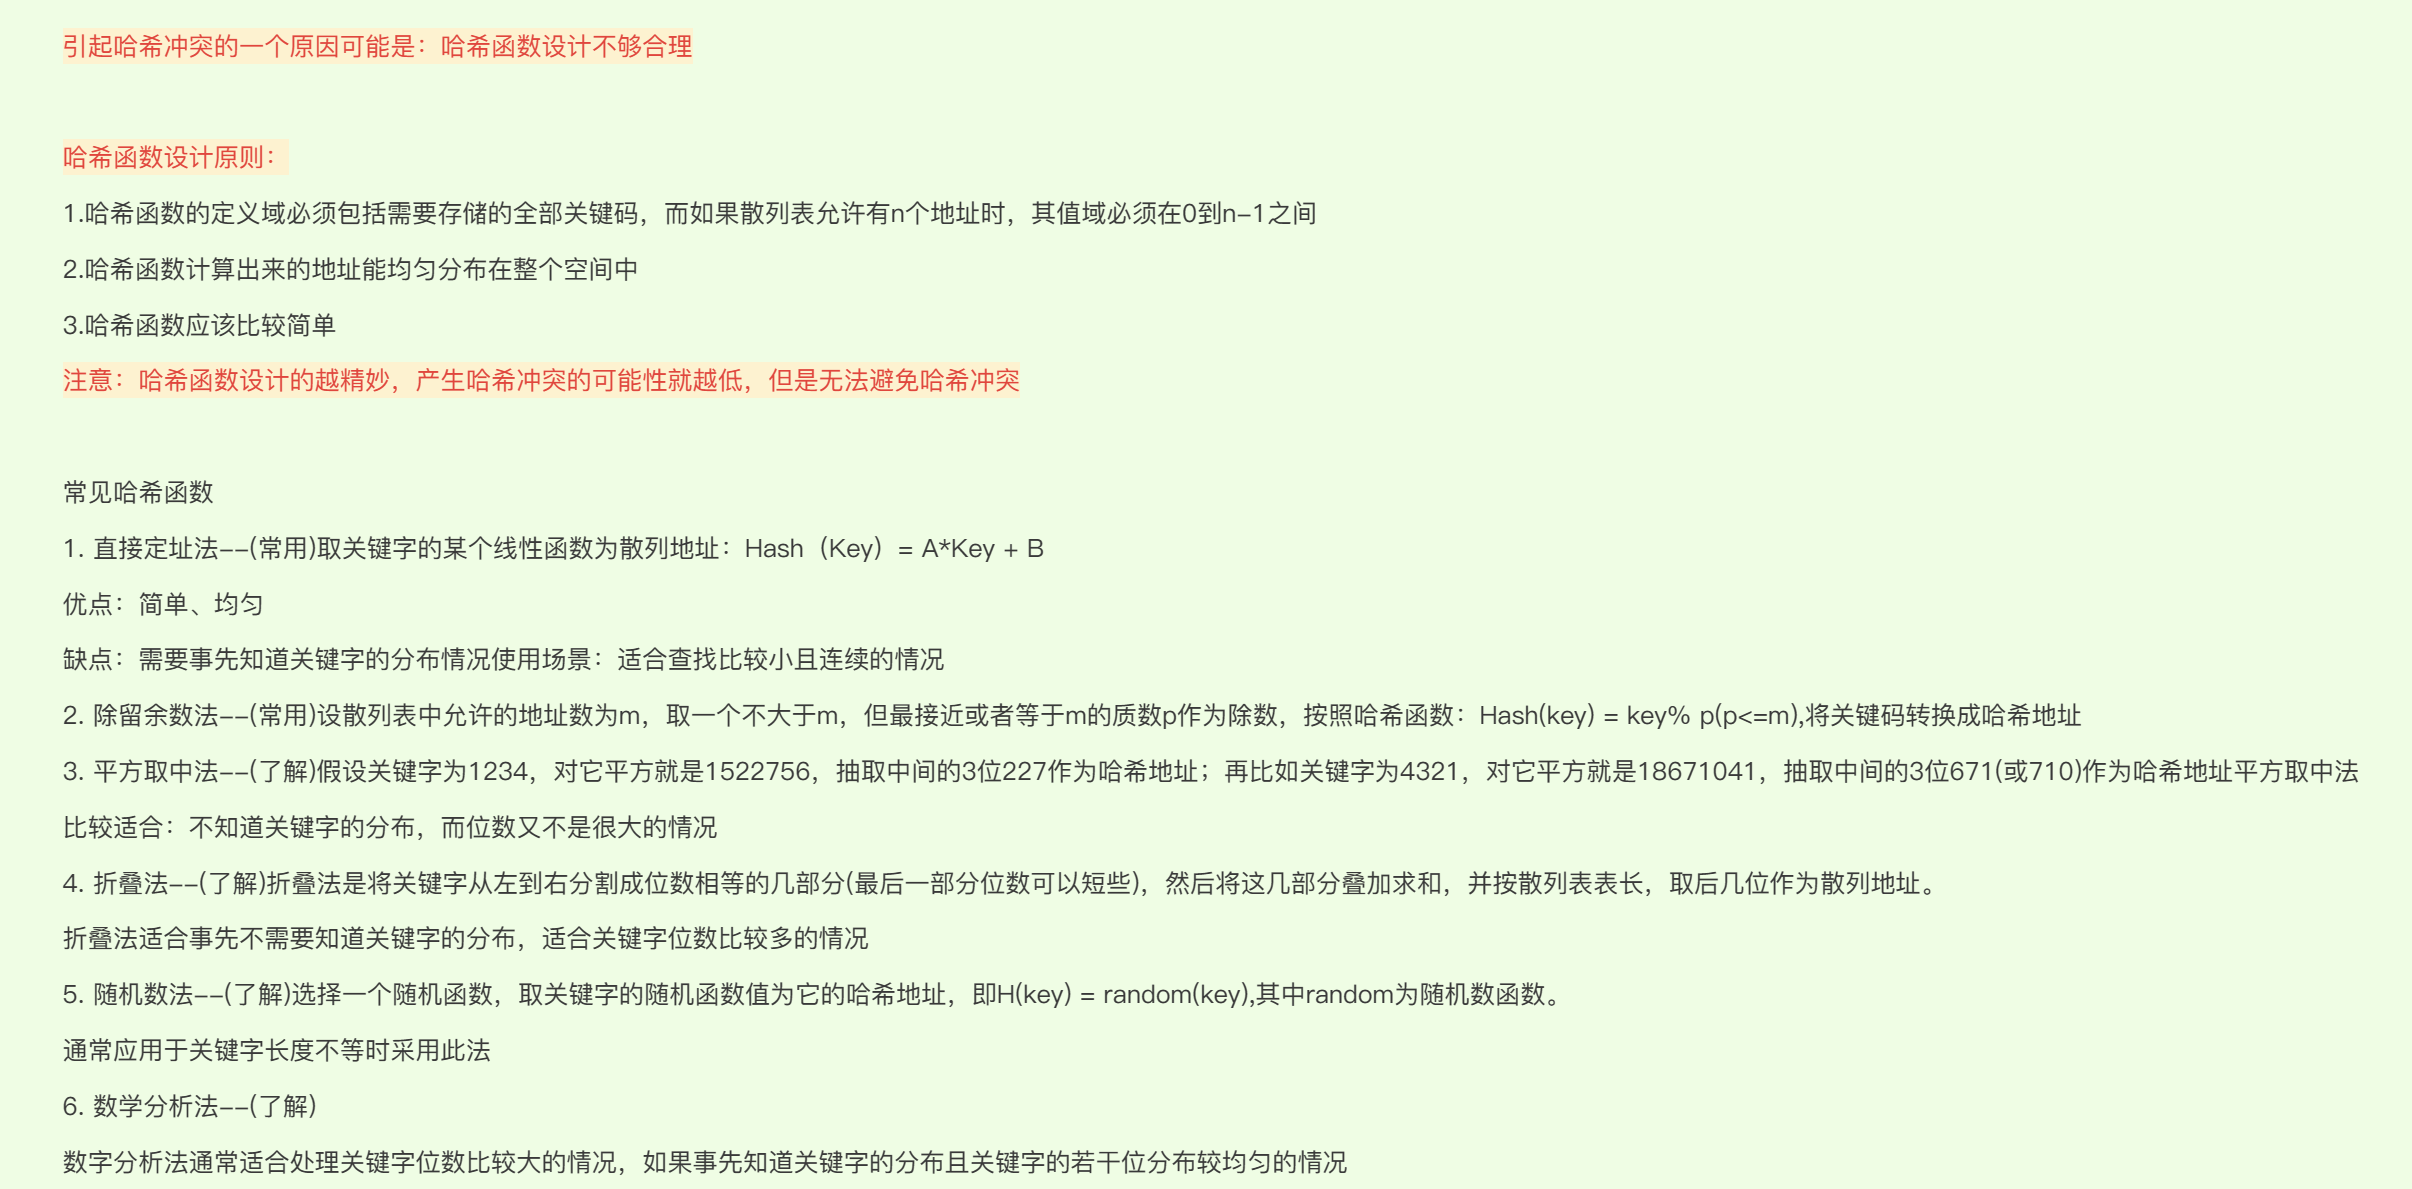
- 2.哈希函数的常见设计
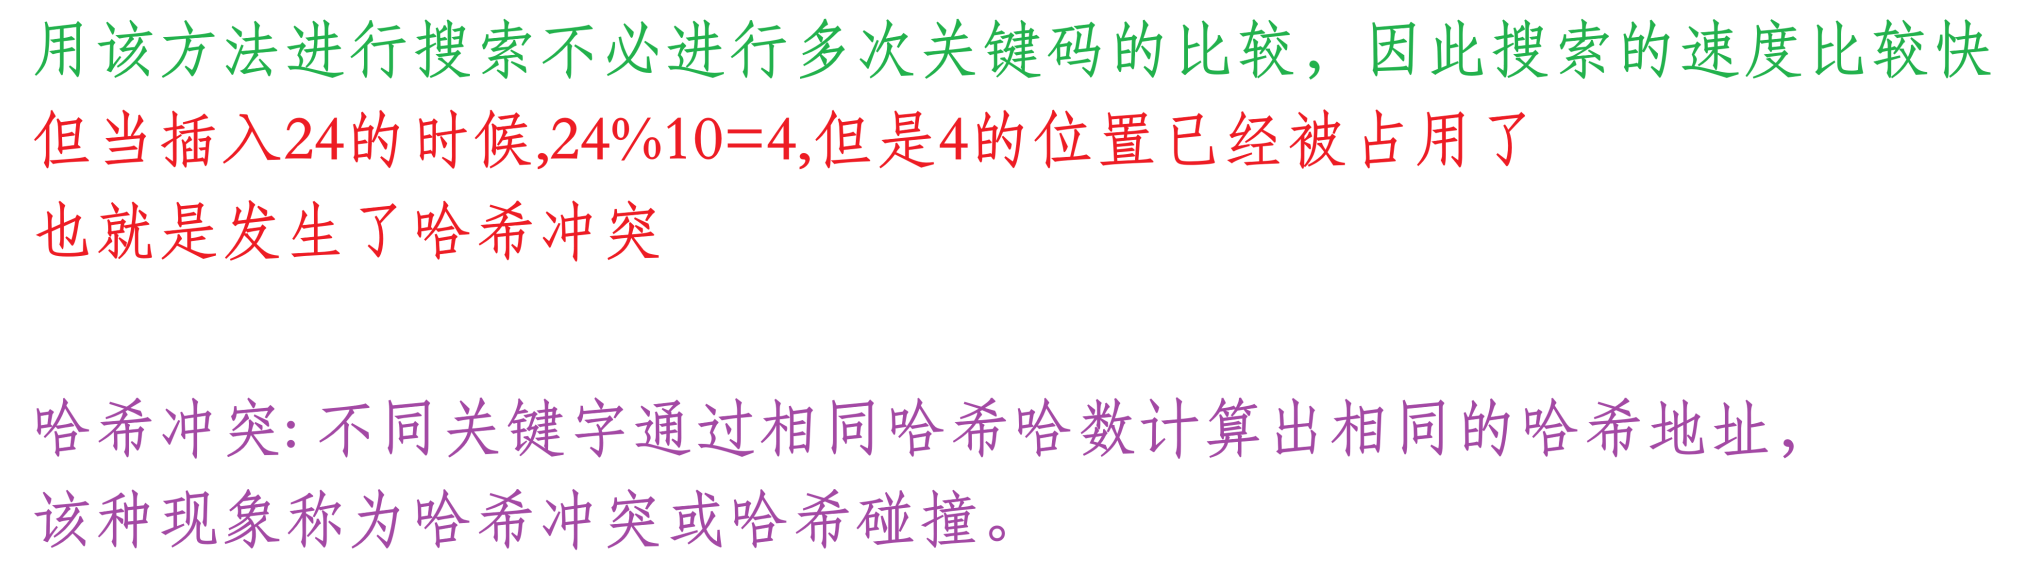
- 3.哈希冲突
- 4.哈希函数的设计原则
- 三.解决哈希冲突
- 1.闭散列(开放定址法)
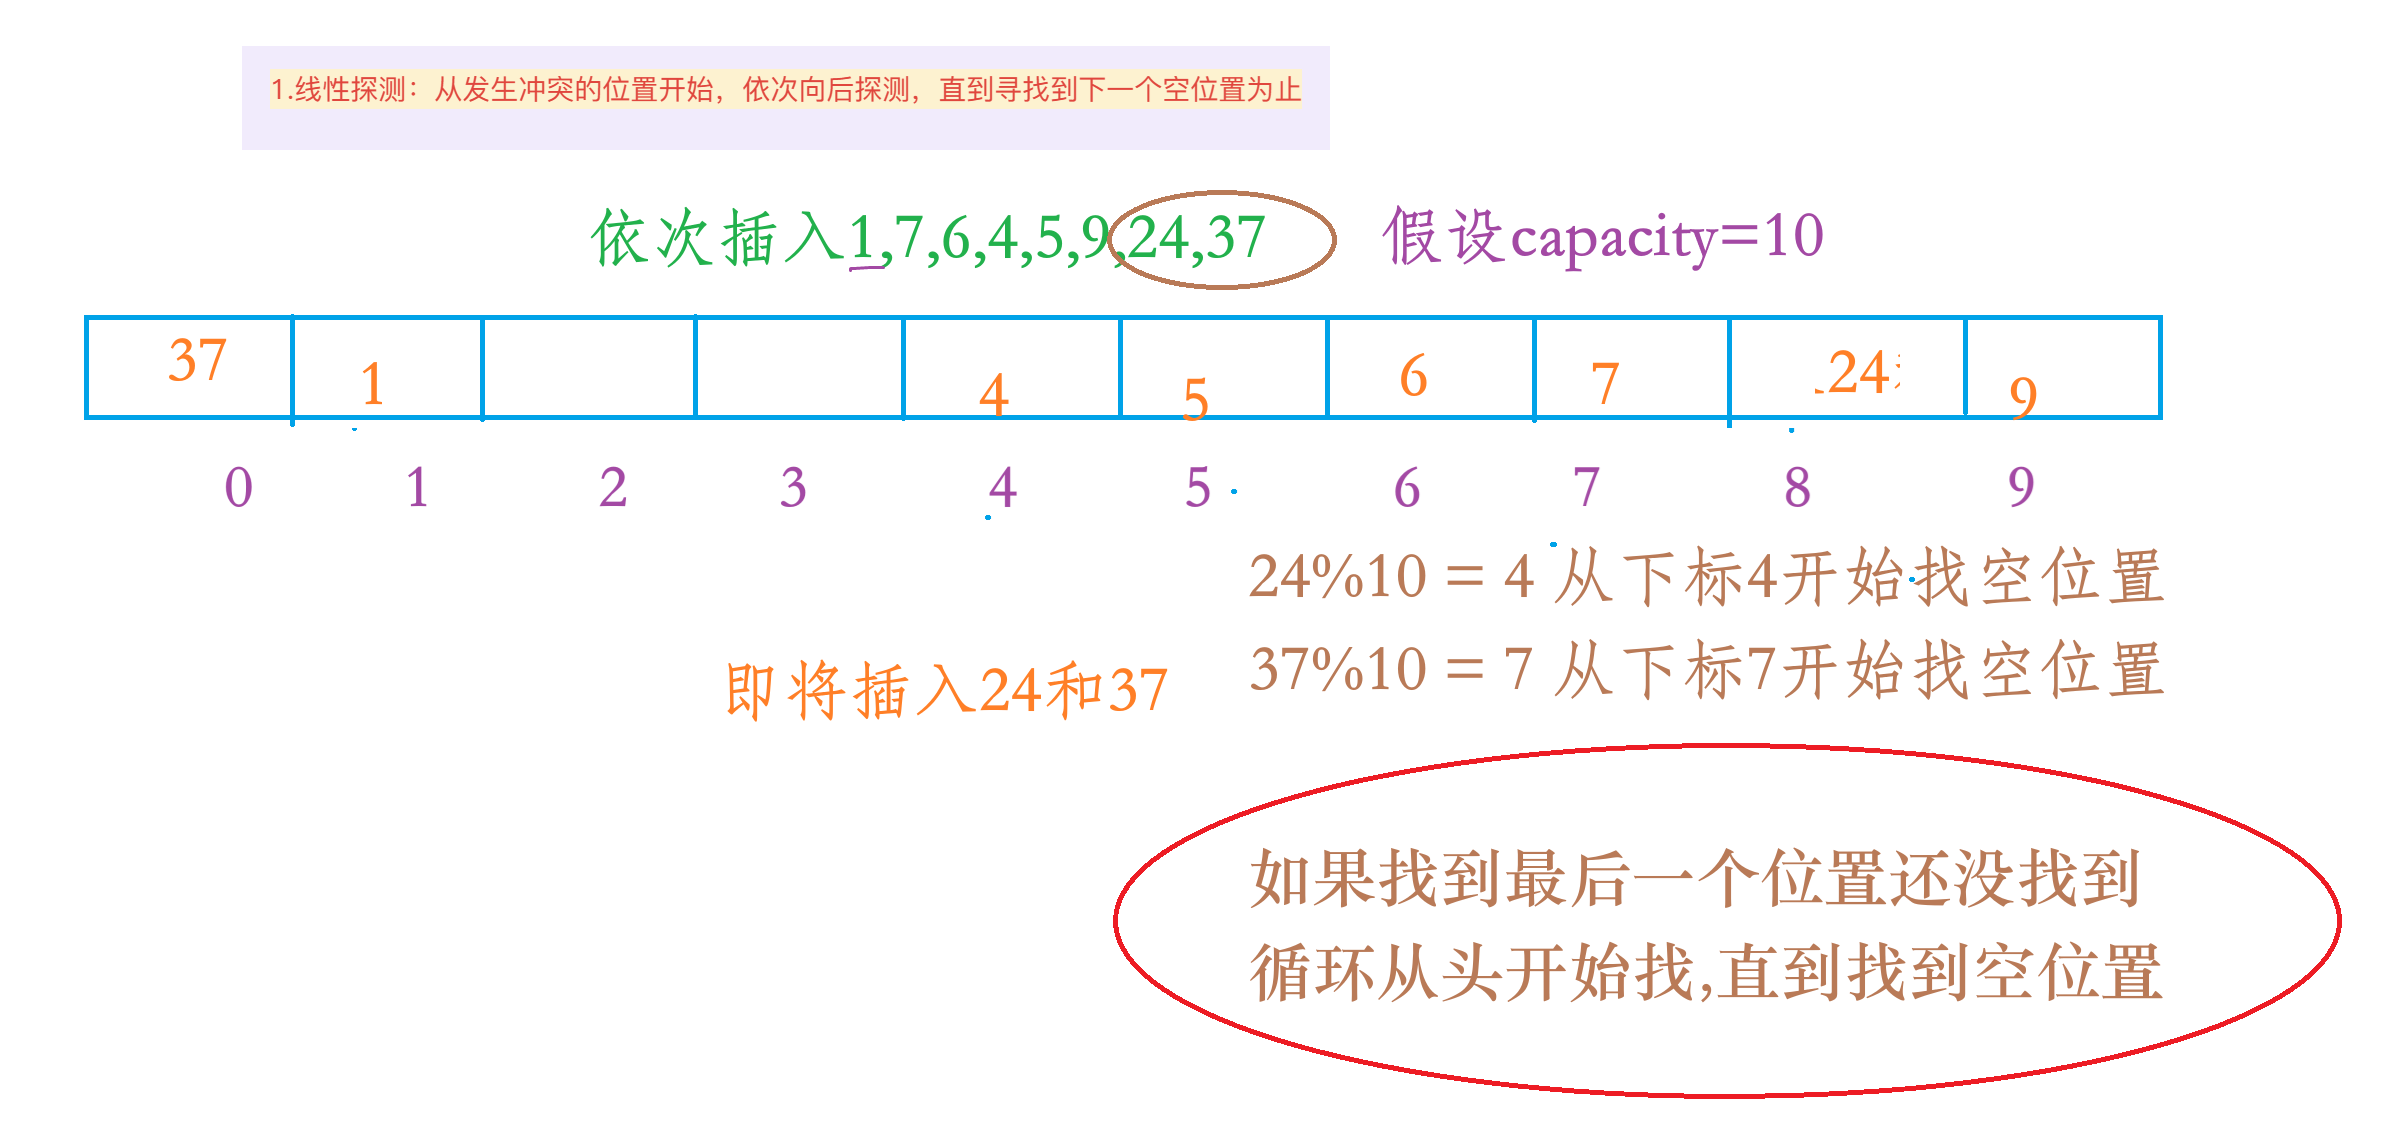
- 1.线性探测
- 1.动图演示
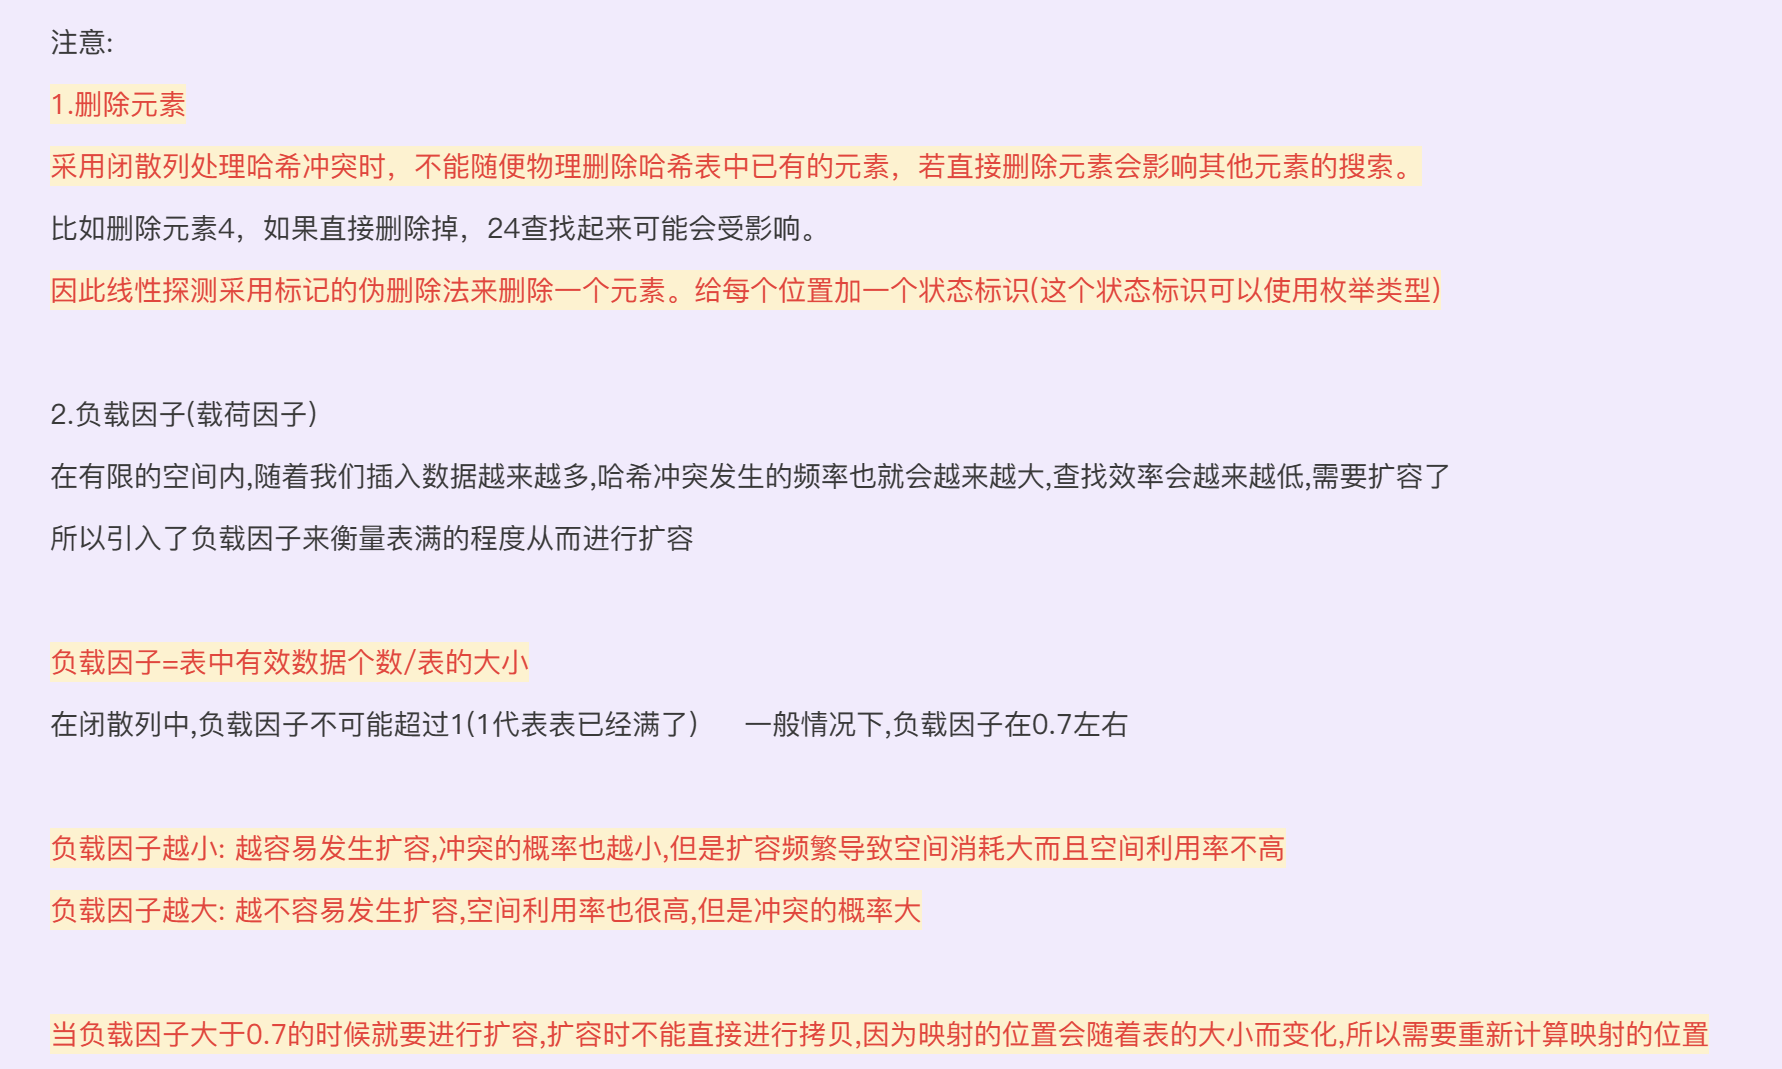
- 2.注意事项
- 3.代码的注意事项
- 4.代码实现
- 2.开散列(哈希桶,拉链法)
- 1.概念
- 2.动图演示
- 3.增容问题
- 1.拉链法的负载因子
- 2.说明
- 3.开散列和闭散列的比较
- 四.开散列哈希表的实现
- 1.跟闭散列哈希表相同的部分
- 2.析构,查找,删除
- 1.析构
- 2.查找
- 3.删除
- 3.插入
- 1.不扩容的代码
- 2.扩容代码
- 3.插入的完整代码
- 4.开散列哈希表的完整代码
一.unordered系列容器的介绍

二.哈希介绍
1.哈希概念
2.哈希函数的常见设计
3.哈希冲突
4.哈希函数的设计原则
三.解决哈希冲突
解决哈希冲突两种常见的方法是:闭散列和开散列
1.闭散列(开放定址法)

因为线性探测跟二次探测很像,所以这里就只实现线性探测了
1.线性探测
1.动图演示
2.注意事项
3.代码的注意事项
1.仿函数的问题:
(1).因为string类型不能进行取模运算,因此给string类型增加一个仿函数
该仿函数可以将string转为整型,整型可以进行取模运算
因此这就相当于二层映射
string -> int -> 哈希表中的下标
(2)
因为这里要考虑到顺序问题,比如"abc",“acb”
或者ASCII码值相等的问题:“aad”,“abc”
所以很多大佬设计了很多字符串哈希算法
各种字符串Hash函数
大家感兴趣的话可以看这篇博客当中的介绍
(3)因为string类型的哈希映射太常用了,
所以这里使用了模板特化,以免每次要存放string时都要指名传入string的哈希函数
这里的哈希函数只返回了整形值,计算下标时一定不要忘了对哈希表大小取模
否则就会有vector的越界错误,直接assert断言暴力报错了
哈希表是Key-Value模型
哈希下标是按照Key来计算的
//仿函数
//整型的hash函数
template<class K>
struct HashFunc
{size_t operator()(const K& key){return (size_t)key;}
};
//模板特化
//string的哈希函数
template<>
struct HashFunc<string>
{size_t operator()(const string& key){// BKDR字符串哈希函数size_t hash = 0;for (auto e : key){hash *= 131;hash += e;}return hash;}
};template<class K, class V, class Hash = HashFunc<K>>
class HashTable
....
4.代码实现
namespace open_address
{enum Status{EMPTY,EXIST,DELETE};template<class K, class V>struct HashData{pair<K, V> _kv;Status _s;         //状态};//仿函数//整型的hash函数template<class K>struct HashFunc{size_t operator()(const K& key){return (size_t)key;}};//模板特化//string的哈希函数template<>struct HashFunc<string>{size_t operator()(const string& key){// BKDR字符串哈希函数size_t hash = 0;for (auto e : key){hash *= 131;hash += e;}return hash;}};template<class K, class V, class Hash = HashFunc<K>>class HashTable{public:HashTable(){_tables.resize(10);}bool Insert(const pair<K, V>& kv){if (Find(kv.first))return false;// 负载因子0.7就扩容if (_n * 10 / _tables.size() == 7){size_t newSize = _tables.size() * 2;HashTable<K, V, Hash> newHT;newHT._tables.resize(newSize);// 遍历旧表for (size_t i = 0; i < _tables.size(); i++){if (_tables[i]._s == EXIST){newHT.Insert(_tables[i]._kv);}}_tables.swap(newHT._tables);}Hash hf;// 线性探测size_t hashi = hf(kv.first) % _tables.size();while (_tables[hashi]._s == EXIST){hashi++;hashi %= _tables.size();}_tables[hashi]._kv = kv;_tables[hashi]._s = EXIST;++_n;return true;}HashData<K, V>* Find(const K& key){Hash hf;size_t hashi = hf(key) % _tables.size();while (_tables[hashi]._s != EMPTY){if (_tables[hashi]._s == EXIST&& _tables[hashi]._kv.first == key){return &_tables[hashi];}hashi++;hashi %= _tables.size();}return NULL;}// 伪删除法bool Erase(const K& key){HashData<K, V>* ret = Find(key);if (ret){ret->_s = DELETE;--_n;return true;}else{return false;}}private:vector<HashData<K, V>> _tables;size_t _n = 0; // 存储的关键字的个数};
}
2.开散列(哈希桶,拉链法)
上面的闭散列并不好用,因此我们重点介绍和实现开散列方法
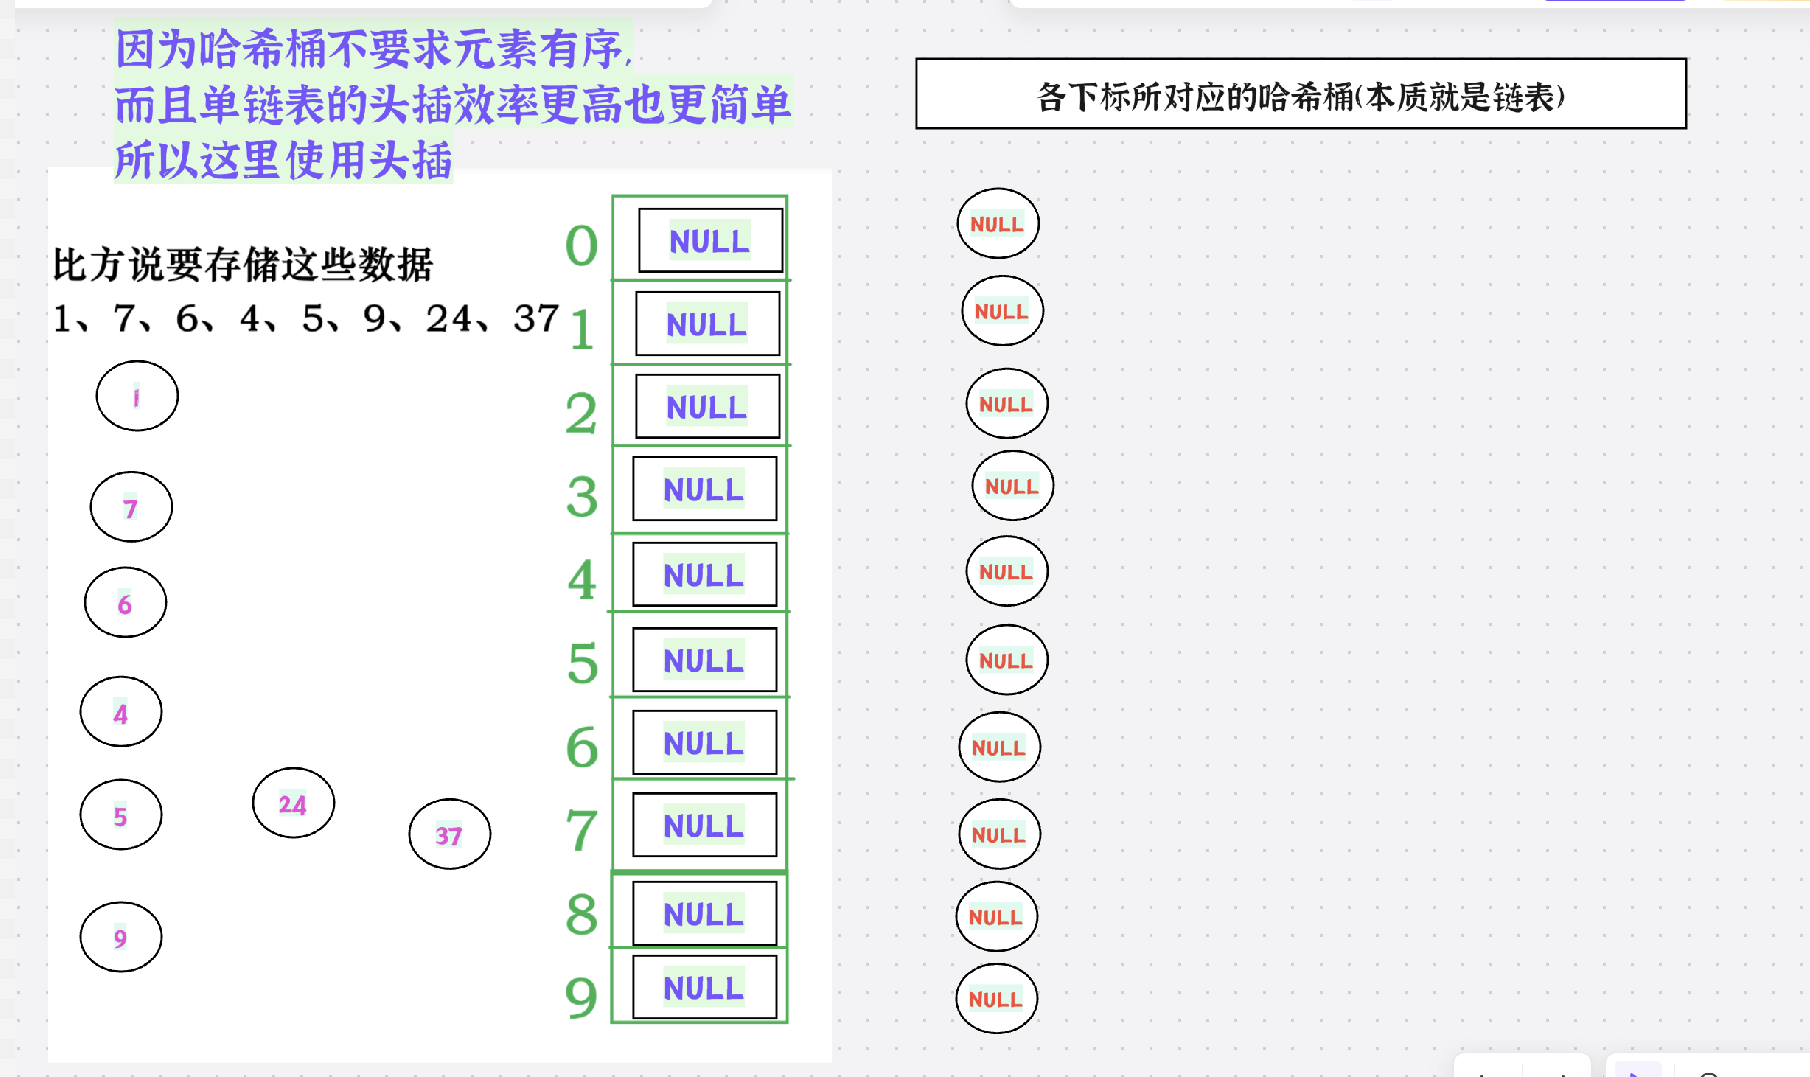
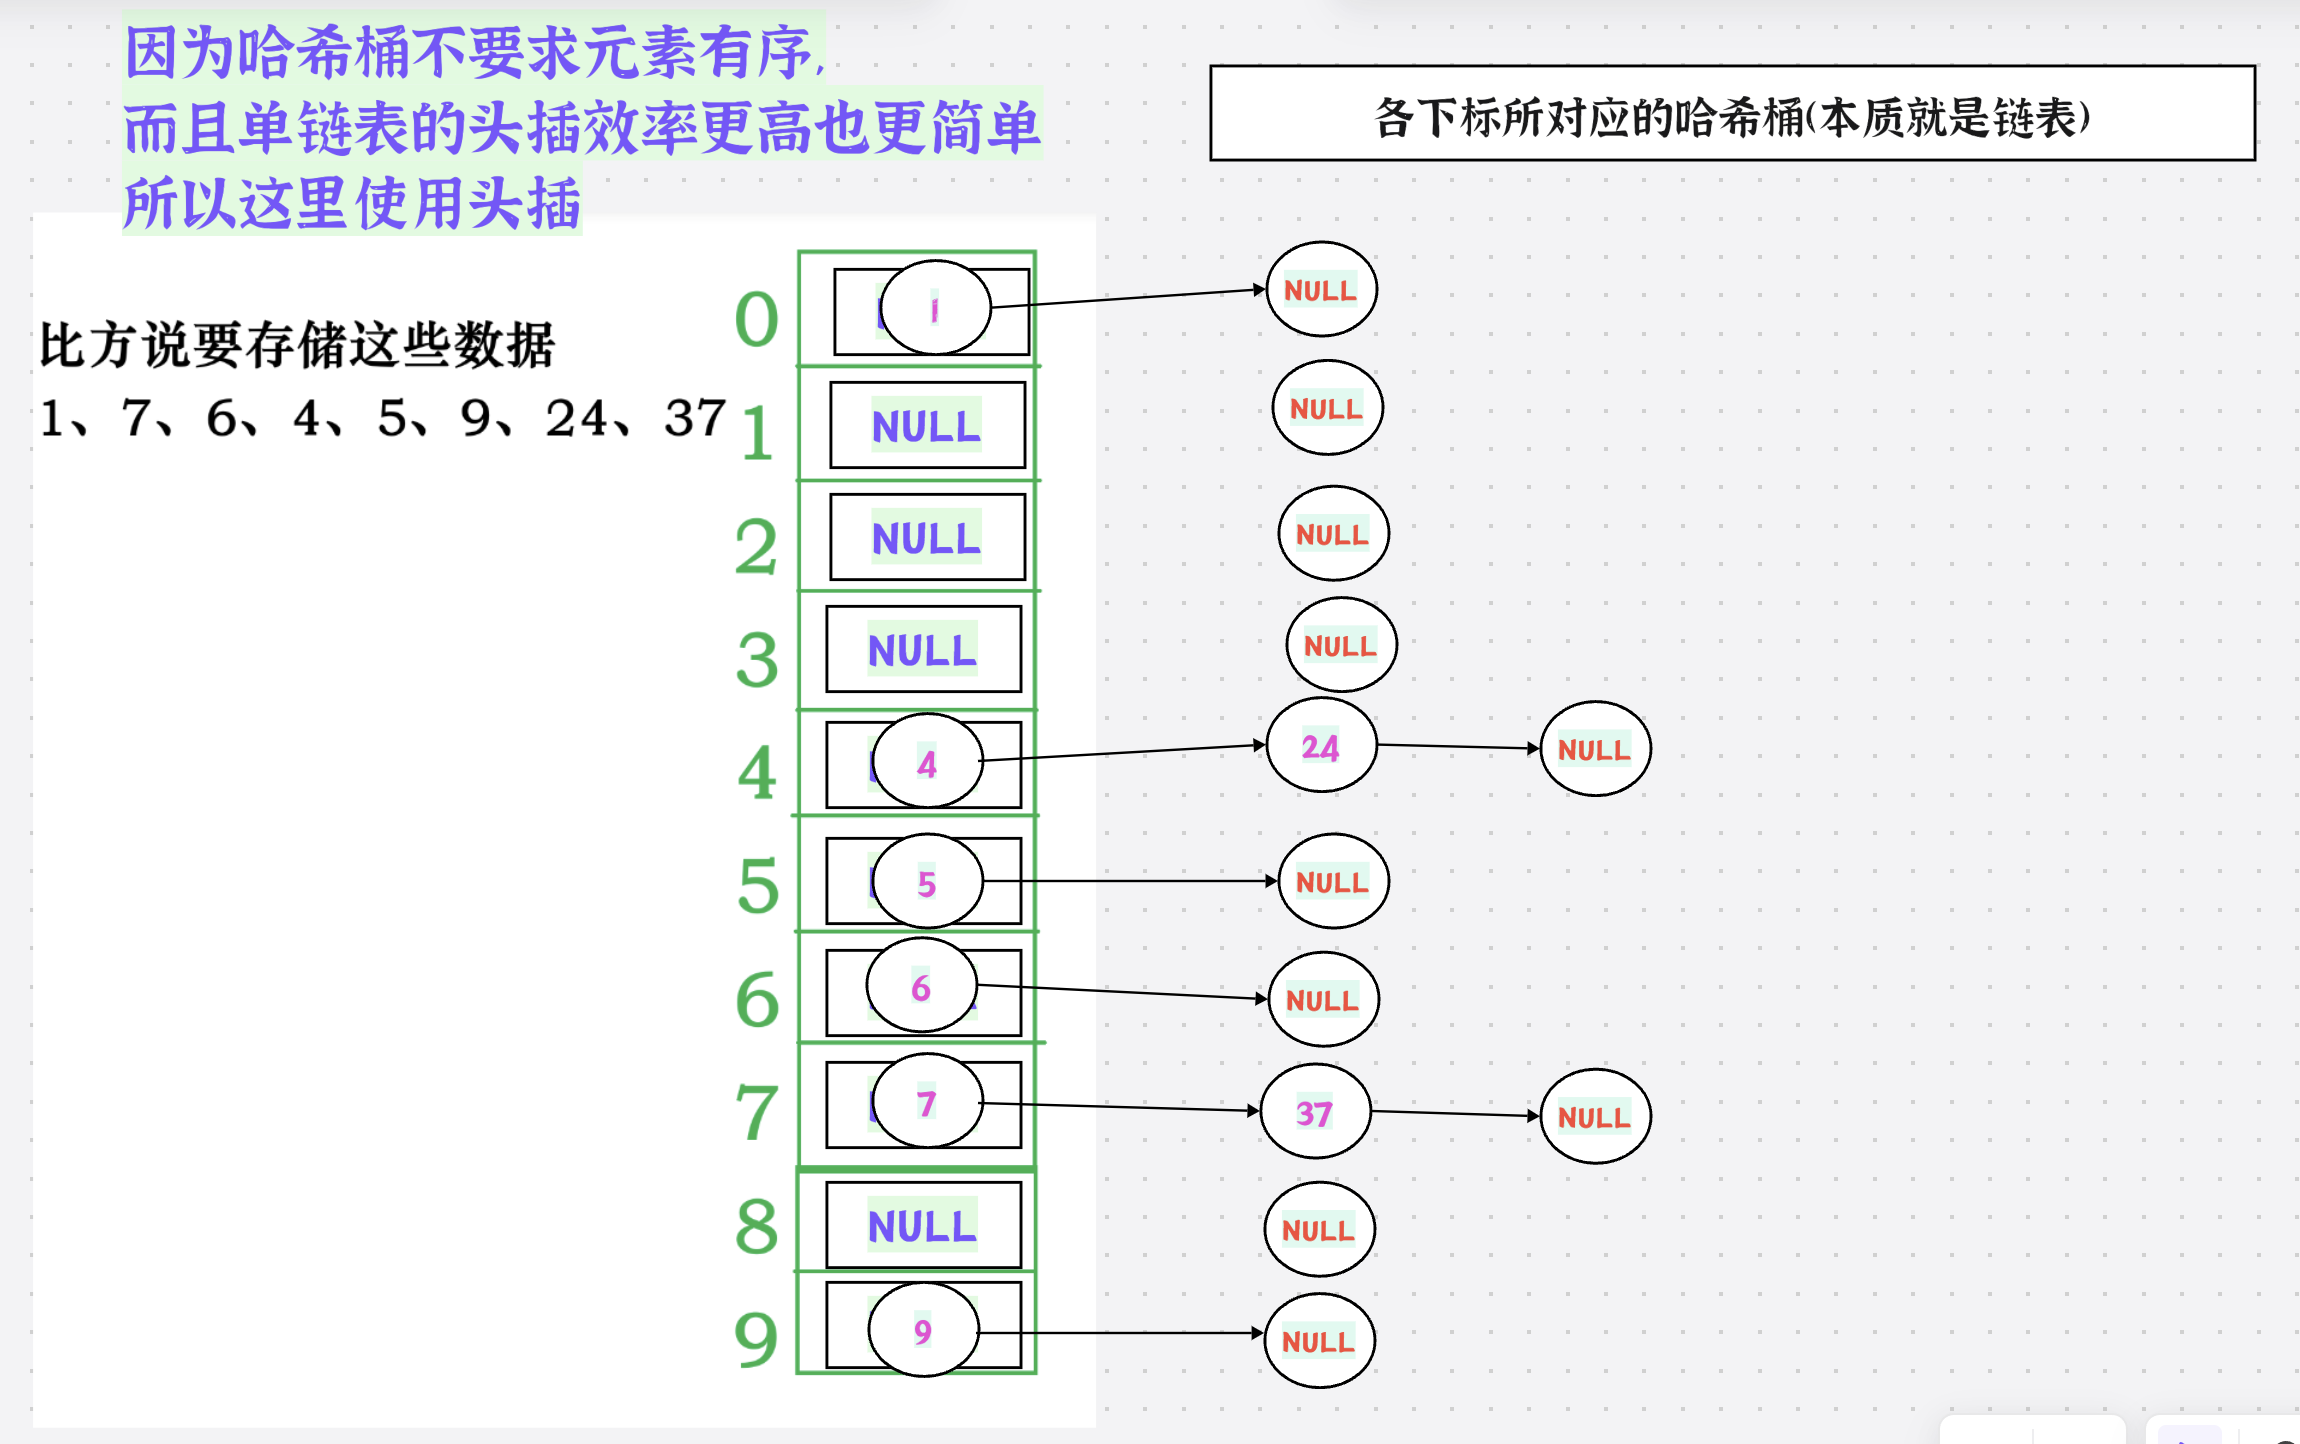
1.概念

2.动图演示
插入之前:
插入过程:
插入之后:
3.增容问题
1.拉链法的负载因子
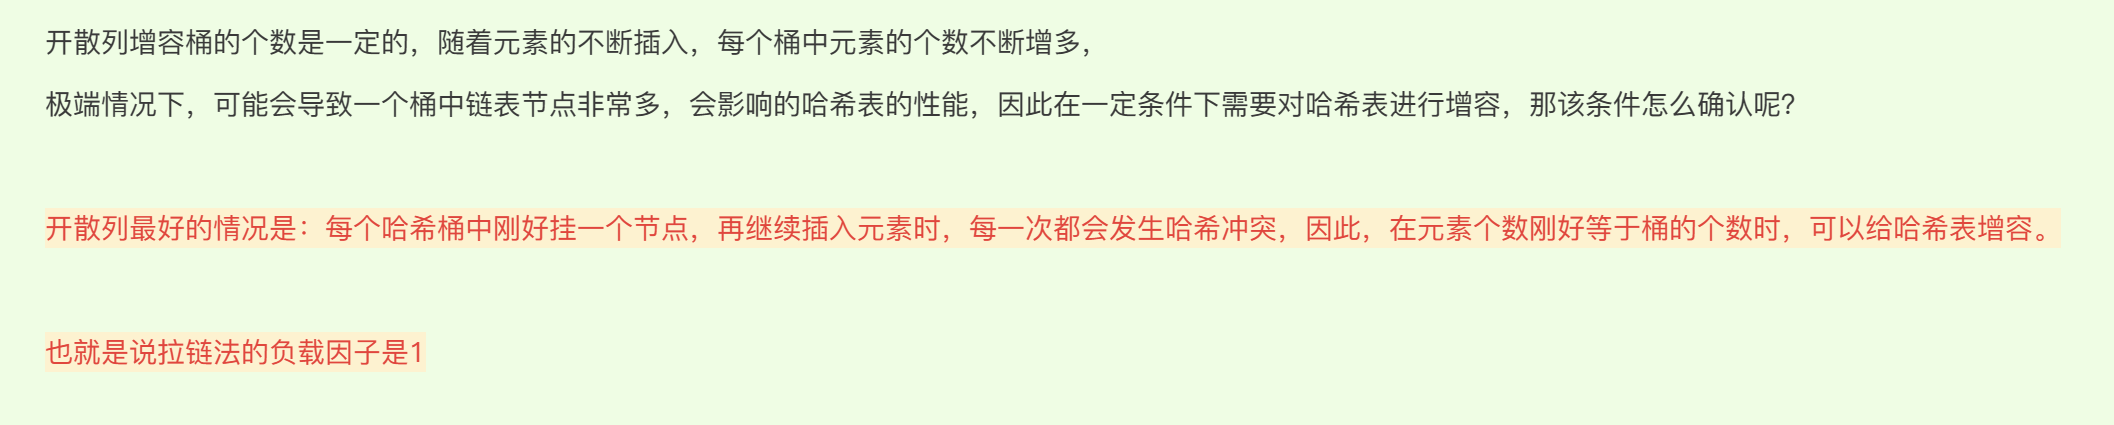
注意:扩容时因为要将下标重新映射所以扩容会使一个桶当中的数据被打散到不同的桶当中,使得这种极端情况很难发生
2.说明
1.对于这里的哈希桶我们采用单链表
2.为了后续使用开散列的哈希桶封装unordered_set和unordered_map,我们不使用STL库中的forward_list(C++11新增容器:单链表),而是自己手撕单链表
3.因为这里的单链表是我们自己实现的,所以要写析构函数,不能使用编译器默认生成的析构函数
4.为了提高效率,哈希表增容时我们直接转移节点,并不会去进行节点的深拷贝,那样太浪费空间了
5.开散列的哈希表无非就是一个指针数组而已,所以大家不要有任何的害怕
AVL树和红黑树我们都能实现,哈希表怕什么…
3.开散列和闭散列的比较

四.开散列哈希表的实现
1.跟闭散列哈希表相同的部分
namespace wzs
{//HashFunc<int>template<class K>//整型的哈希函数struct HashFunc{size_t operator()(const K& key){return (size_t)key;}};//HashFunc<string>//string的哈希函数template<>struct HashFunc<string>{size_t operator()(const string& key){// BKDRsize_t hash = 0;for (auto e : key){hash *= 131;hash += e;}return hash;}};template<class K, class V>struct HashNode{HashNode* _next;pair<K, V> _kv;HashNode(const pair<K, V>& kv):_kv(kv), _next(nullptr){}};template<class K, class V, class Hash = HashFunc<K>>class HashTable{typedef HashNode<K, V> Node;public:HashTable(){_tables.resize(10);}~HashTable();bool Insert(const pair<K, V>& kv);Node* Find(const K& key);bool Erase(const K& key);private://哈希表是一个指针数组vector<Node*> _tables;size_t _n = 0;Hash hash;};
}
2.析构,查找,删除
1.析构
析构就是遍历哈希表,把每个单链表都销毁即可
~HashTable()
{for (int i = 0; i < _tables.size(); i++){Node* cur = _tables[i];while (cur){Node* next = cur->_next;delete cur;cur = next;}_tables[i] = nullptr;}
}
2.查找
1.根据哈希函数计算出下标,找到对应的哈希桶
2.遍历哈希桶,找数据即可
3.找到则返回该节点,找不到返回空指针
Node* Find(const K& key)
{int hashi = hash(key) % _tables.size();Node* cur = _tables[hashi];while (cur){if (cur->_kv.first == key){return cur;}cur = cur->_next;}return nullptr;
}
3.删除
删除就是找到该节点,让该节点的前驱指向该节点的后继,然后delete该节点
注意:
如果该节点是该哈希桶的头节点,直接让该哈希桶的头节点成为该节点的后继,然后delete该节点即可
bool Erase(const K& key)
{int hashi = hash(key) % _tables.size();Node* cur = _tables[hashi], * prev = nullptr;while (cur){if (cur->_kv.first == key){if (cur == _tables[hashi]){_tables[hashi] = cur->_next;}else{prev->_next = cur->_next;}return true;}prev = cur;cur = cur->_next;}return false;
}
3.插入
因为我们的哈希表不支持存放重复值,所以插入时
1.先查找在不在,如果在,返回false表示插入失败
2.不在,判断是否需要扩容,如果需要,则进行扩容
3.插入时,先根据哈希函数计算出对应的下标,然后找到该哈希桶头插即可
1.不扩容的代码
bool Insert(const pair<K, V>& kv)
{//先查找在不在//如果在,返回false,插入失败if (Find(kv.first)){return false;}//扩容....//1.利用哈希函数计算需要插入到那个桶里面int hashi = hash(kv.first) % _tables.size();//头插Node* newnode = new Node(kv);newnode->_next = _tables[hashi];_tables[hashi] = newnode;++_n;return true;
}
2.扩容代码
1.开辟新的哈希表
2.将新哈希表的容量扩为2倍(一定要做,因为转移数据时需要根据新表的大小映射下标)
3.转移数据时
(1).遍历旧表取节点
(2).利用哈希函数计算该节点在新表中的下标
(3).头插该节点
4.转移完数据后不要忘记把旧表中的哈希桶的节点置空,否则会出现野指针问题
bool Insert(const pair<K, V>& kv)
{//扩容if (_n == _tables.size()){//开辟新的哈希表HashTable newtable;int newcapacity = _tables.size() * 2;//扩2倍newtable._tables.resize(newcapacity);//转移数据for (int i = 0; i < _tables.size(); i++){Node* cur = _tables[i];while (cur){Node* next = cur->_next;int hashi = hash(cur->_kv.first) % newtable._tables.size();cur->_next = newtable._tables[hashi];newtable._tables[hashi] = cur;cur = next;}//防止出现野指针导致重复析构..._tables[i] = nullptr;}}
}
3.插入的完整代码
bool Insert(const pair<K, V>& kv)
{//先查找在不在//如果在,返回false,插入失败if (Find(kv.first)){return false;}//扩容if (_n == _tables.size()){//开辟新的哈希表HashTable newtable;int newcapacity = _tables.size() * 2;//扩2倍newtable._tables.resize(newcapacity);//转移数据for (int i = 0; i < _tables.size(); i++){Node* cur = _tables[i];while (cur){Node* next = cur->_next;int hashi = hash(cur->_kv.first) % newtable._tables.size();cur->_next = newtable._tables[hashi];newtable._tables[hashi] = cur;cur = next;}//防止出现野指针导致重复析构..._tables[i] = nullptr;}//交换两个vector,从而做到交换两个哈希表//通过学习vector的模拟实现,我们知道vector进行交换时只交换first,finish,end_of_storage_tables.swap(newtable._tables);}//1.利用哈希函数计算需要插入到那个桶里面int hashi = hash(kv.first) % _tables.size();//头插Node* newnode = new Node(kv);newnode->_next = _tables[hashi];_tables[hashi] = newnode;++_n;return true;
}
4.开散列哈希表的完整代码
namespace wzs
{//HashFunc<int>template<class K>//整型的哈希函数struct HashFunc{size_t operator()(const K& key){return (size_t)key;}};//HashFunc<string>//string的哈希函数template<>struct HashFunc<string>{size_t operator()(const string& key){// BKDRsize_t hash = 0;for (auto e : key){hash *= 131;hash += e;}return hash;}};template<class K, class V>struct HashNode{HashNode* _next;pair<K, V> _kv;HashNode(const pair<K, V>& kv):_kv(kv), _next(nullptr){}};template<class K, class V, class Hash = HashFunc<K>>class HashTable{typedef HashNode<K, V> Node;public:HashTable(){_tables.resize(10);}~HashTable(){for (int i = 0; i < _tables.size(); i++){Node* cur = _tables[i];while (cur){Node* next = cur->_next;delete cur;cur = next;}_tables[i] = nullptr;}}bool Insert(const pair<K, V>& kv){//先查找在不在//如果在,返回false,插入失败if (Find(kv.first)){return false;}//扩容if (_n == _tables.size()){//开辟新的哈希表HashTable newtable;int newcapacity = _tables.size() * 2;//扩2倍newtable._tables.resize(newcapacity);//转移数据for (int i = 0; i < _tables.size(); i++){Node* cur = _tables[i];while (cur){Node* next = cur->_next;int hashi = hash(cur->_kv.first) % newtable._tables.size();cur->_next = newtable._tables[hashi];newtable._tables[hashi] = cur;cur = next;}//防止出现野指针导致重复析构..._tables[i] = nullptr;}//交换两个vector,从而做到交换两个哈希表//通过学习vector的模拟实现,我们知道vector进行交换时只交换first,finish,end_of_storage_tables.swap(newtable._tables);}//1.利用哈希函数计算需要插入到那个桶里面int hashi = hash(kv.first) % _tables.size();//头插Node* newnode = new Node(kv);newnode->_next = _tables[hashi];_tables[hashi] = newnode;++_n;return true;}Node* Find(const K& key){int hashi = hash(key) % _tables.size();Node* cur = _tables[hashi];while (cur){if (cur->_kv.first == key){return cur;}cur = cur->_next;}return nullptr;}bool Erase(const K& key){int hashi = hash(key) % _tables.size();Node* cur = _tables[hashi], * prev = nullptr;while (cur){if (cur->_kv.first == key){if (cur == _tables[hashi]){_tables[hashi] = cur->_next;}else{prev->_next = cur->_next;}return true;}prev = cur;cur = cur->_next;}return false;}private://哈希表是一个指针数组vector<Node*> _tables;size_t _n = 0;Hash hash;};
}
以上就是C++哈希表的实现的全部内容,希望能对大家有所帮助!