佛山专业的做网站推广图片制作
文章目录
- 创建环境
- 创建专用网络VPC
- 安全组
- 创建云服务器
- 打包部署
- 2. Java环境
- 启动项目
- 开机启动任意服务
- 1. 制作服务文件
- 2. 制作启动脚本
- 3. 制作停止脚本
- 4. 增加执行权限
- 5. 设置开机启动
- 创建镜像
- 继续创建多台云服务器
- 负载均衡
- 弹性伸缩
- redis的报警规则
- 白名单
- 1. LAMP 环境
- 1. 安装Apache+PHP
- 2. 安装MySQL
- 3. WordPress安装
- 4. Docker安装
- 1. 安装
- 2. 常用命令
- 3. MySQL、Redis安装
- 5. 1Panel
- 1. 简介
- 2. 安装
创建环境
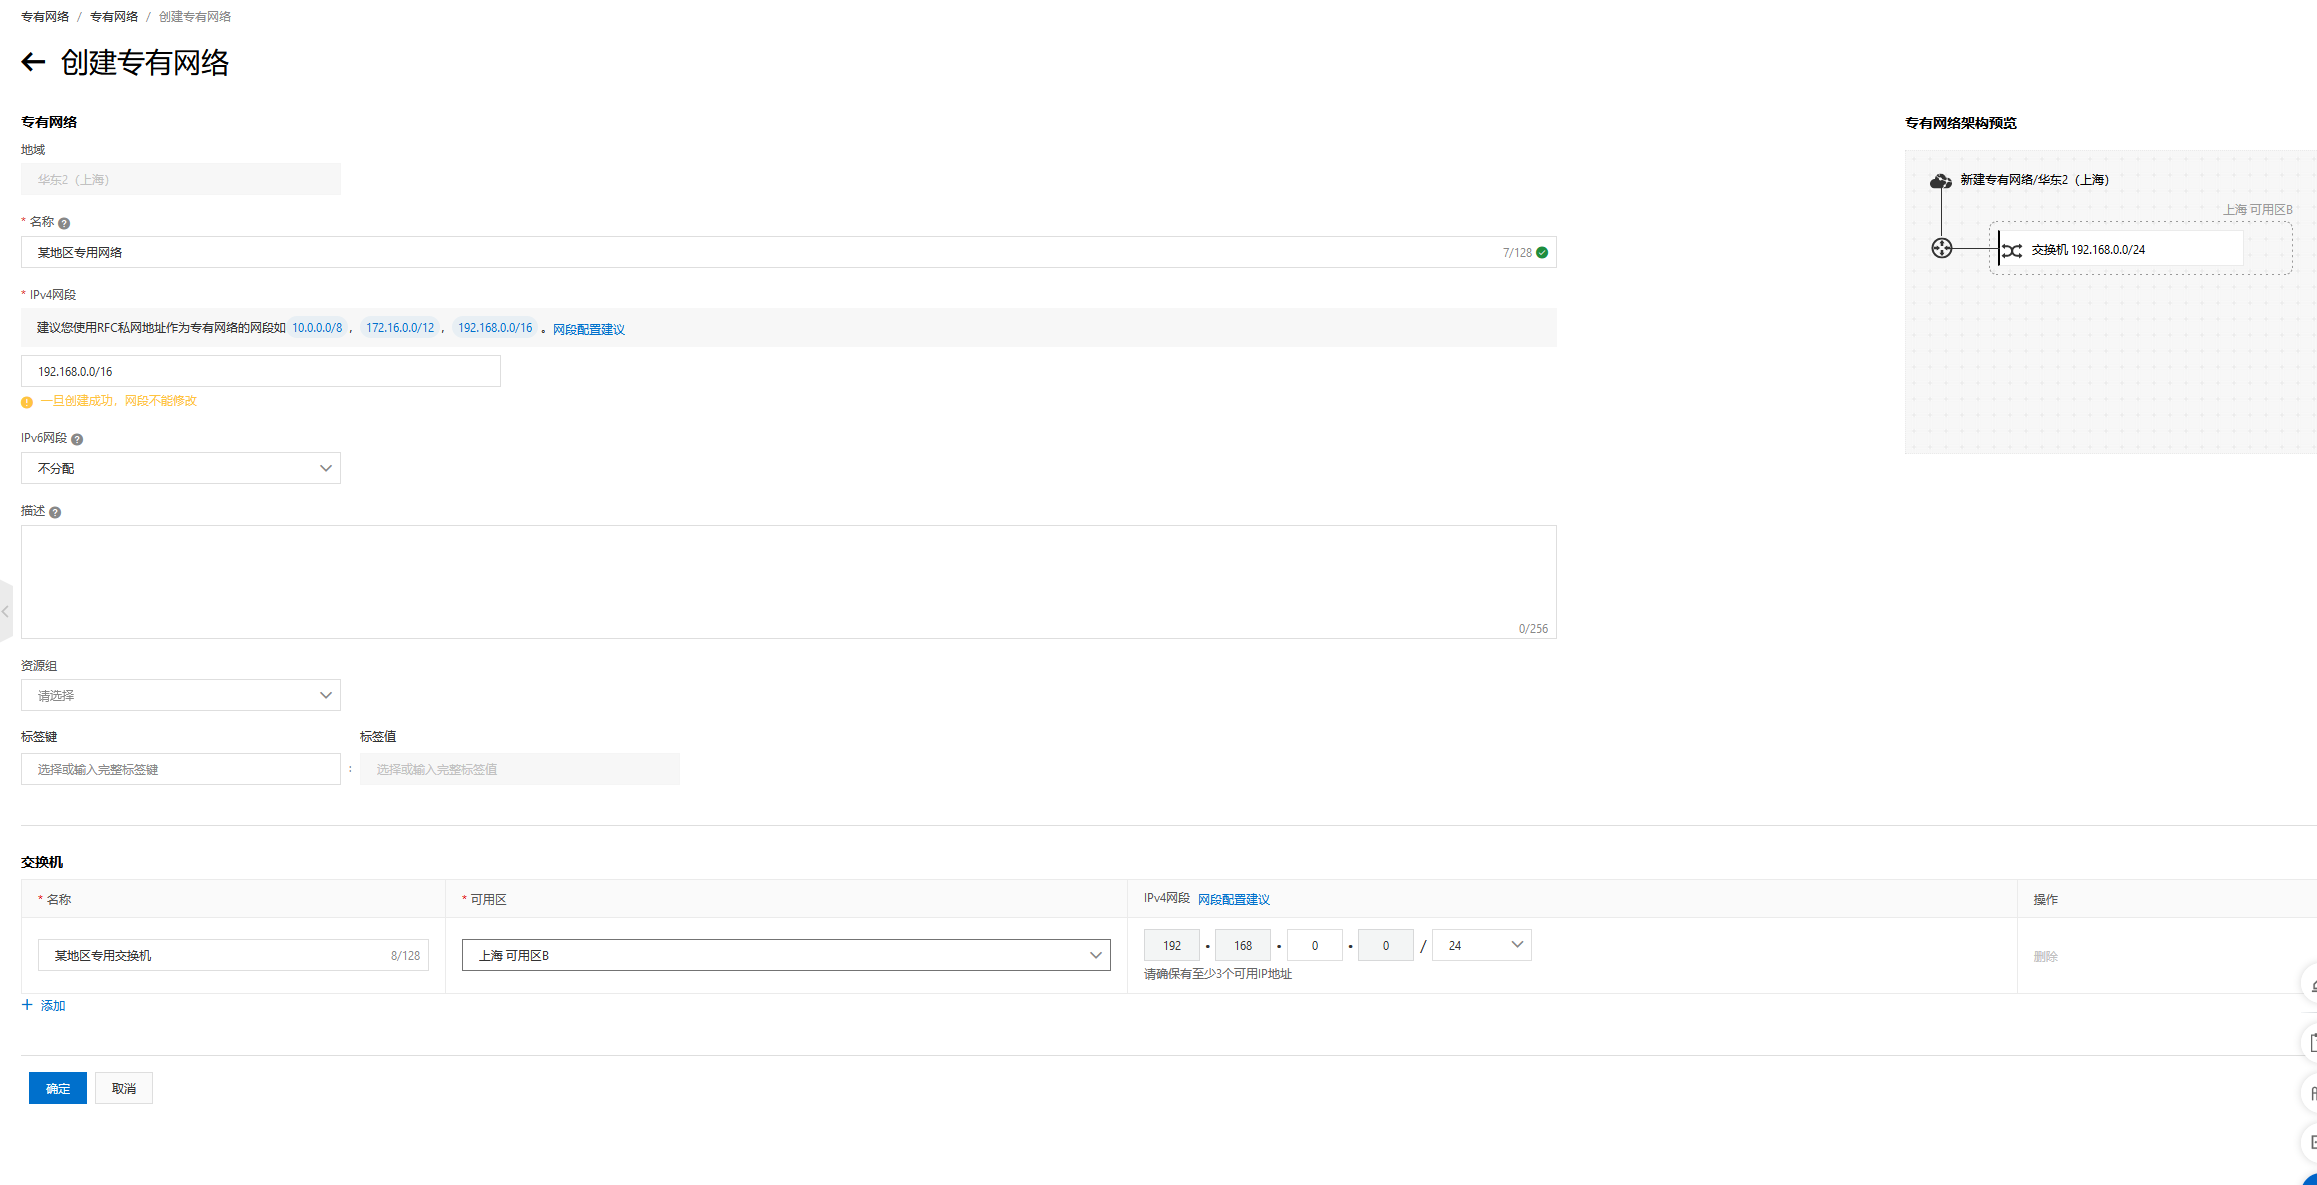
创建专用网络VPC
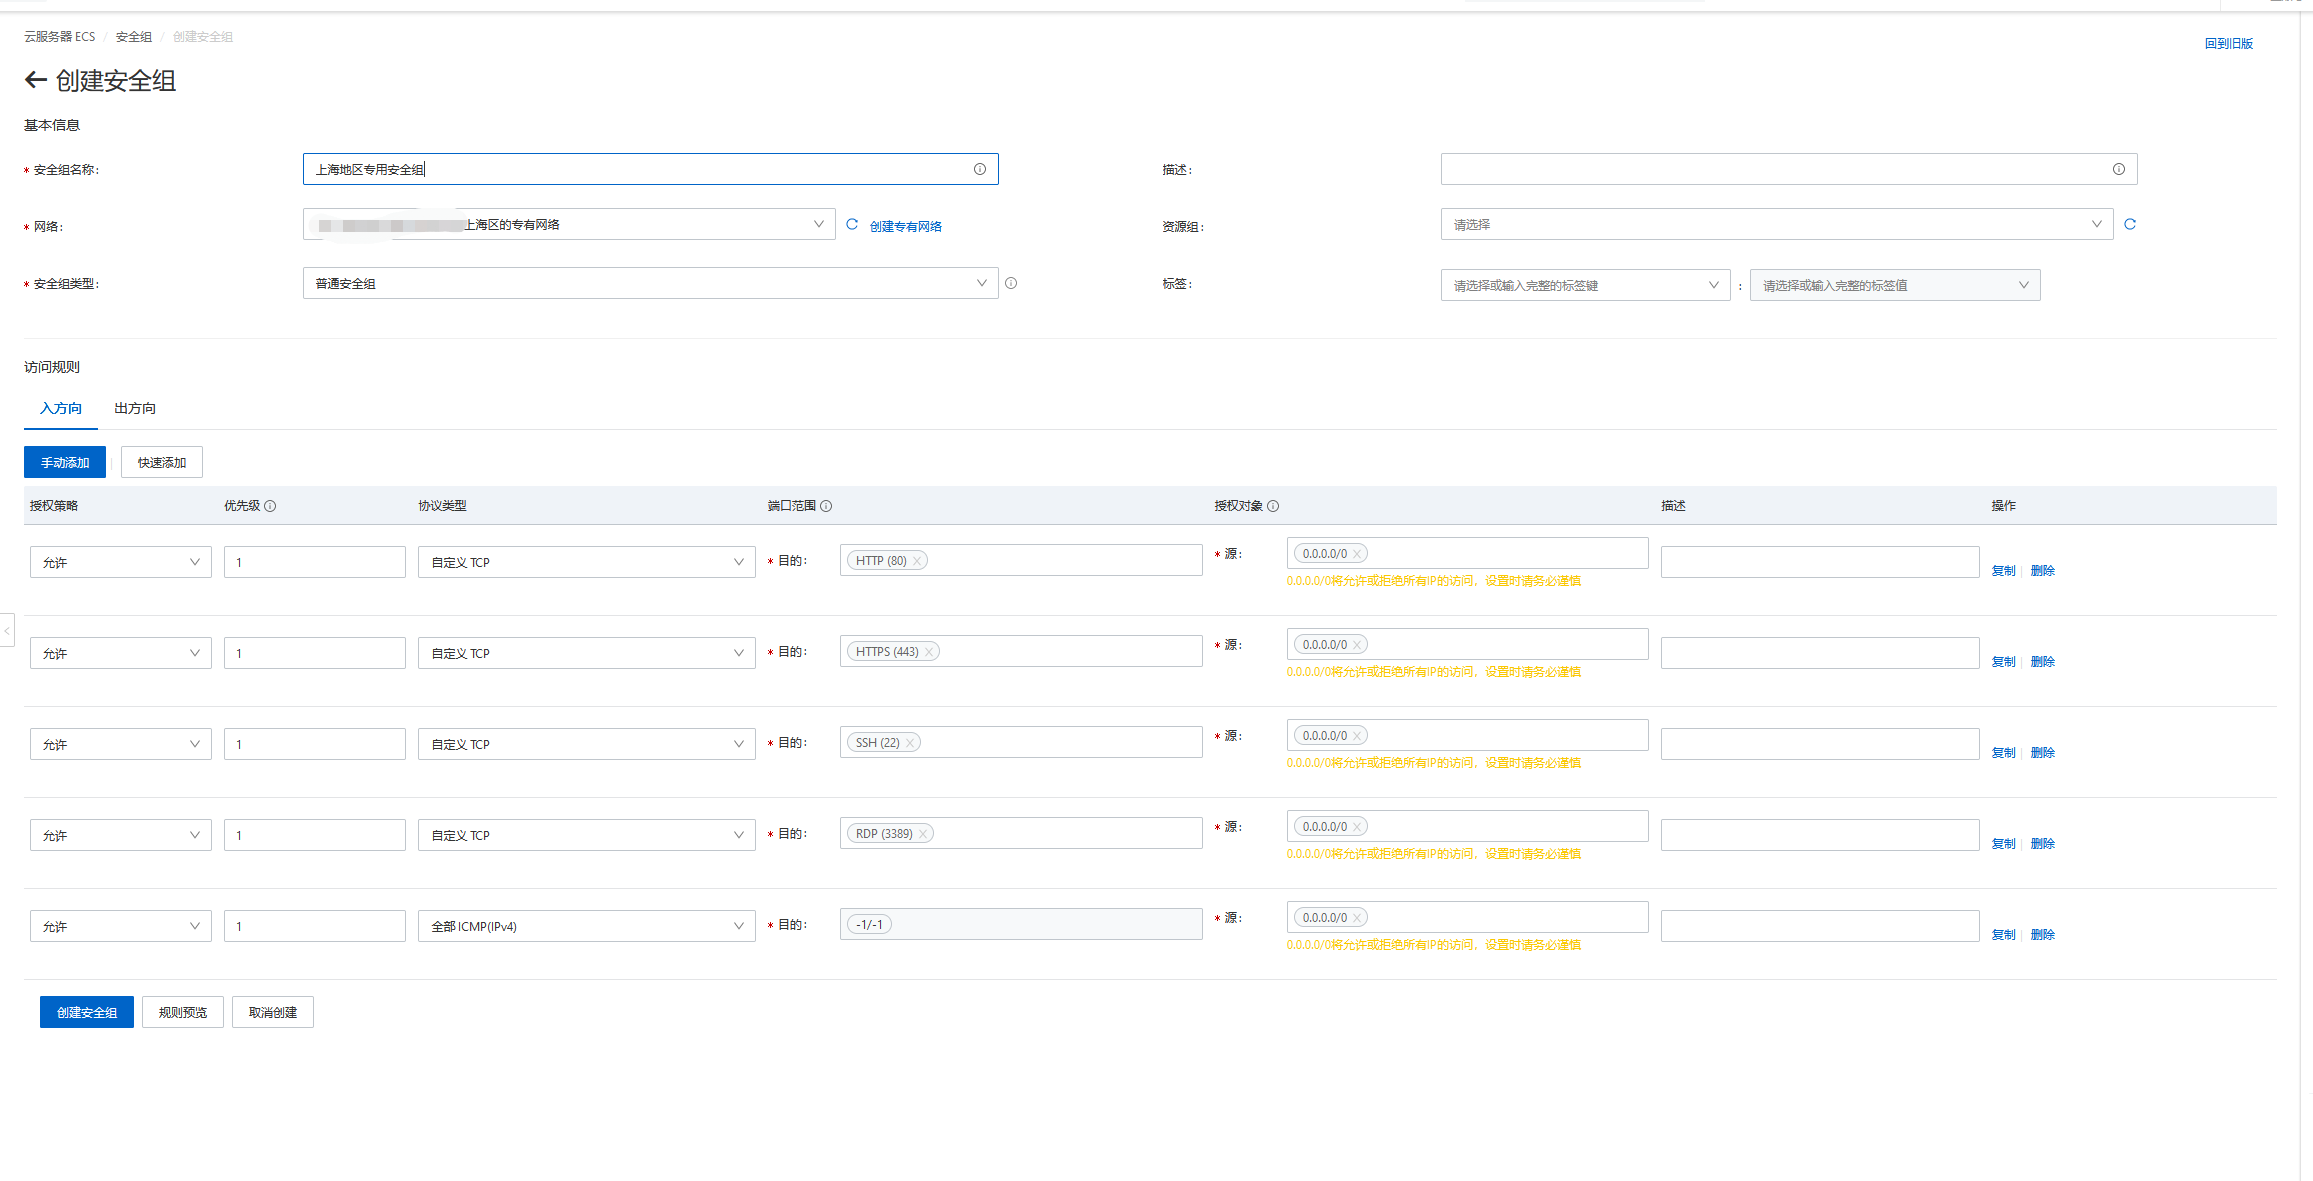
安全组
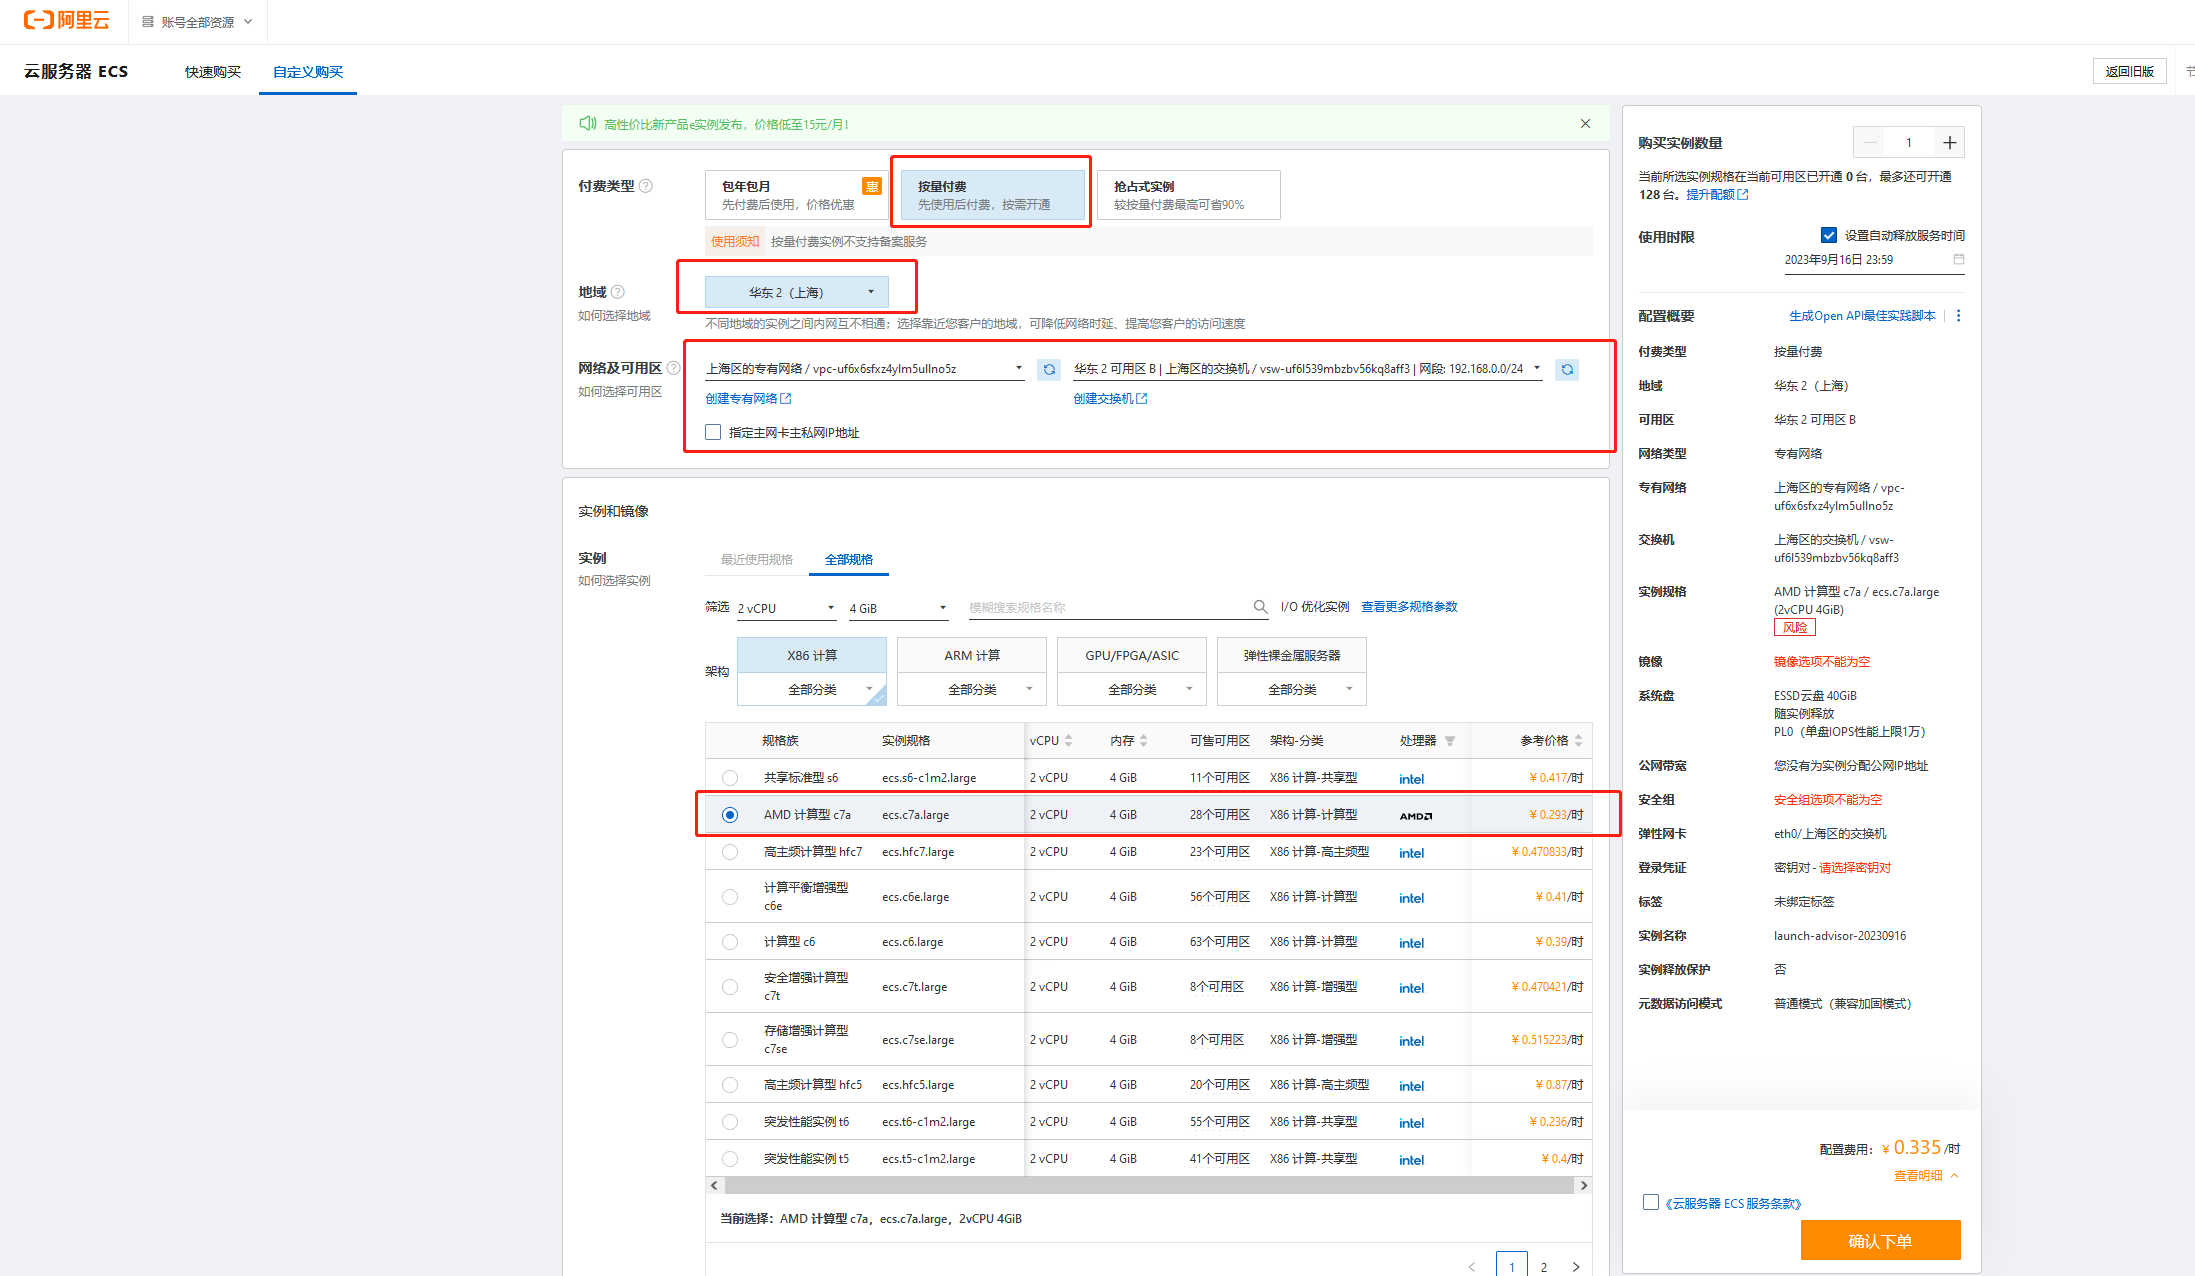
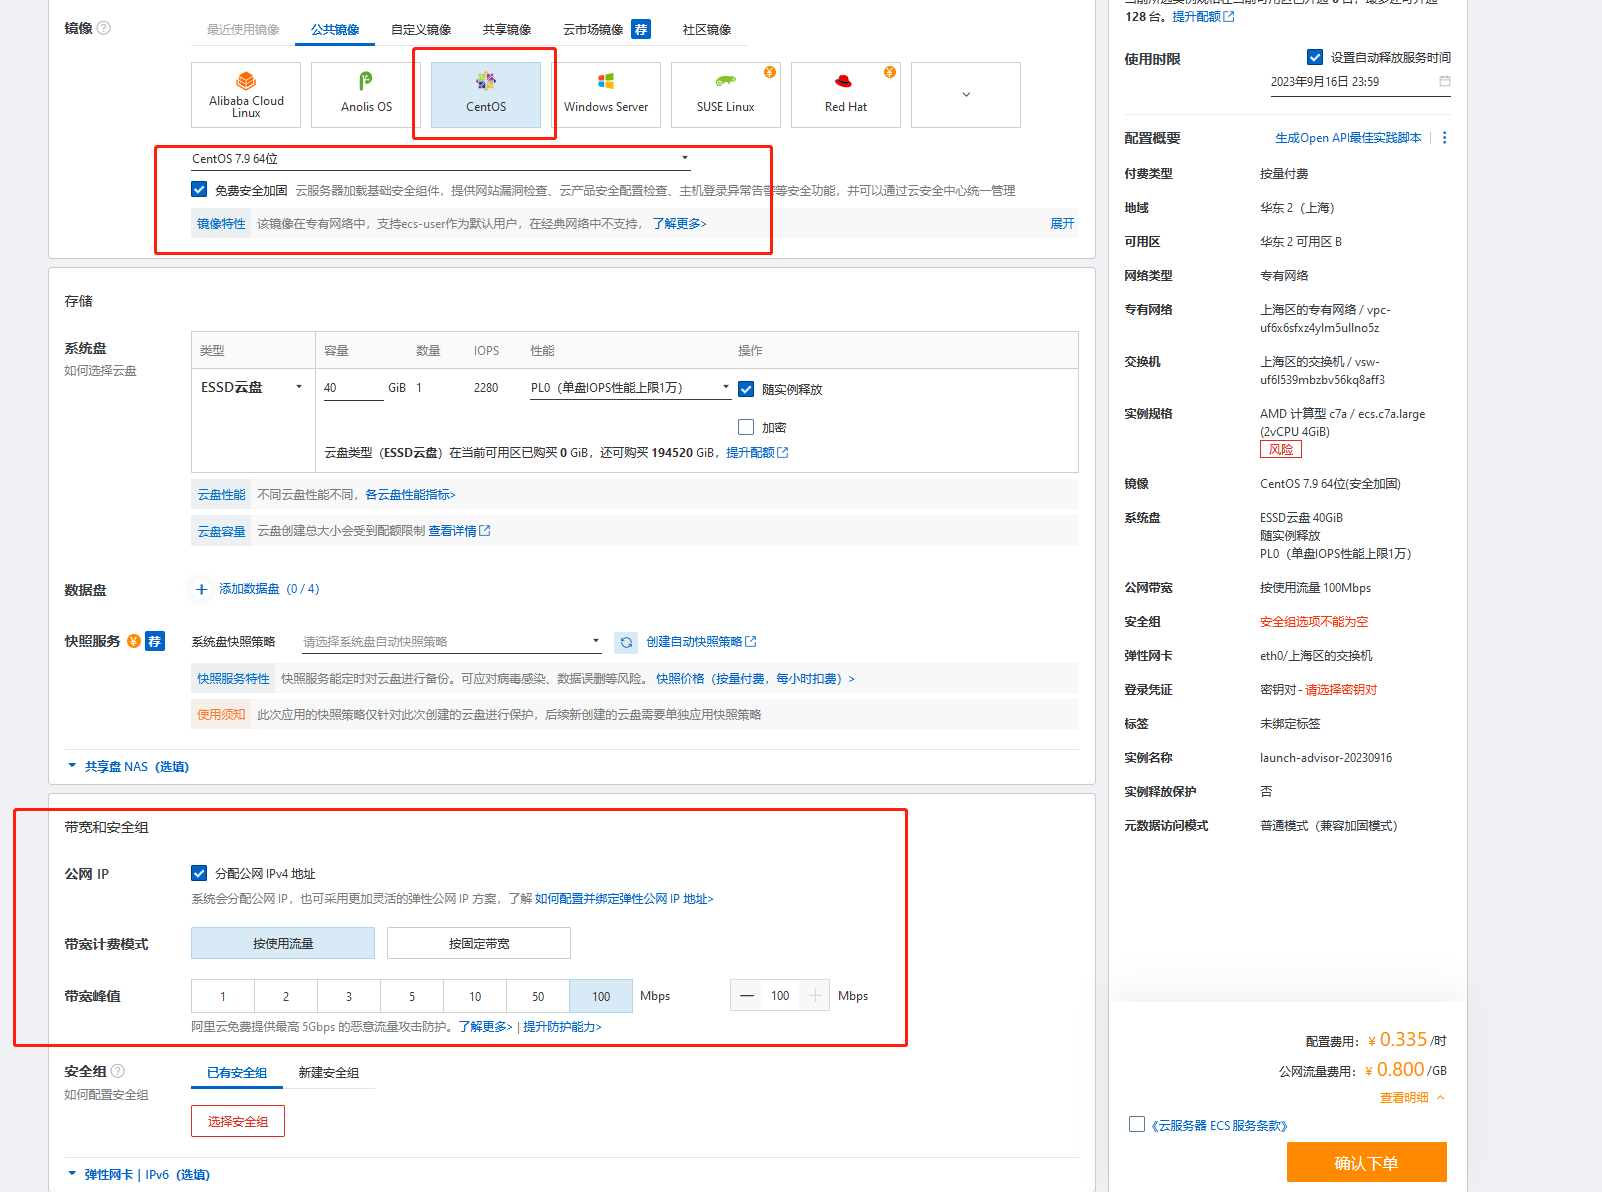
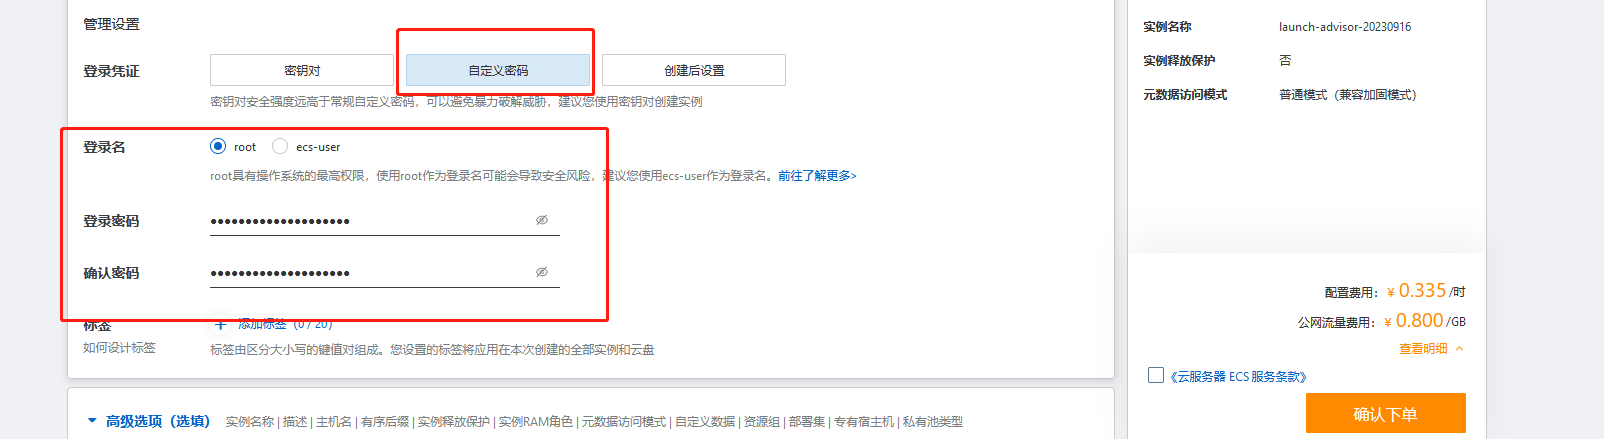
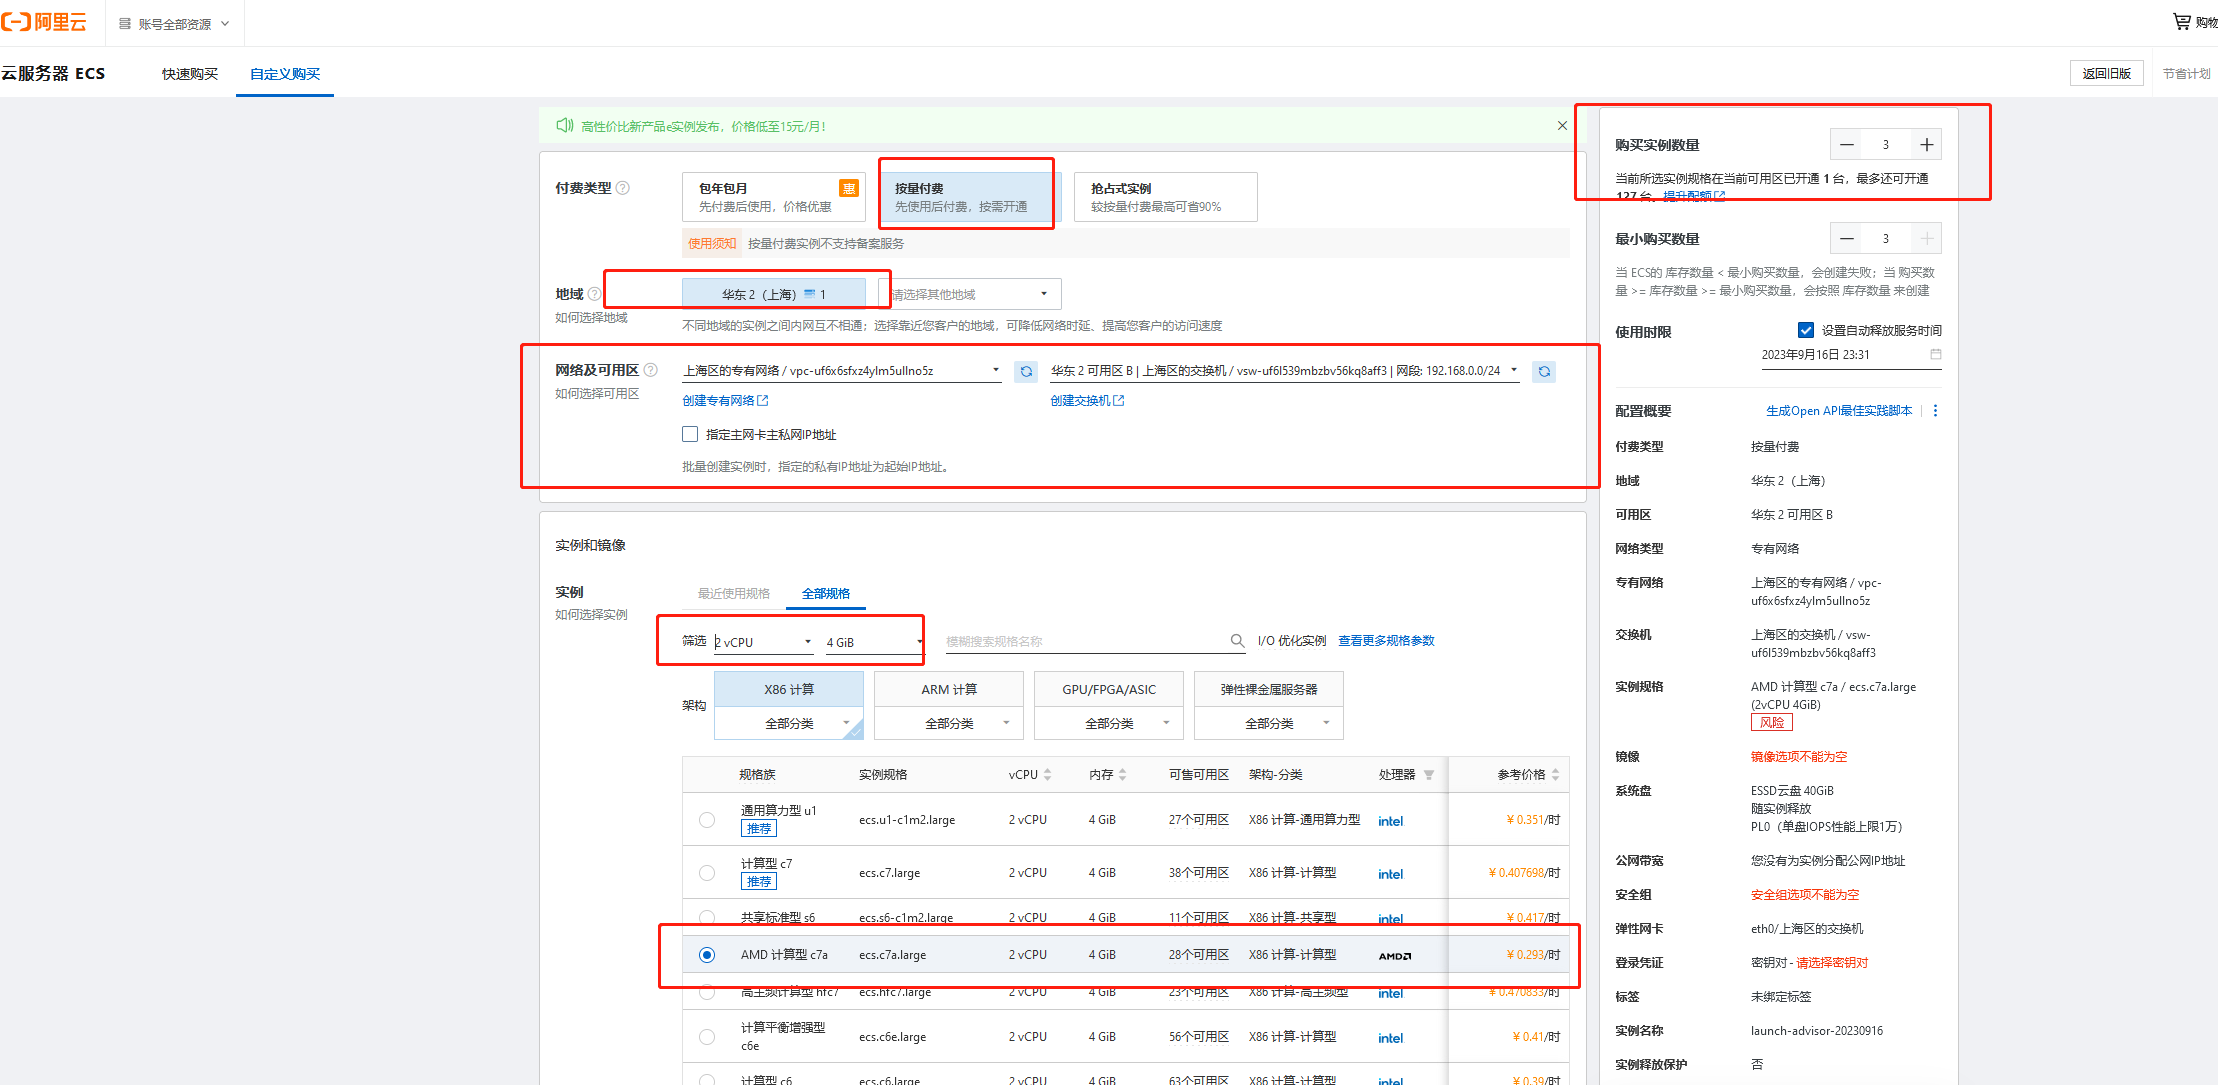
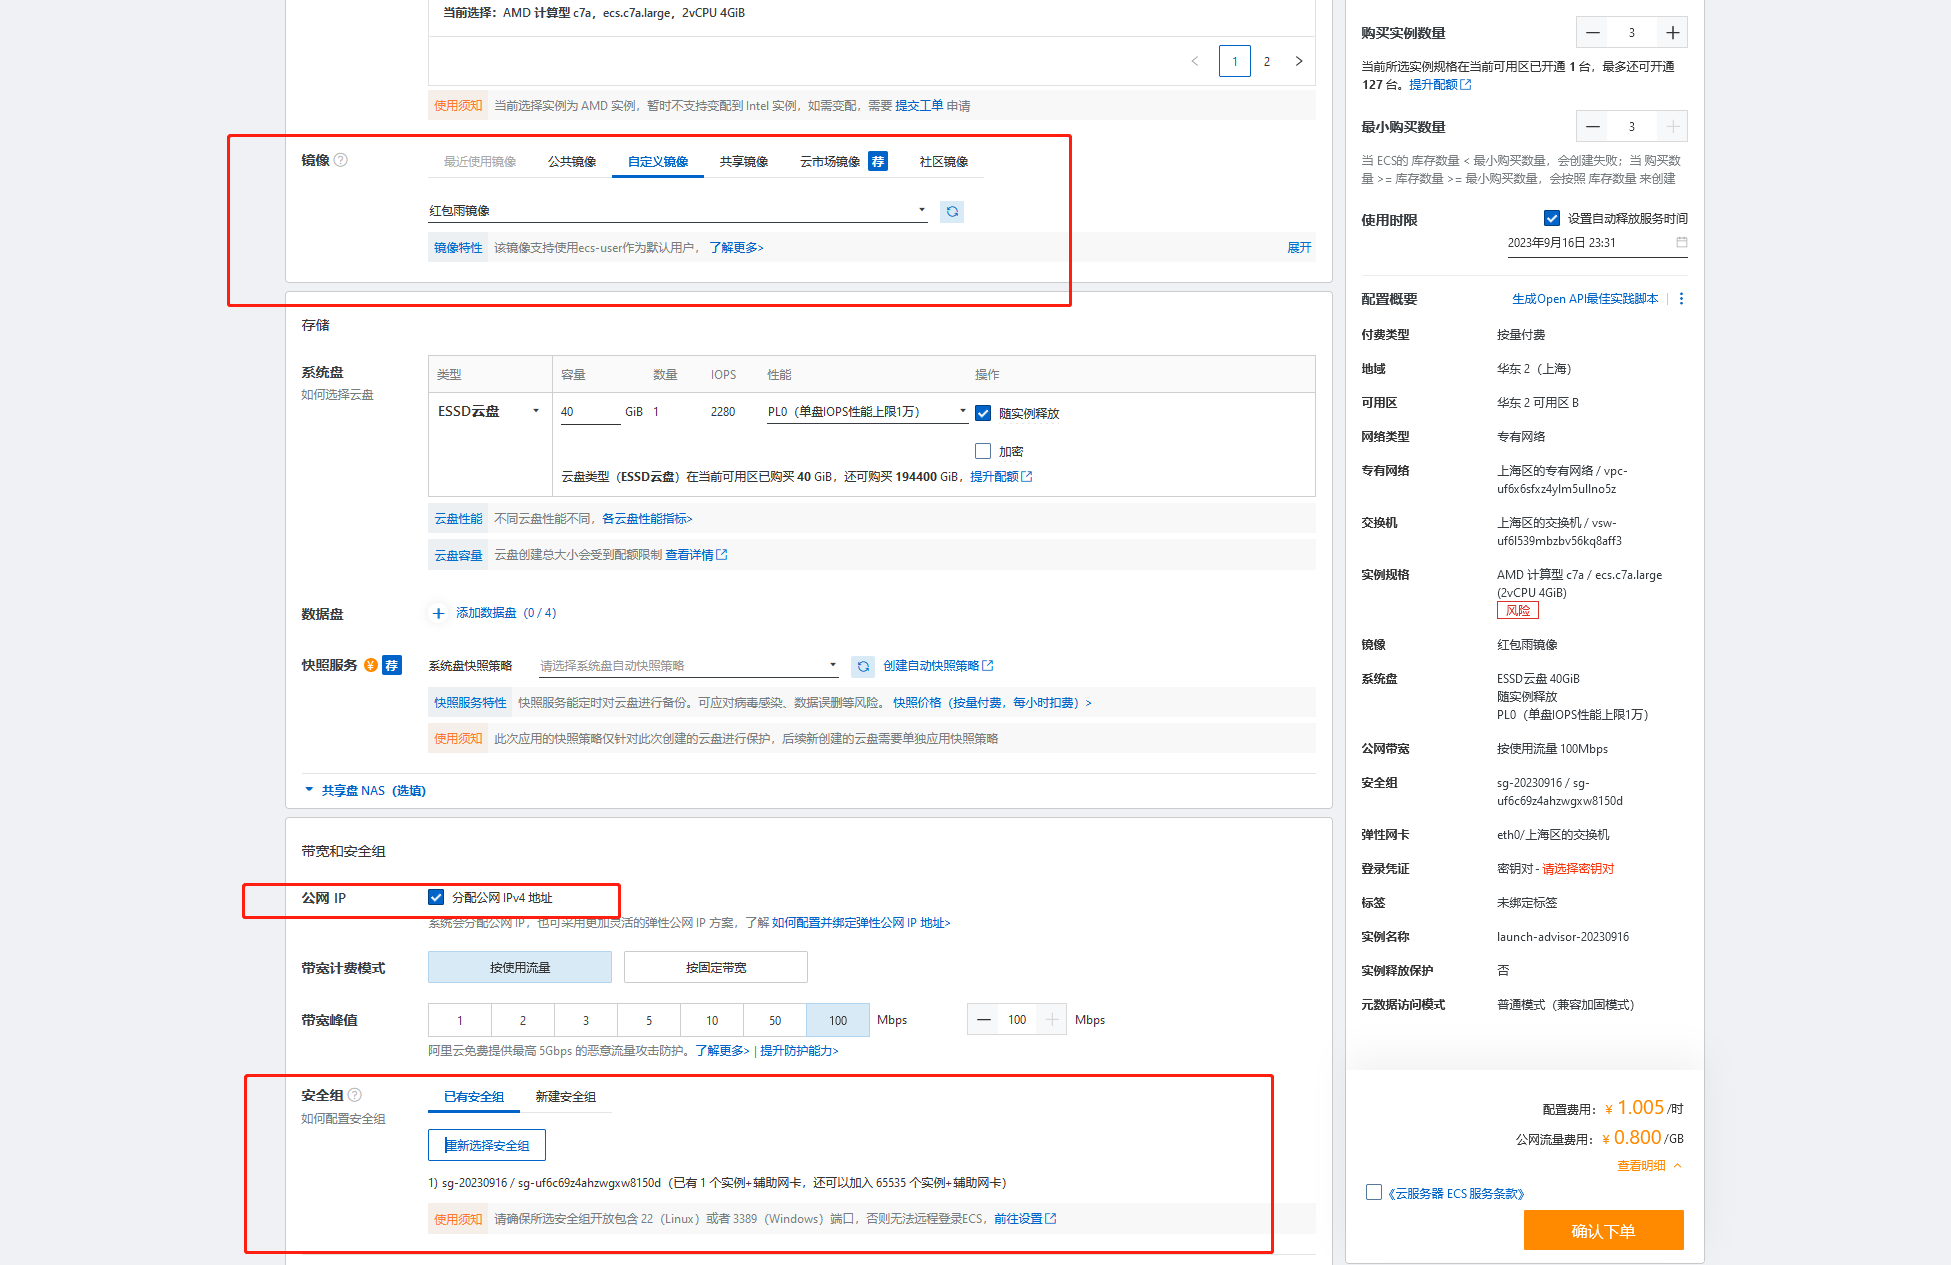
创建云服务器
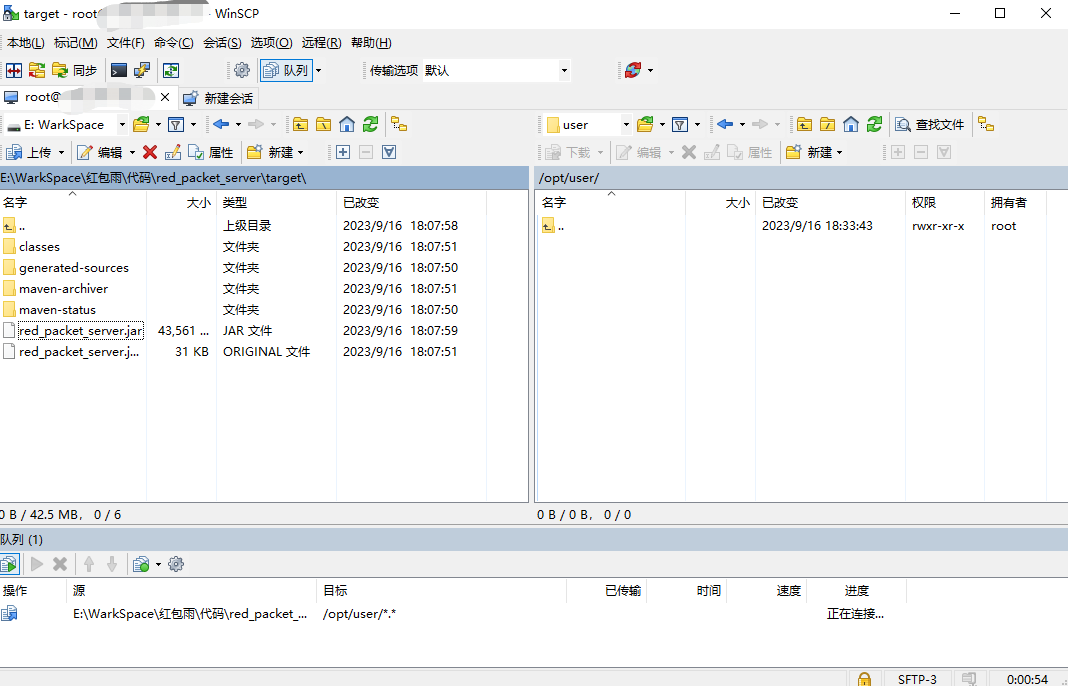
打包部署
2. Java环境
#下载jdk17
wget https://download.oracle.com/java/17/latest/jdk-17_linux-x64_bin.tar.gz
#安装上传工具 以后使用命令 rz  选中文件进行上传
yum install -y lrzsz#解压
tar -xzvf jdk-17_linux-x64_bin.tar.gz#移动到指定位置; 记住全路径: /opt/user/jdk-17.0.8
mv jdk-17.0.8 /opt/user/jdk-17.0.8#配置环境变量   /opt/jdk-17.0.2
vim /etc/profile#在最后加入下面配置,注意修改 JAVA_HOME位置为你自己的位置
export JAVA_HOME=/opt/user/jdk-17.0.8
export PATH=$JAVA_HOME/bin:$PATH#使环境变量生效
source /etc/profile#验证安装成功
java -version

启动项目
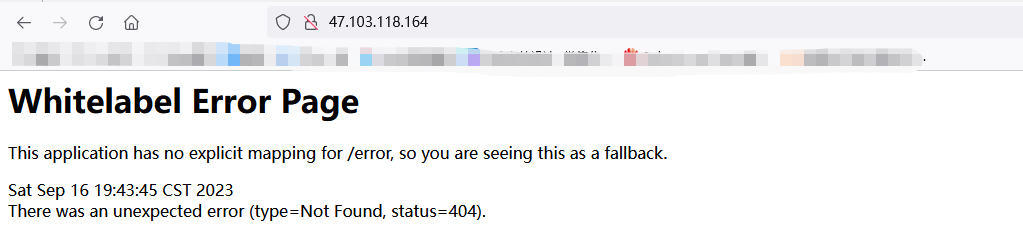
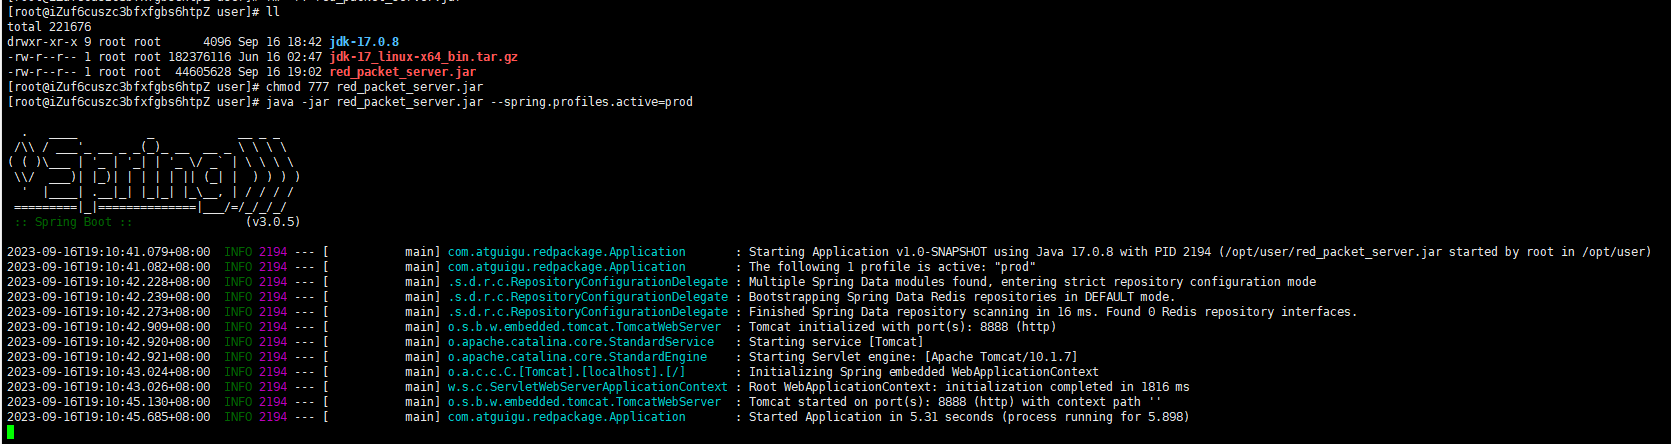 测试能否访问

开机启动任意服务
作为基础服务器,需要配置开机自启服务,方便后面自动伸缩以这台服务器为主,扩容服务器能实现开机运行java服务。
1. 制作服务文件
cd /usr/lib/systemd/system
vim springbootapp.service
#内容如下[Unit]
Description=springbootapp
After=syslog.target network.target remote-fs.target nss-lookup.target[Service]
Type=forking
ExecStart=/opt/app/app-start.sh
ExecStop=/opt/app/app-stop.sh
PrivateTmp=true[Install]
WantedBy=multi-user.target
2. 制作启动脚本
vim app-start.sh
内容如下
#!/bin/sh
export JAVA_HOME=/opt/jdk-17.0.2
export PATH=$JAVA_HOME/bin:$PATH
nohup java -jar /opt/app/app.jar > /opt/app/app.log 2>&1 & --spring.profiles.active=prod
echo $! > /opt/app/app-service.pid
3. 制作停止脚本
vim app-stop.sh
内容如下
#!/bin/sh
PID=$(cat /opt/app/app-service.pid)
kill -9 $PID
4. 增加执行权限
chmod +x app-start.sh
chmod +x app-stop.sh
5. 设置开机启动
systemctl daemon-reload
systemctl status springbootapp
systemctl enable springbootapp
关闭开机自启动
systemctl disable springbootapp
立即执行启动服务脚本
systemctl start springbootapp
立即执行关闭服务脚本
systemctl stop springbootapp
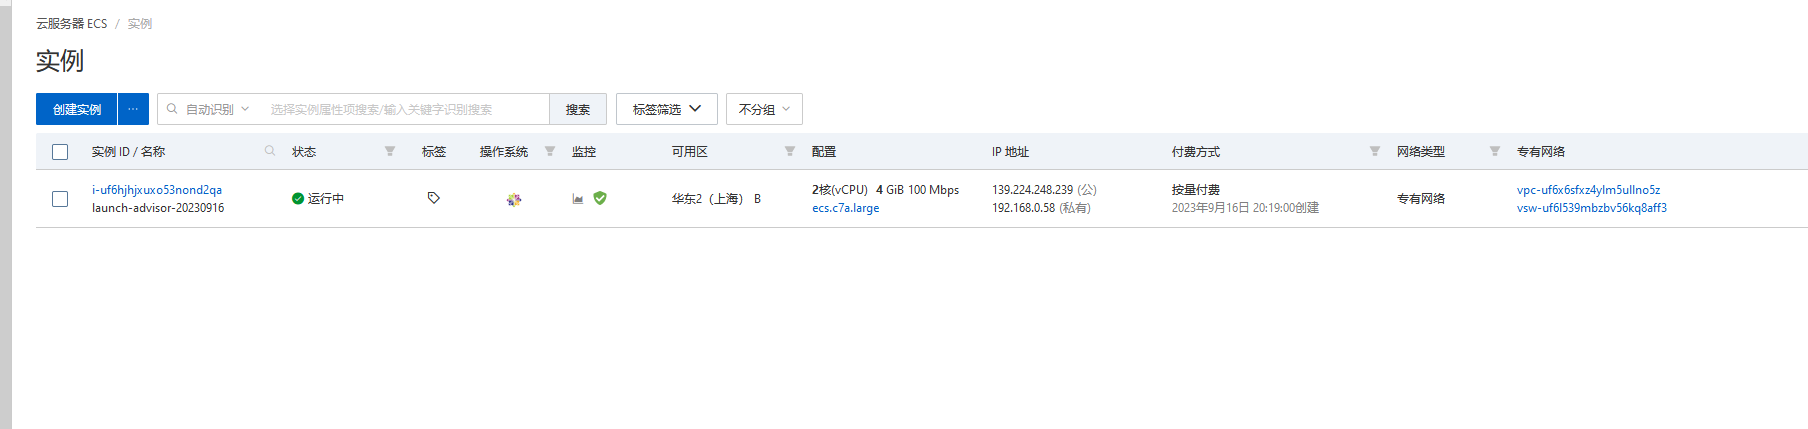
创建镜像


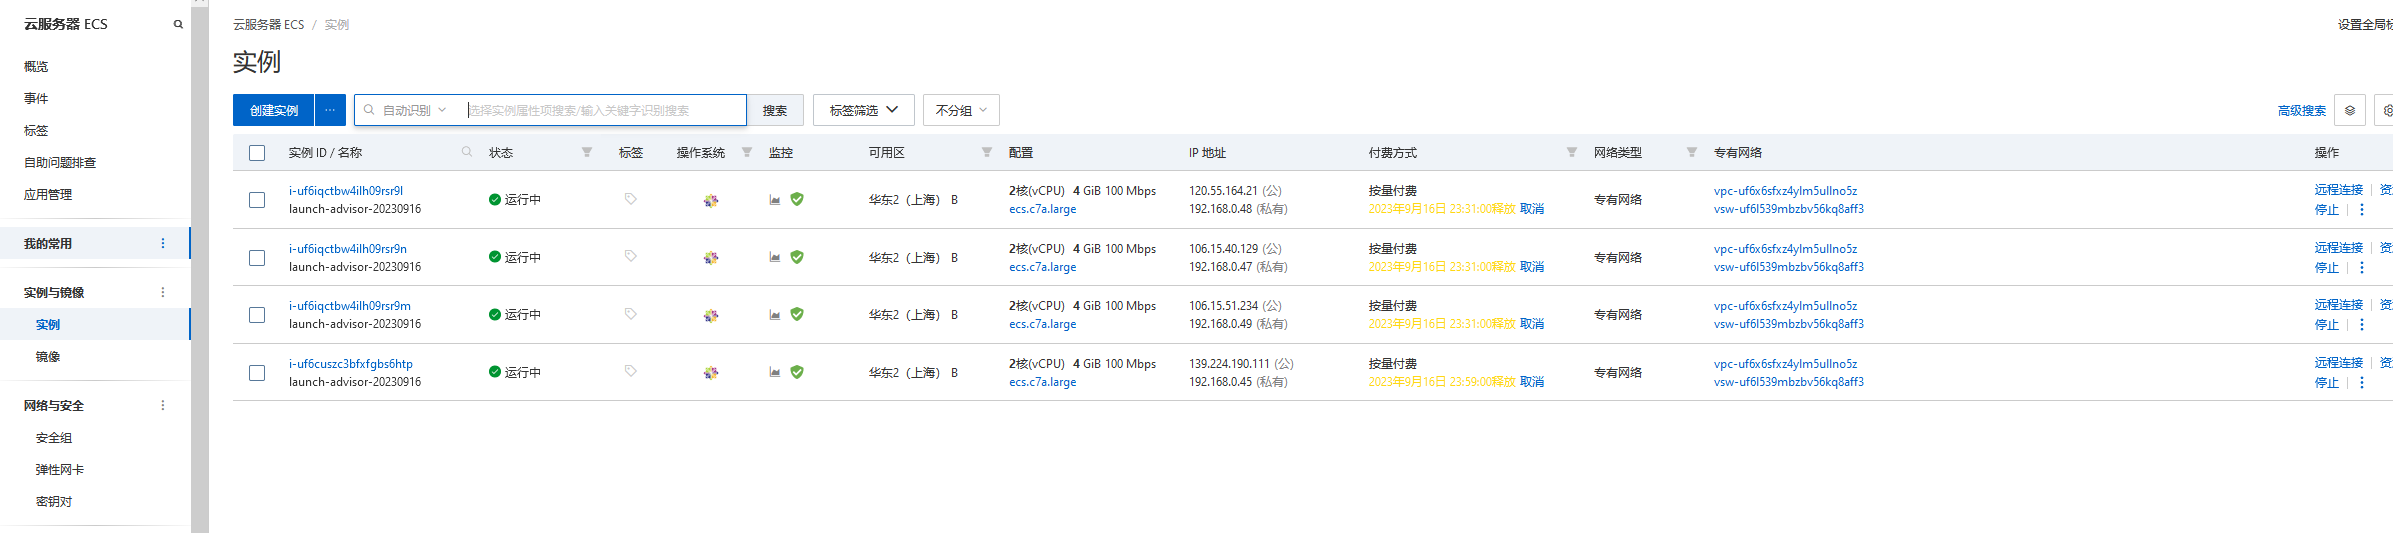
继续创建多台云服务器

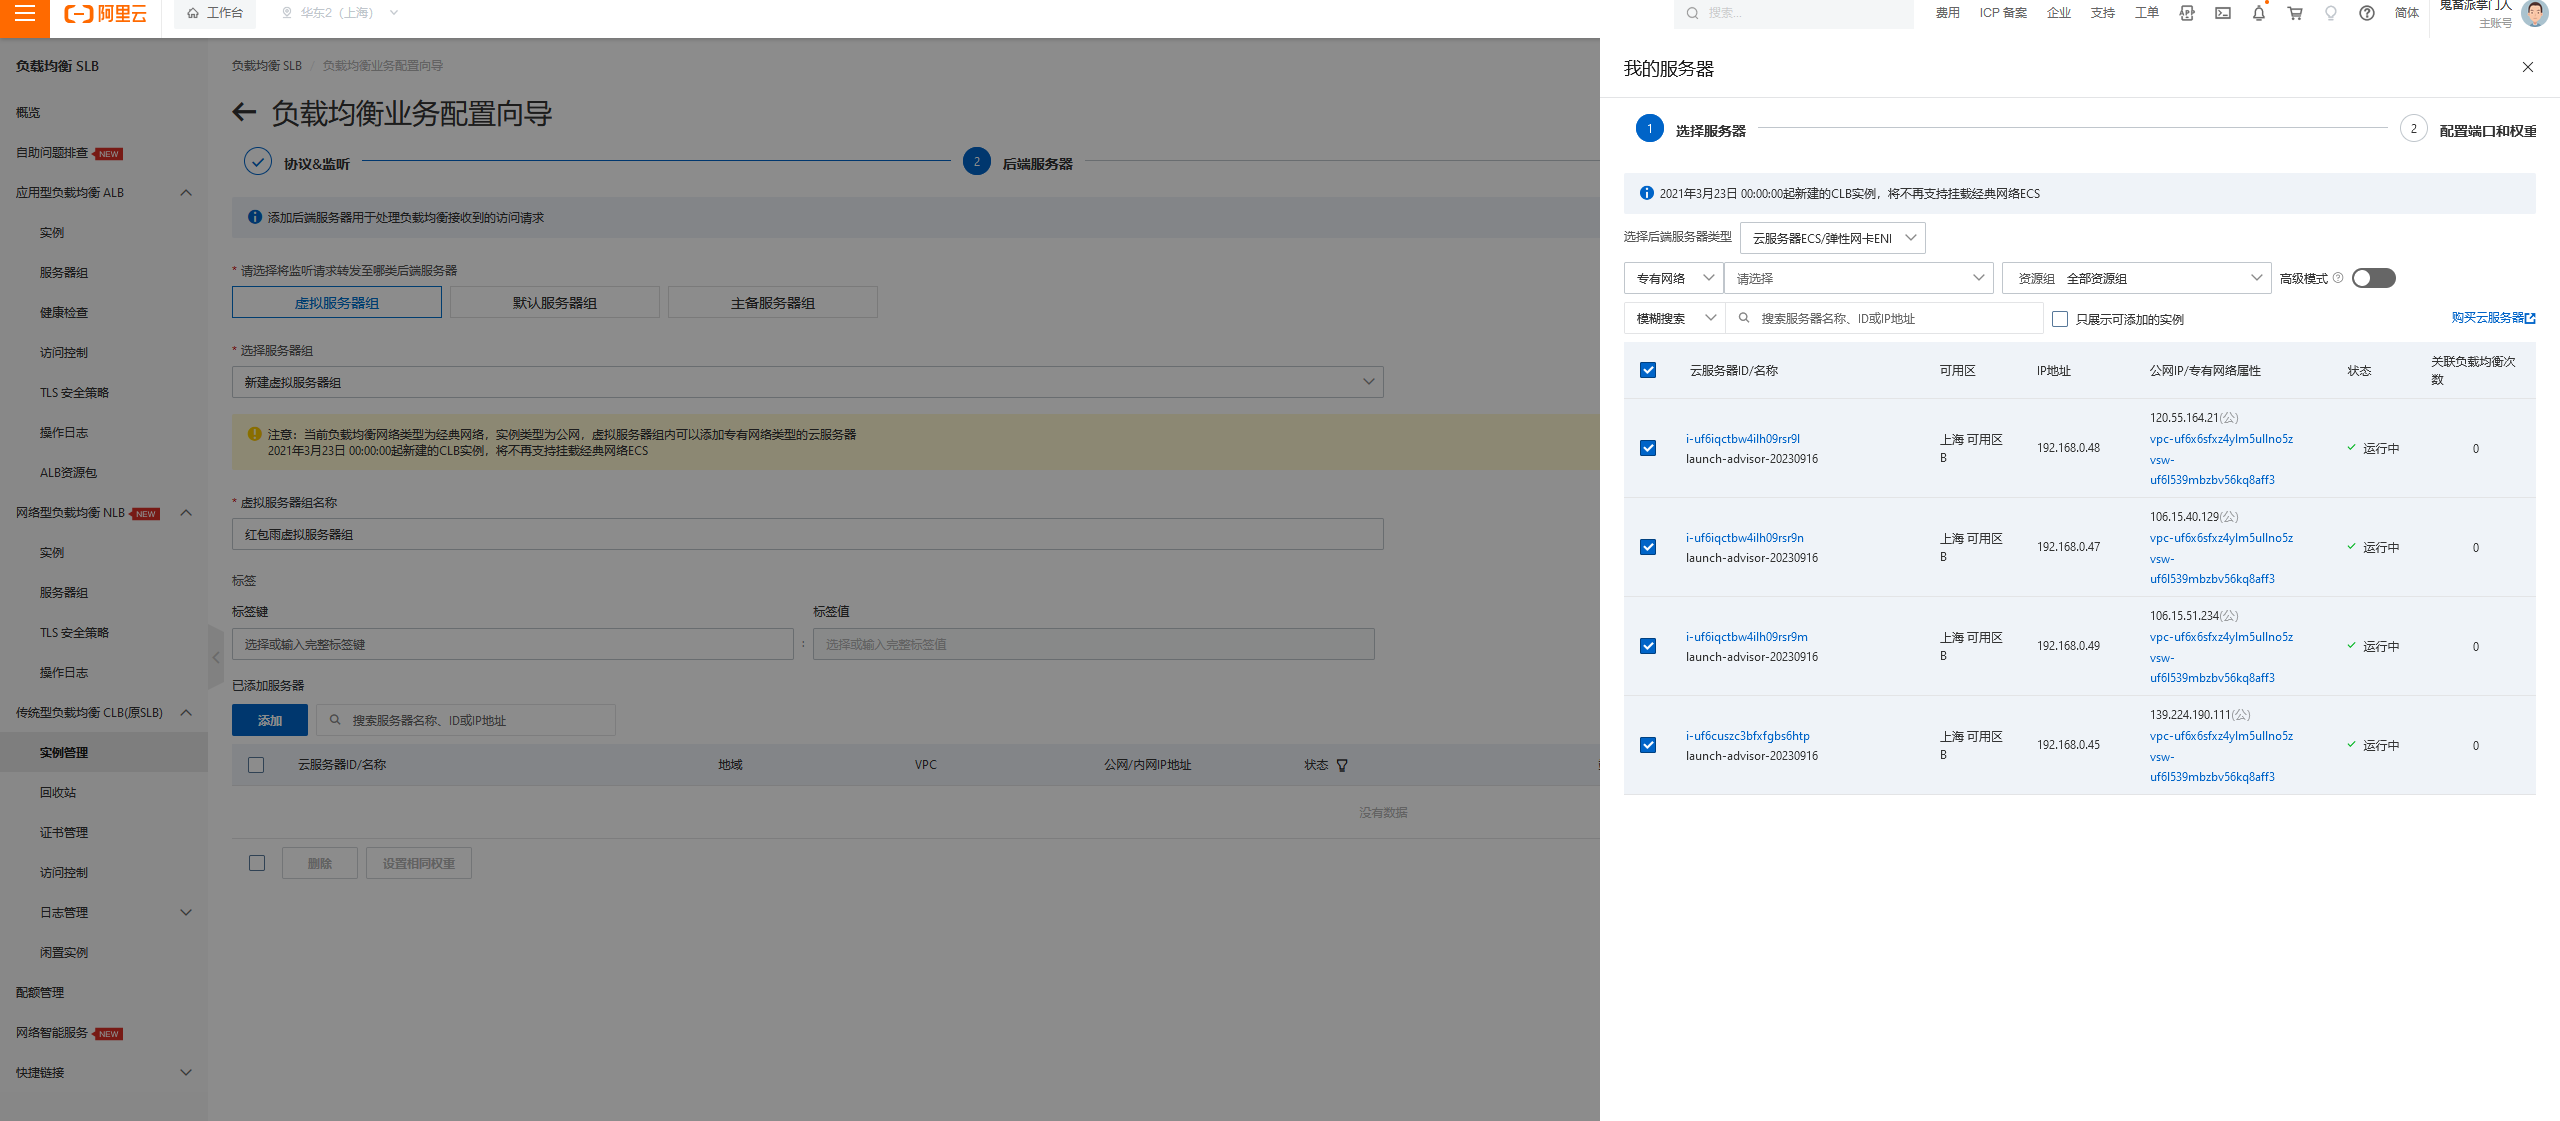
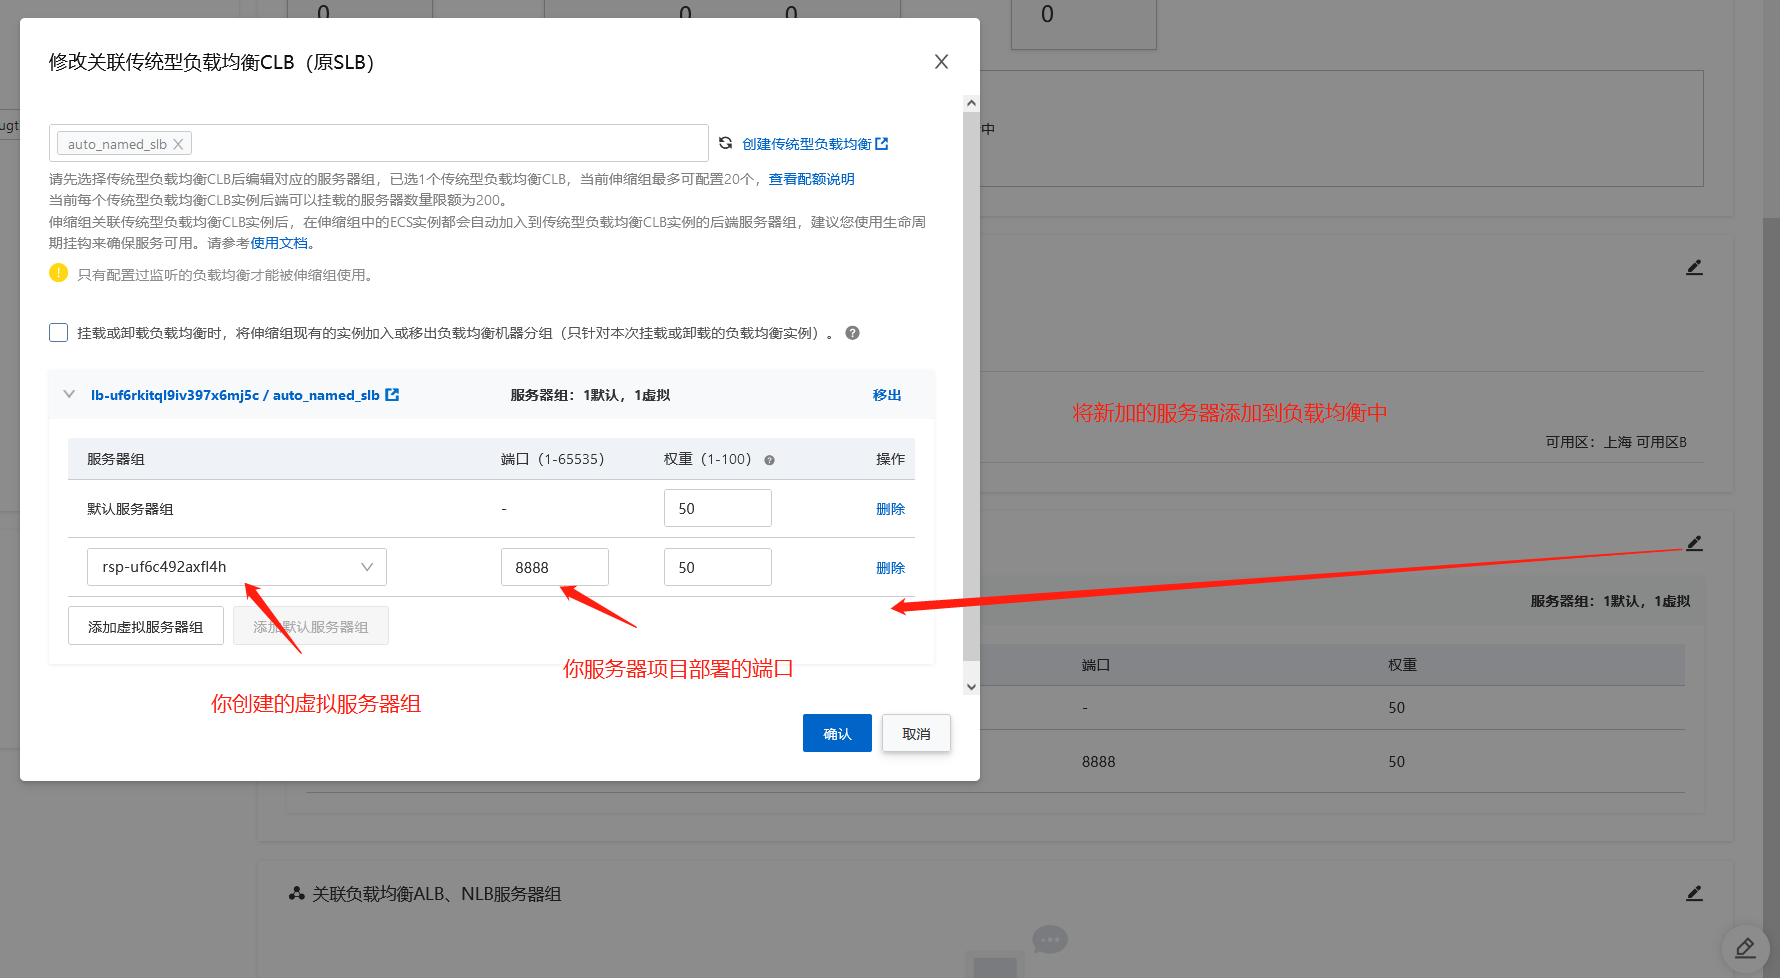
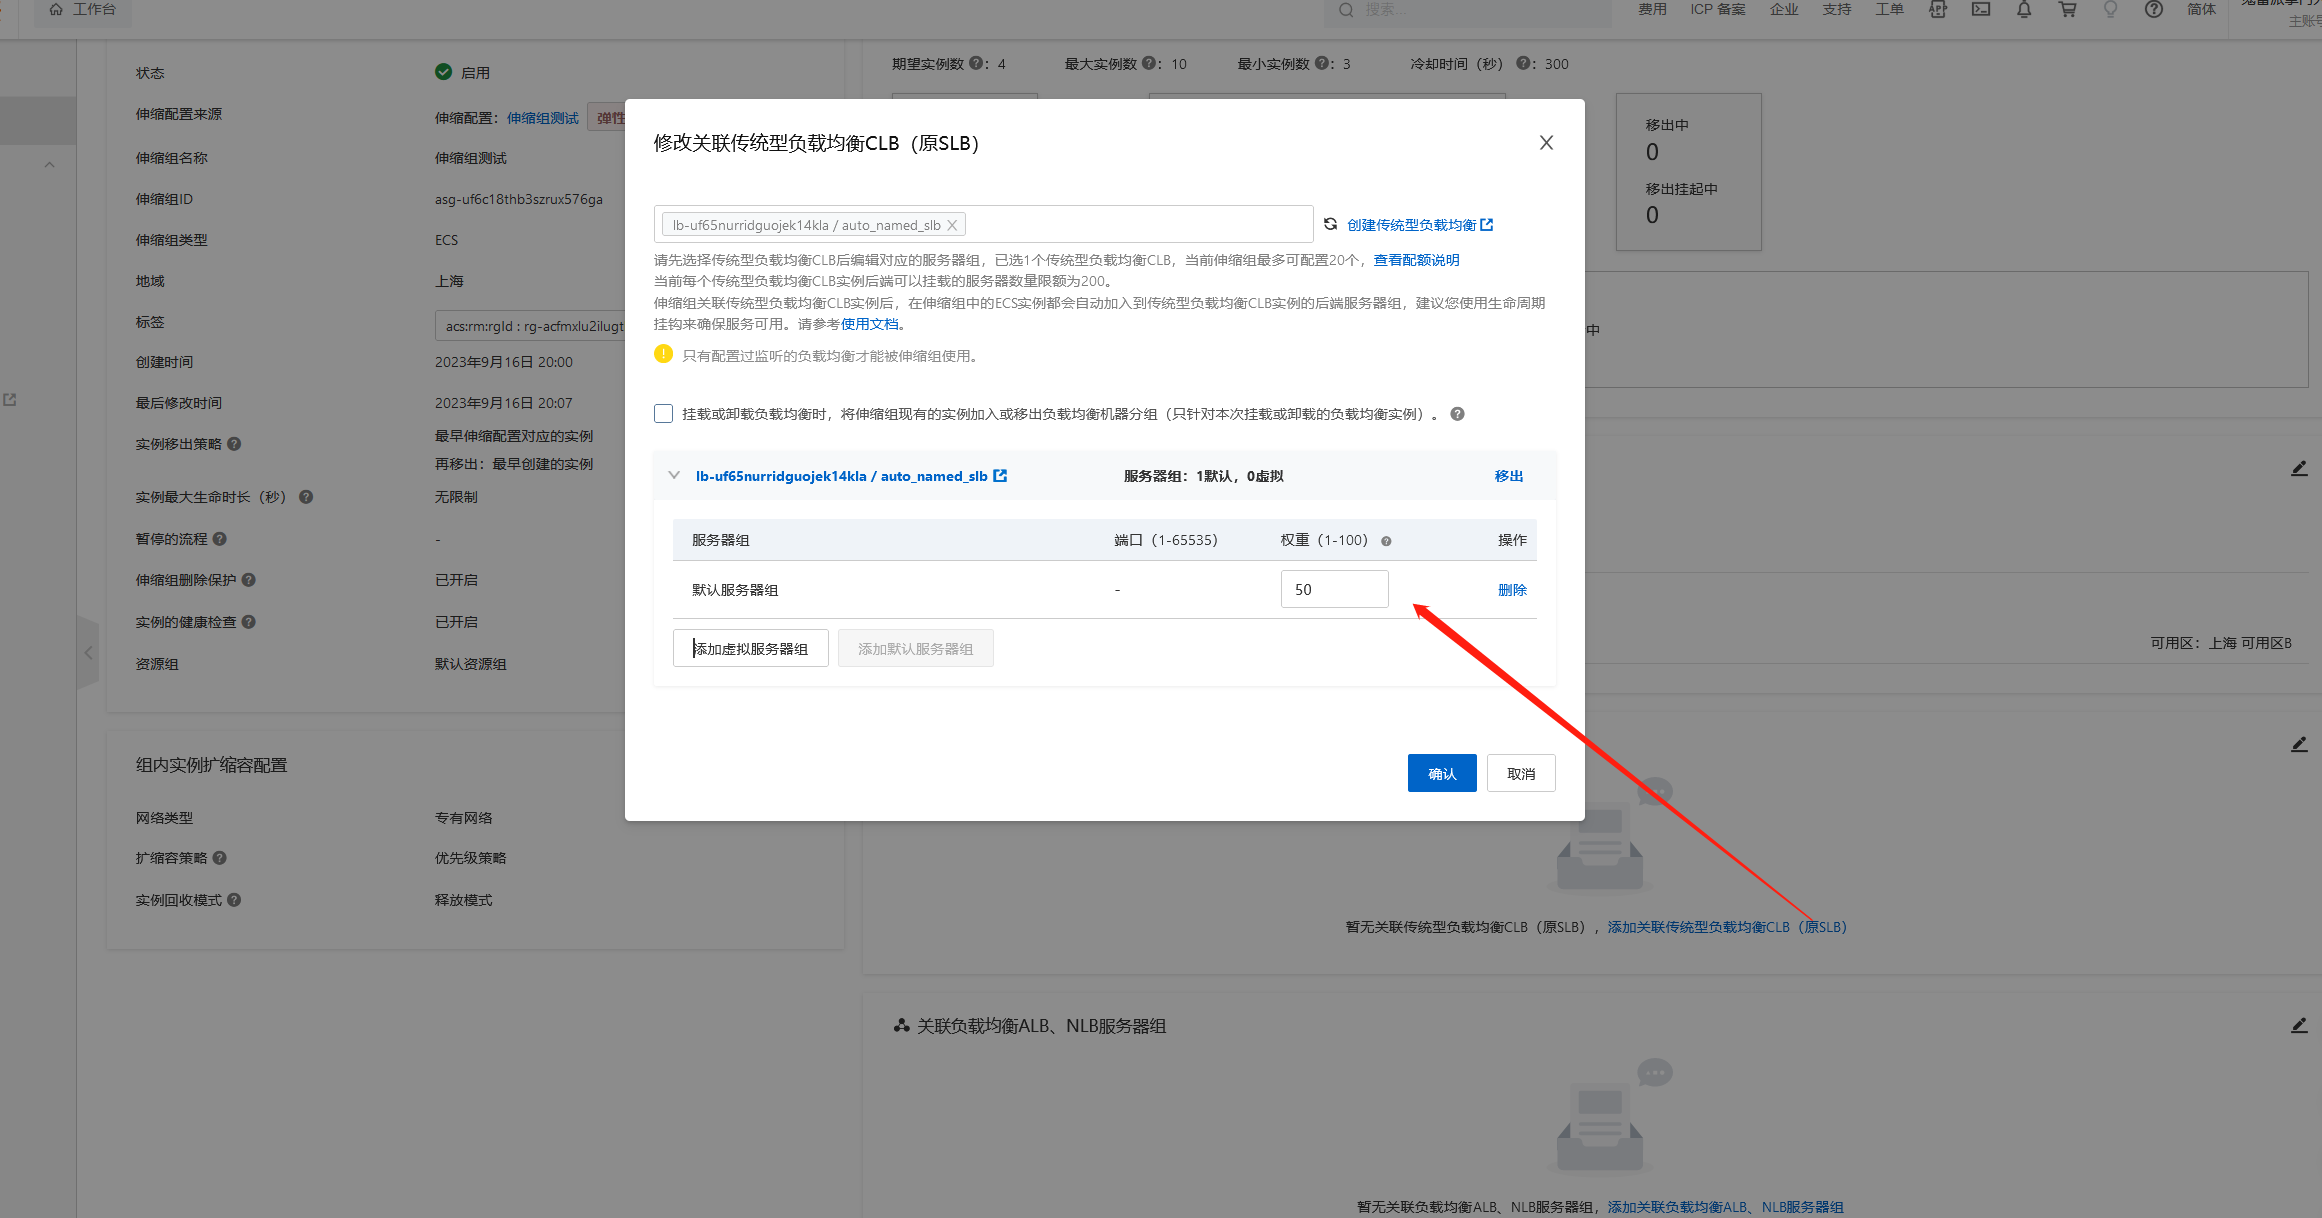
负载均衡
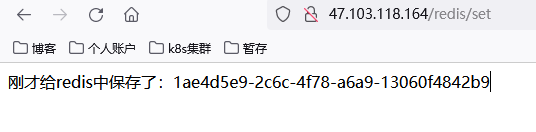
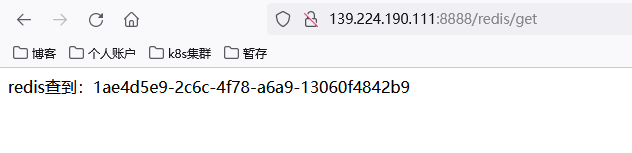
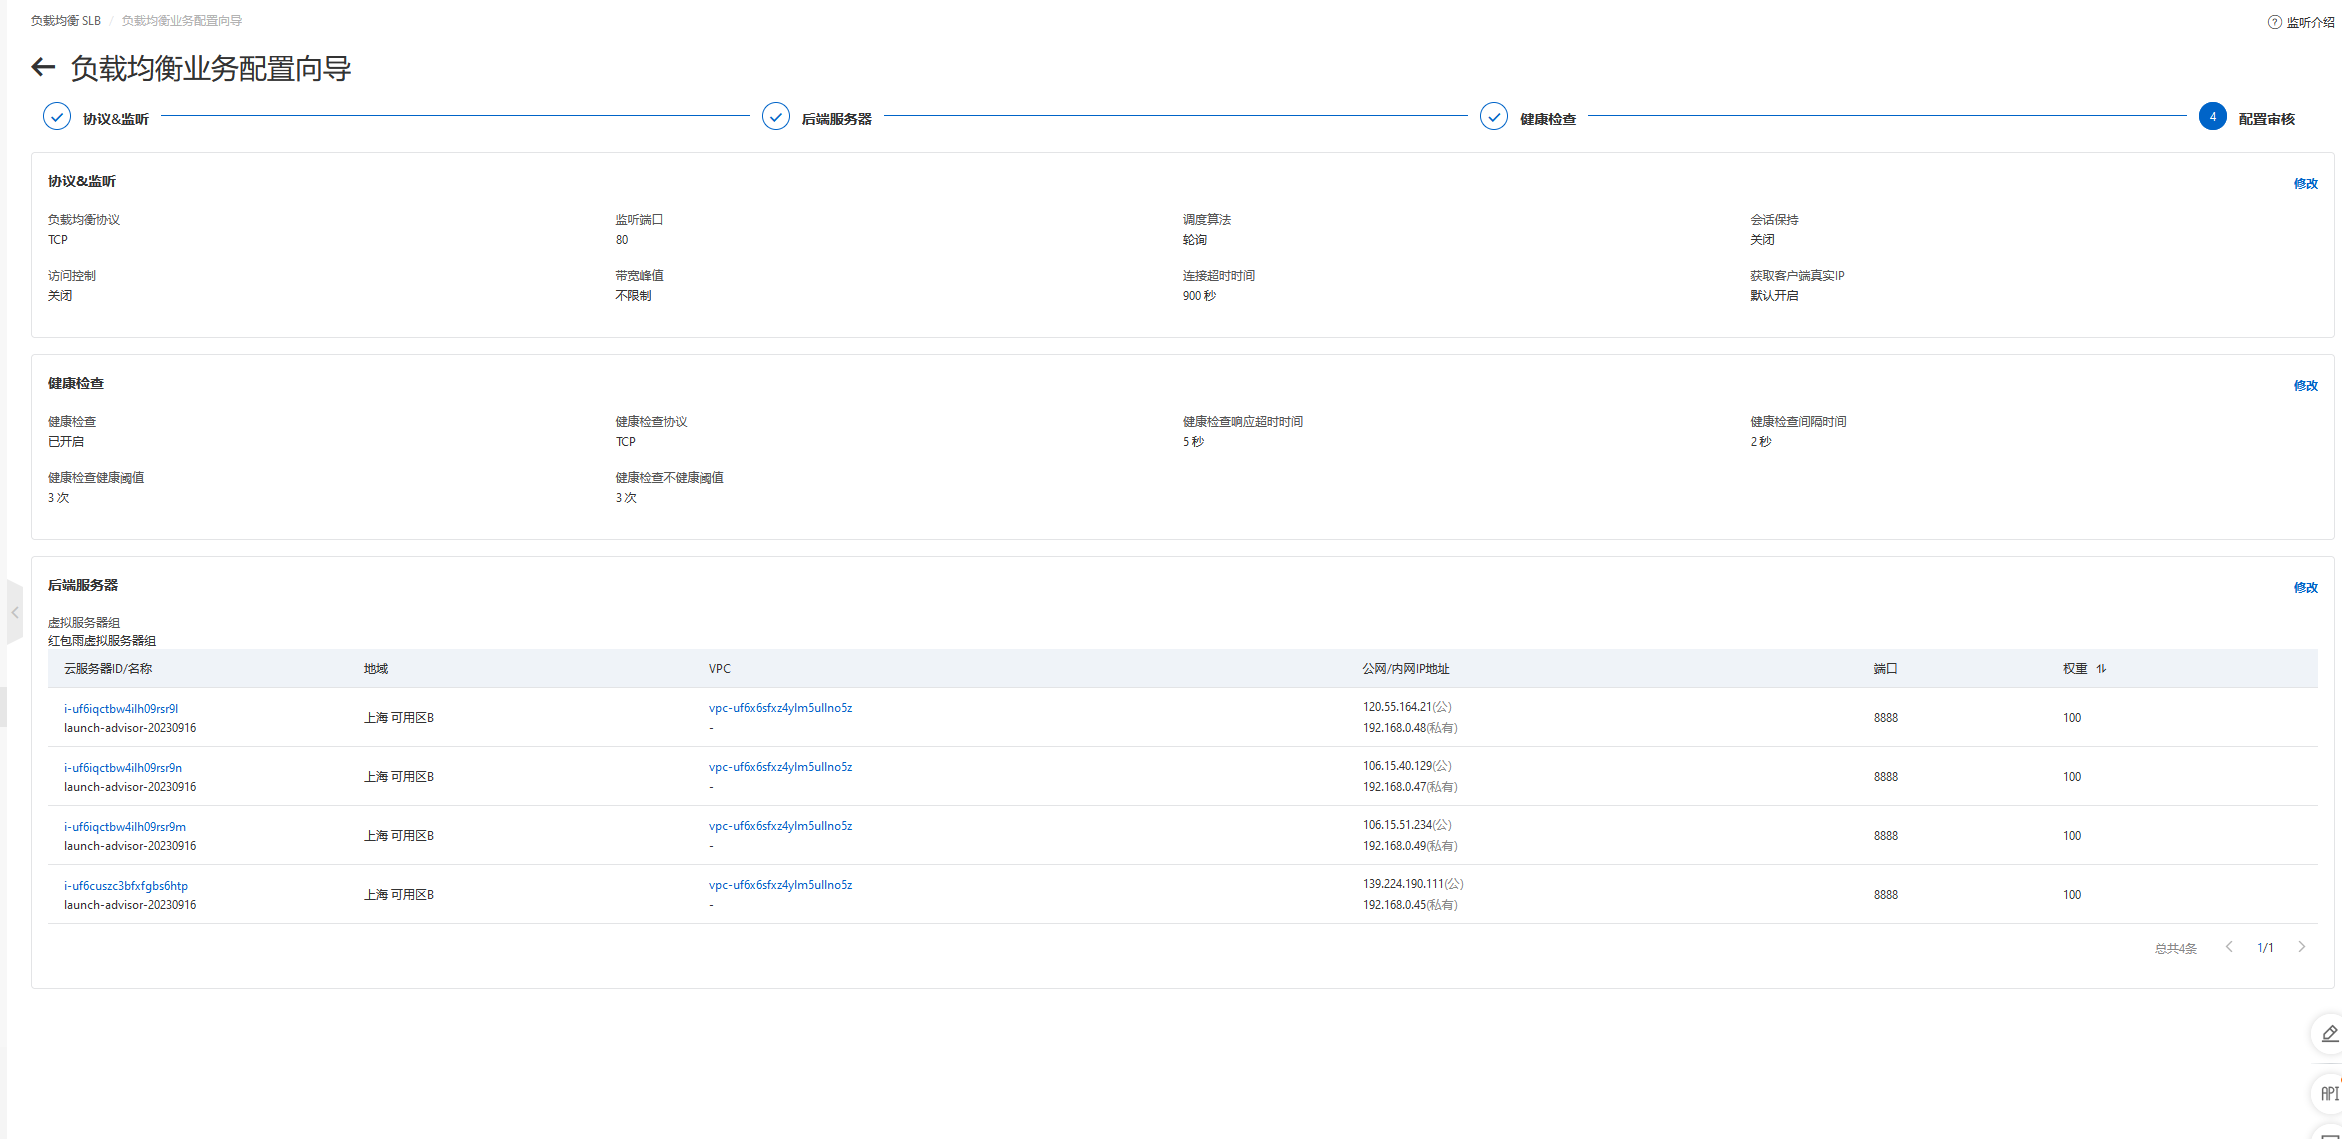 直接通过负载均衡的ip访问服务的8888端口
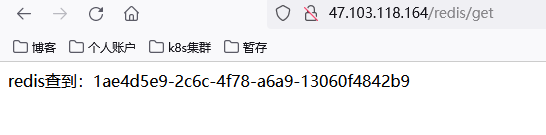
 测试一下
测试一下

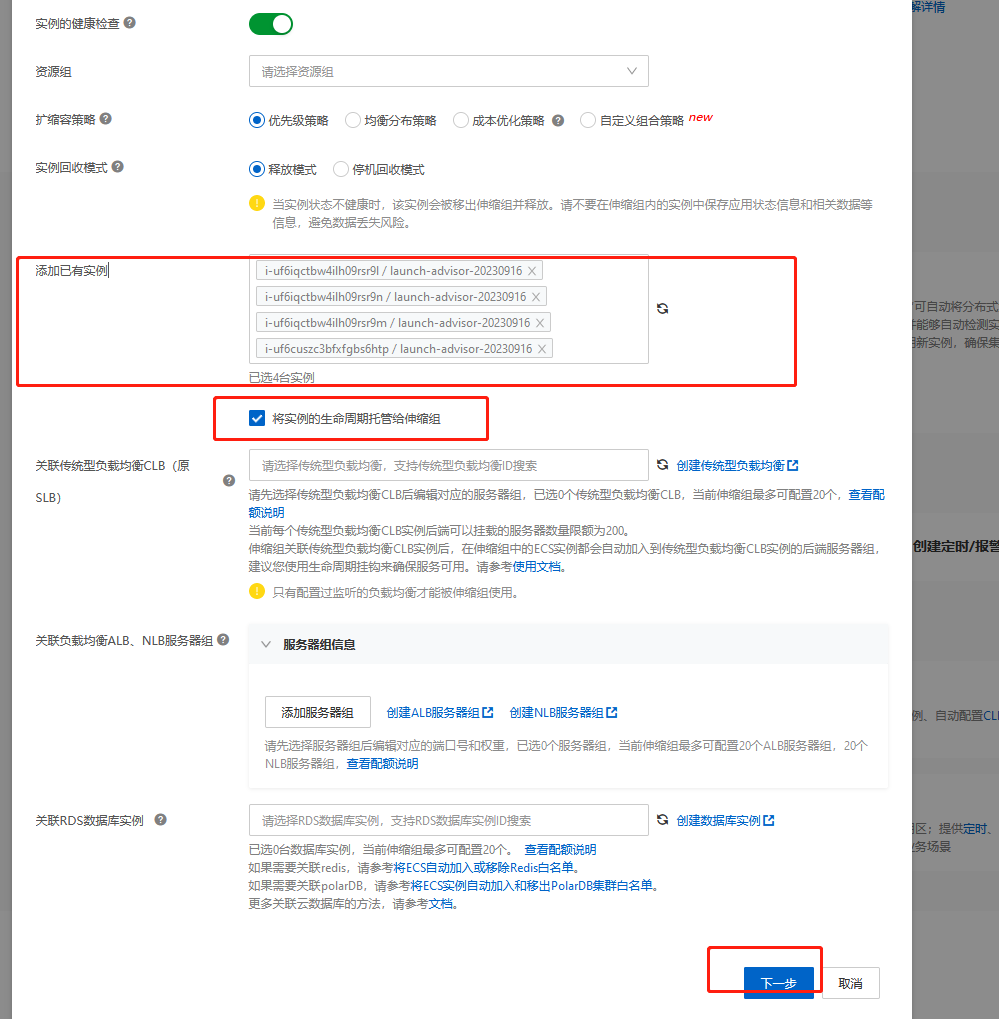
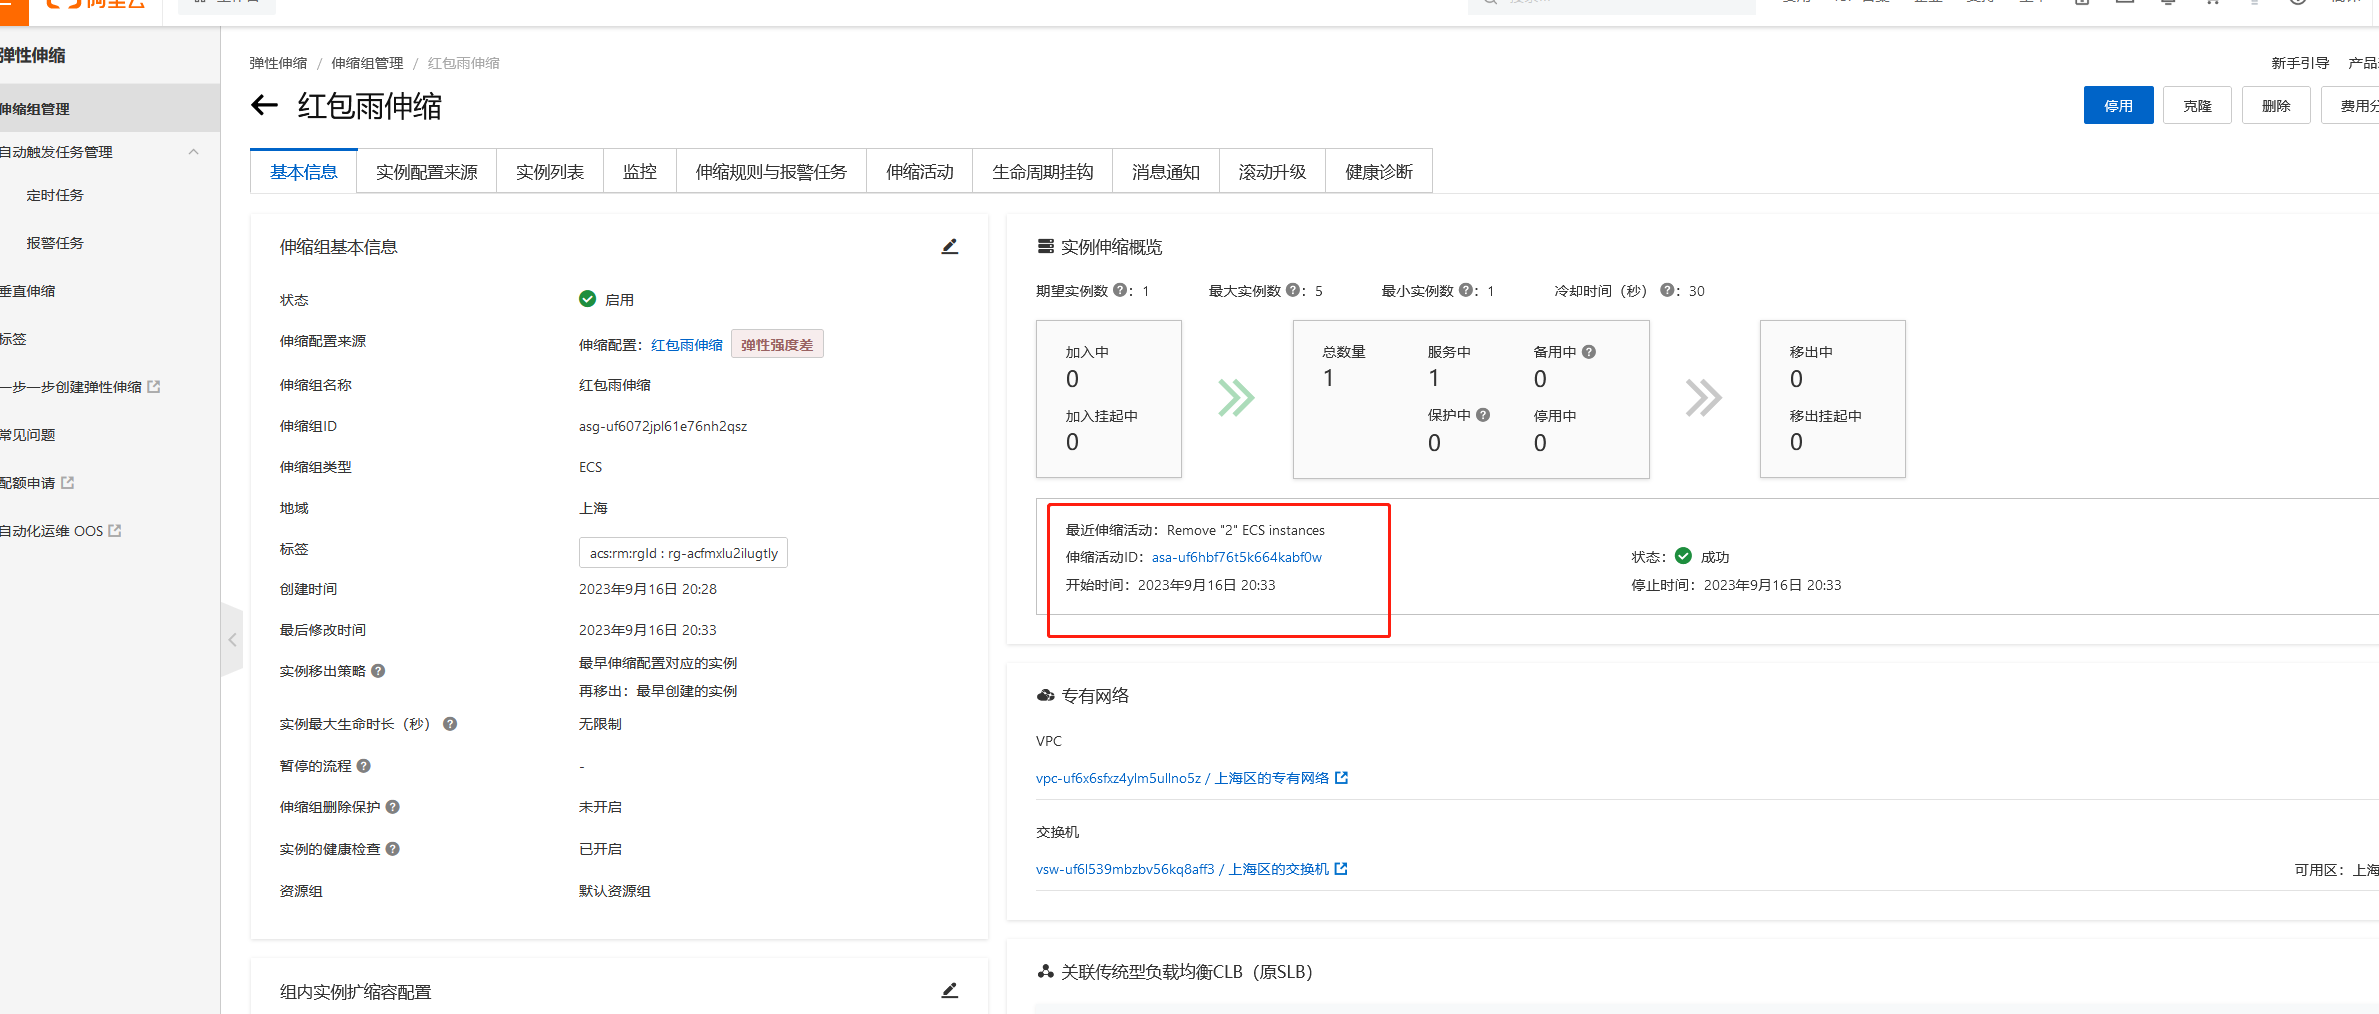
弹性伸缩
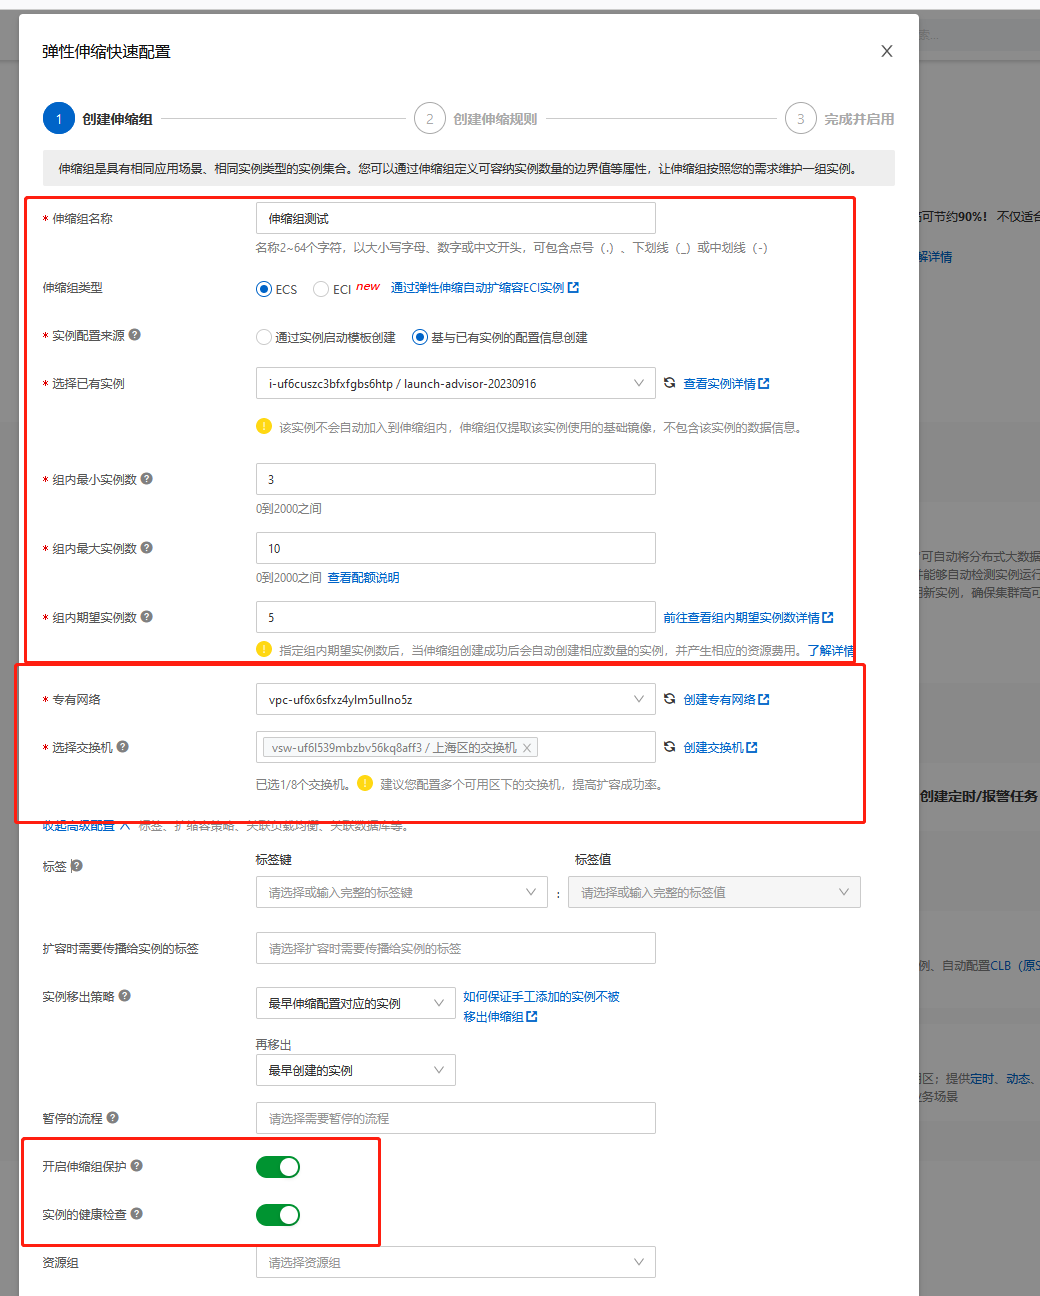
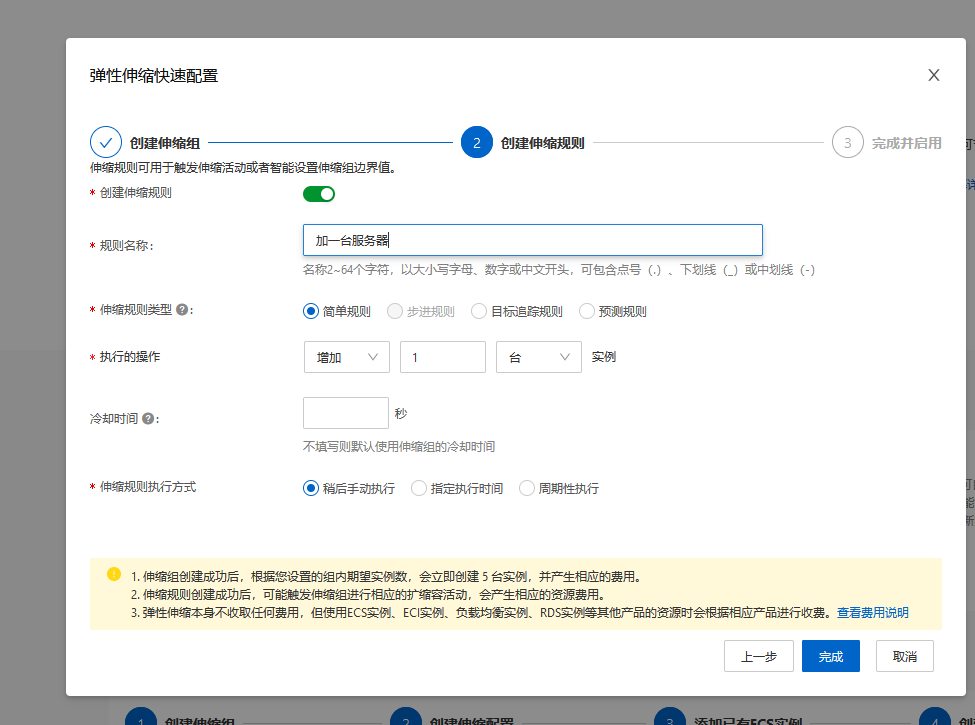

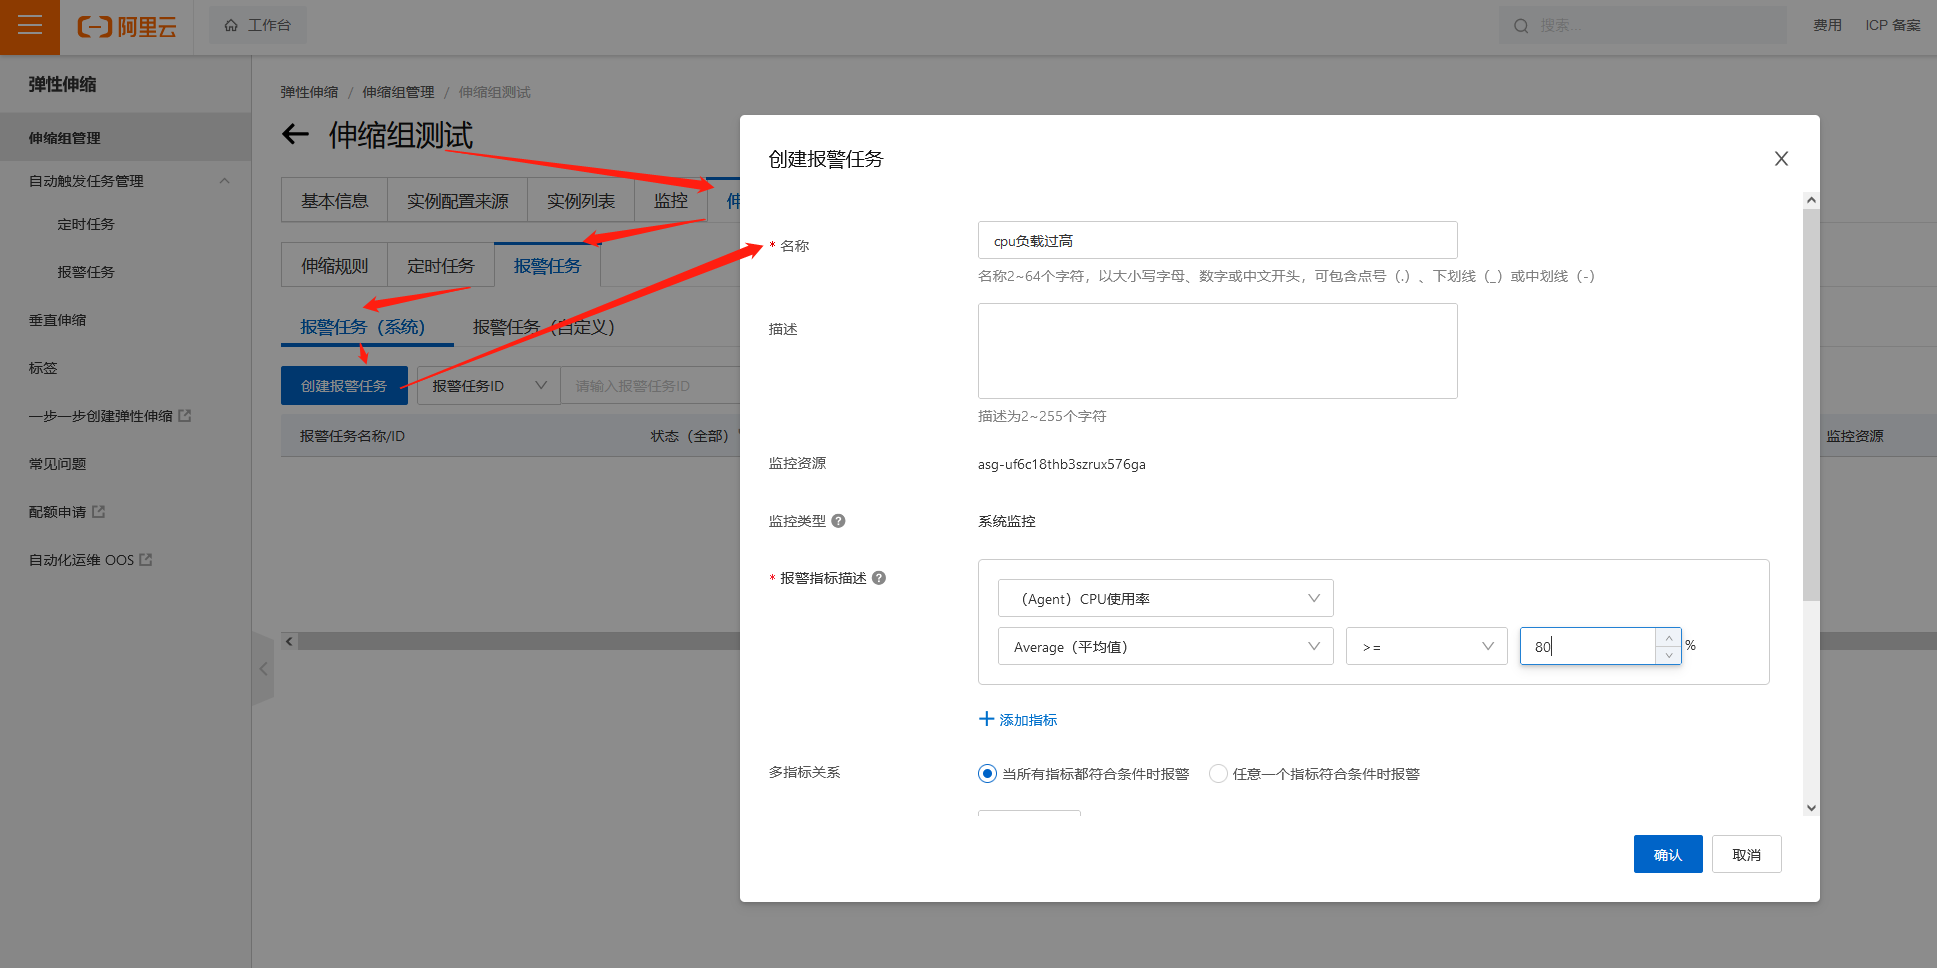
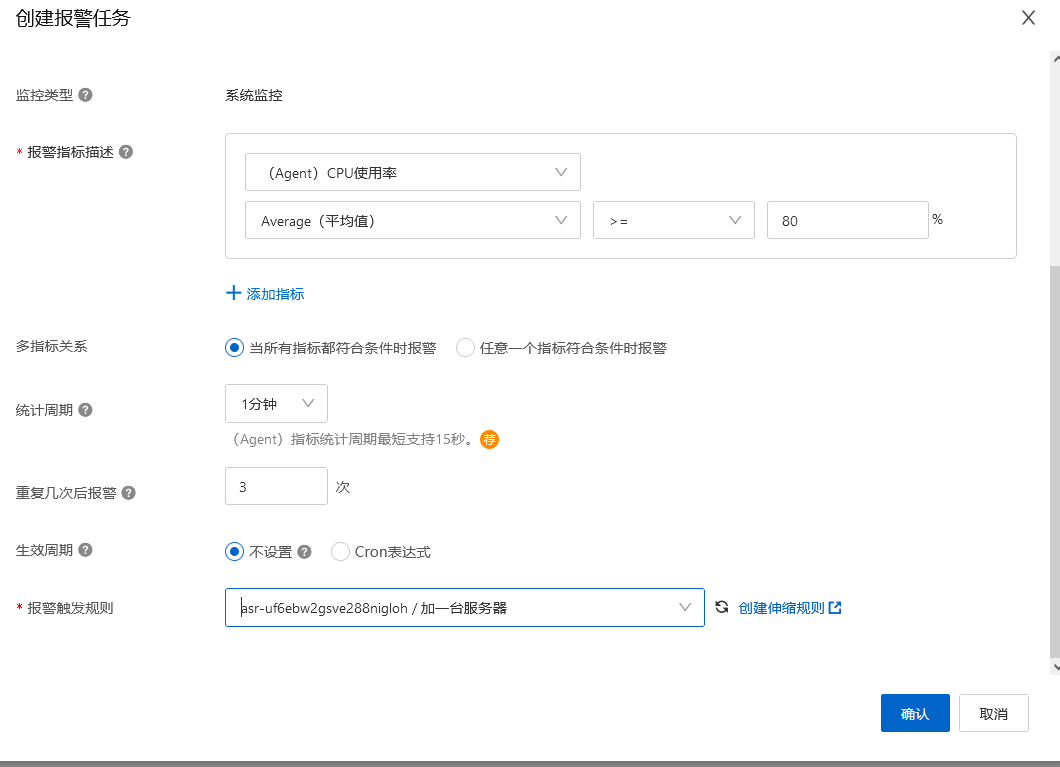
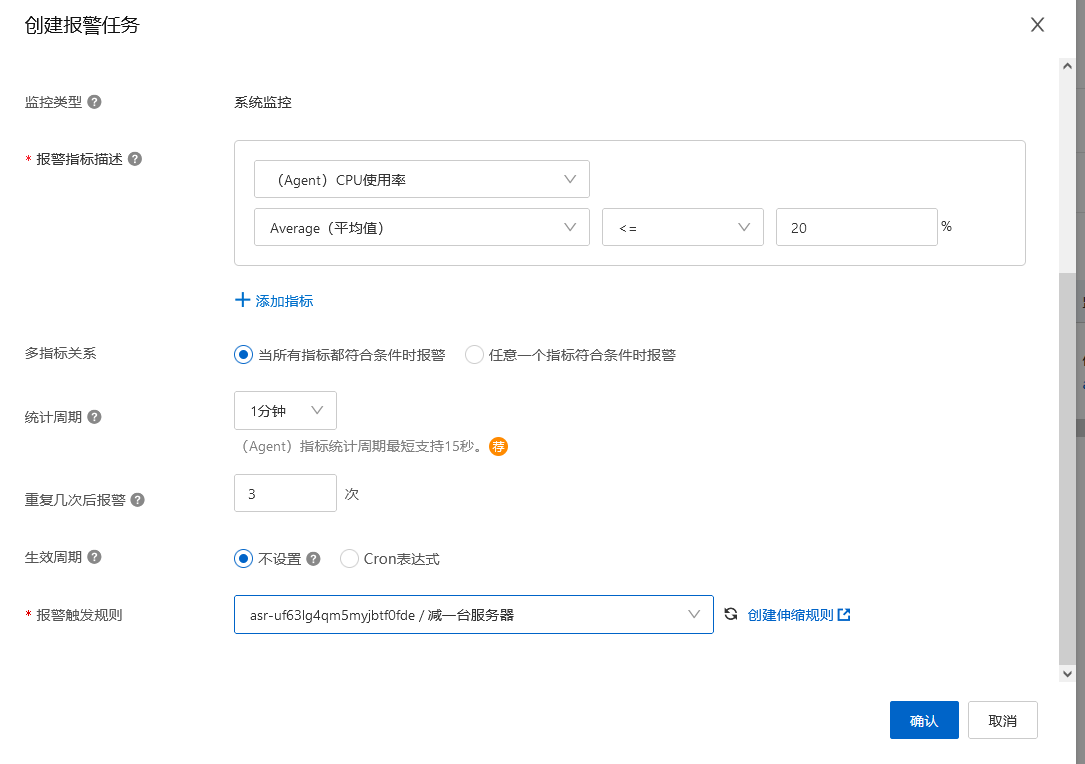
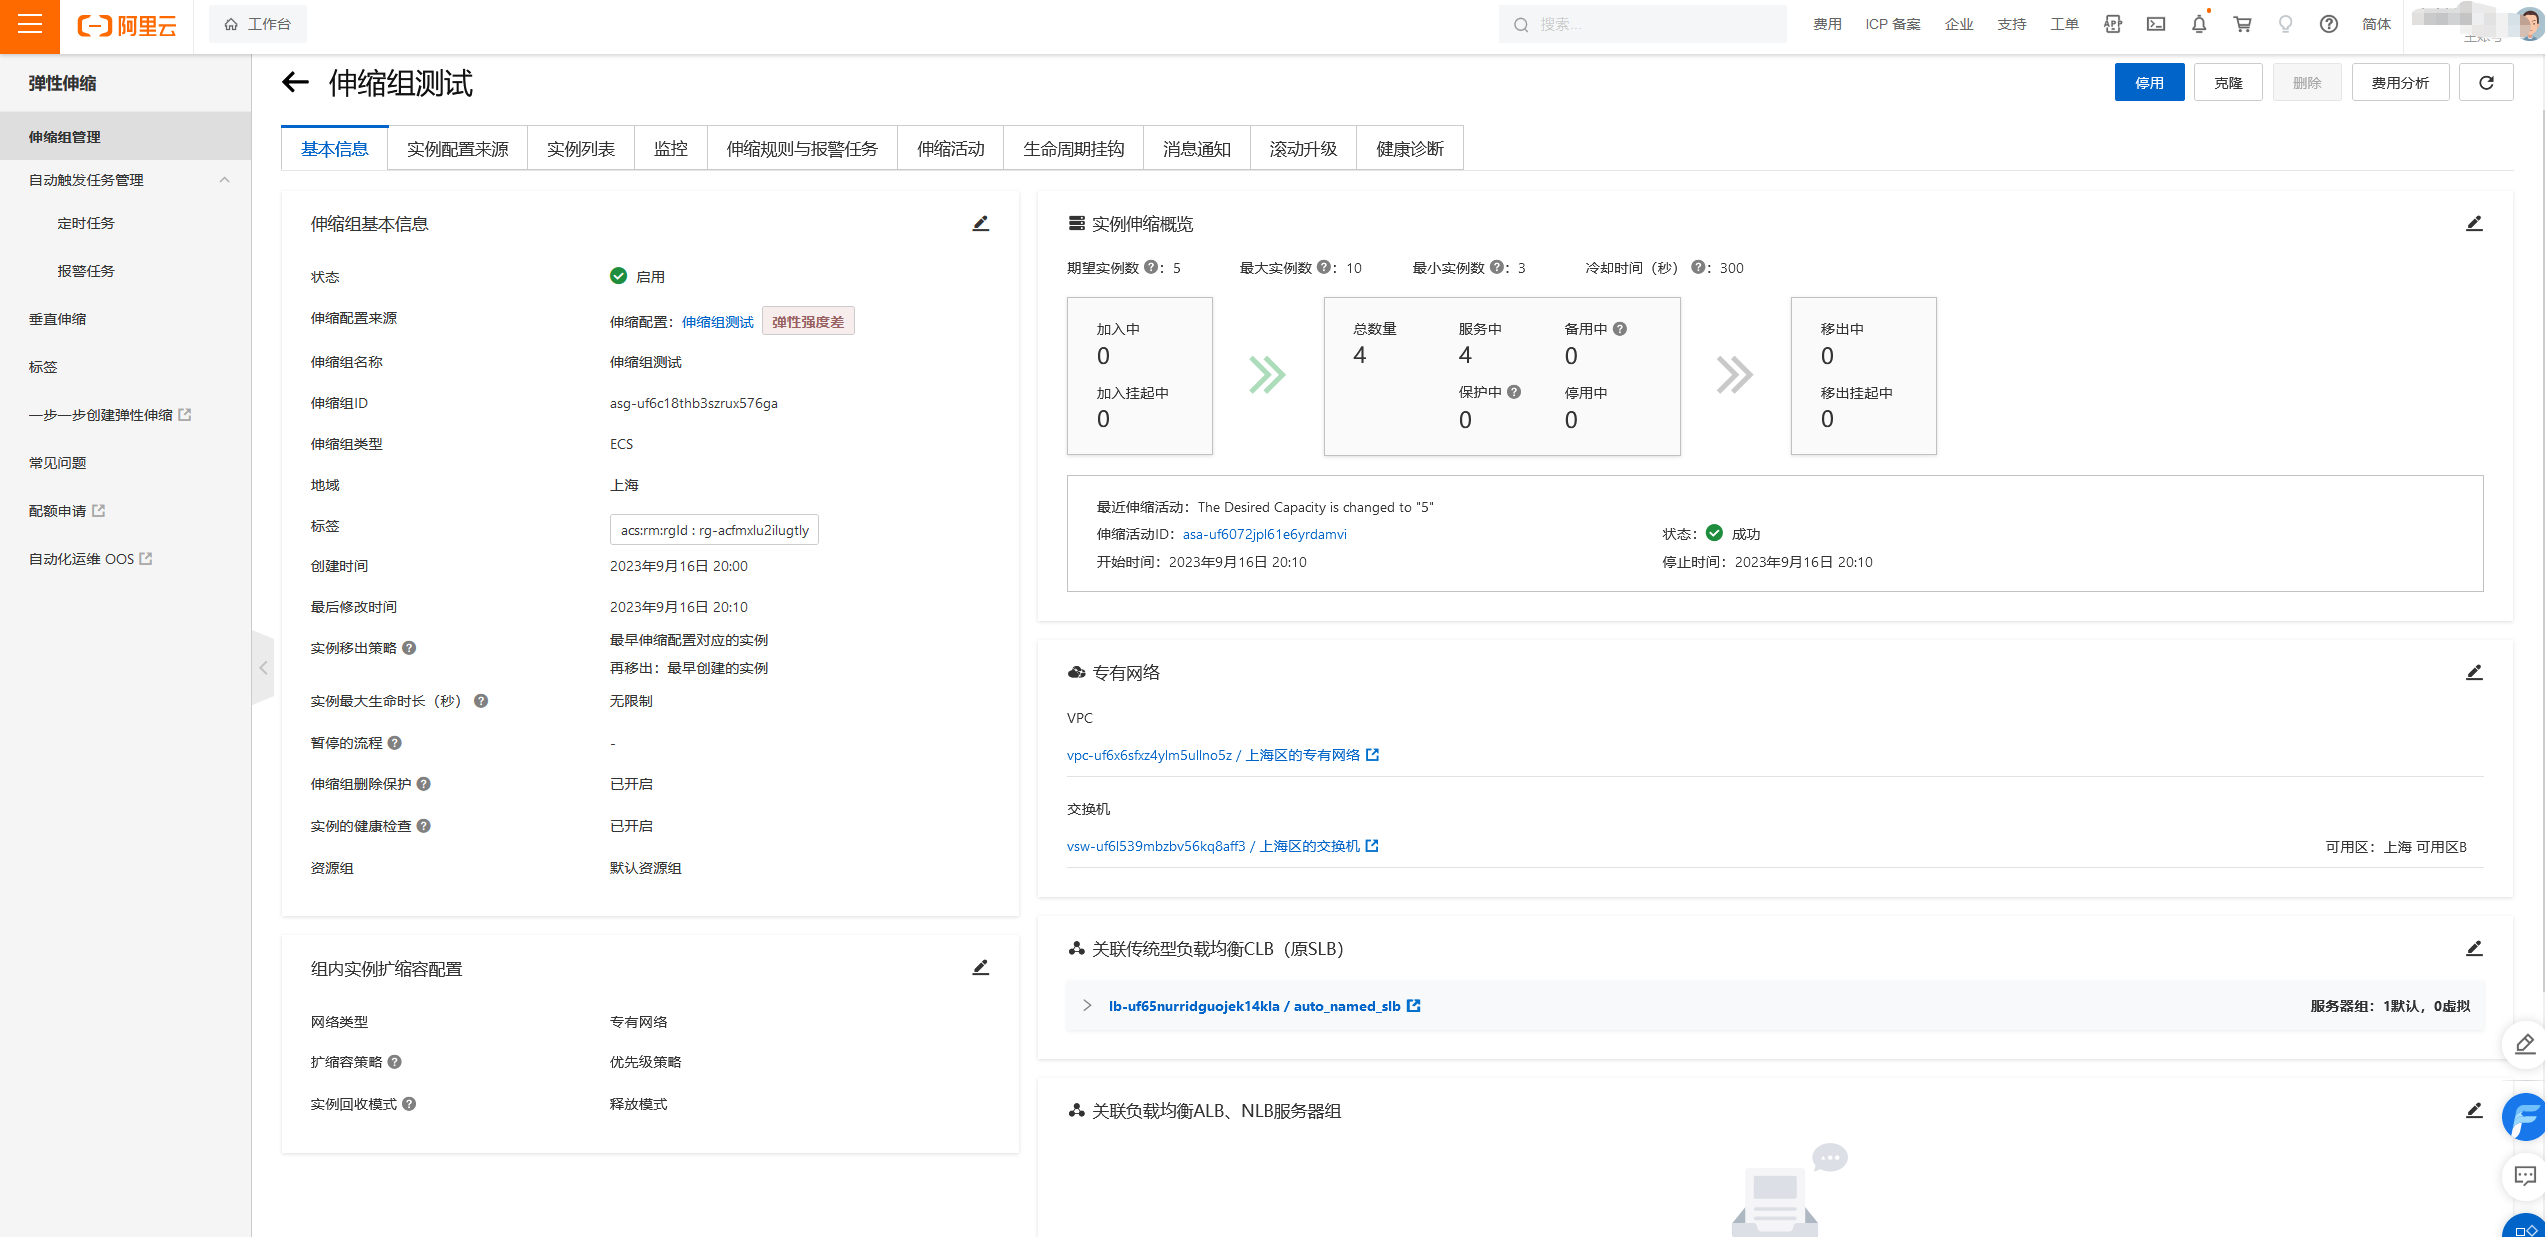 如果我配置的期望值是1台服务器,那么过一段时间没有负载就会直接把你创建的实例给删除了,仅保留一台。
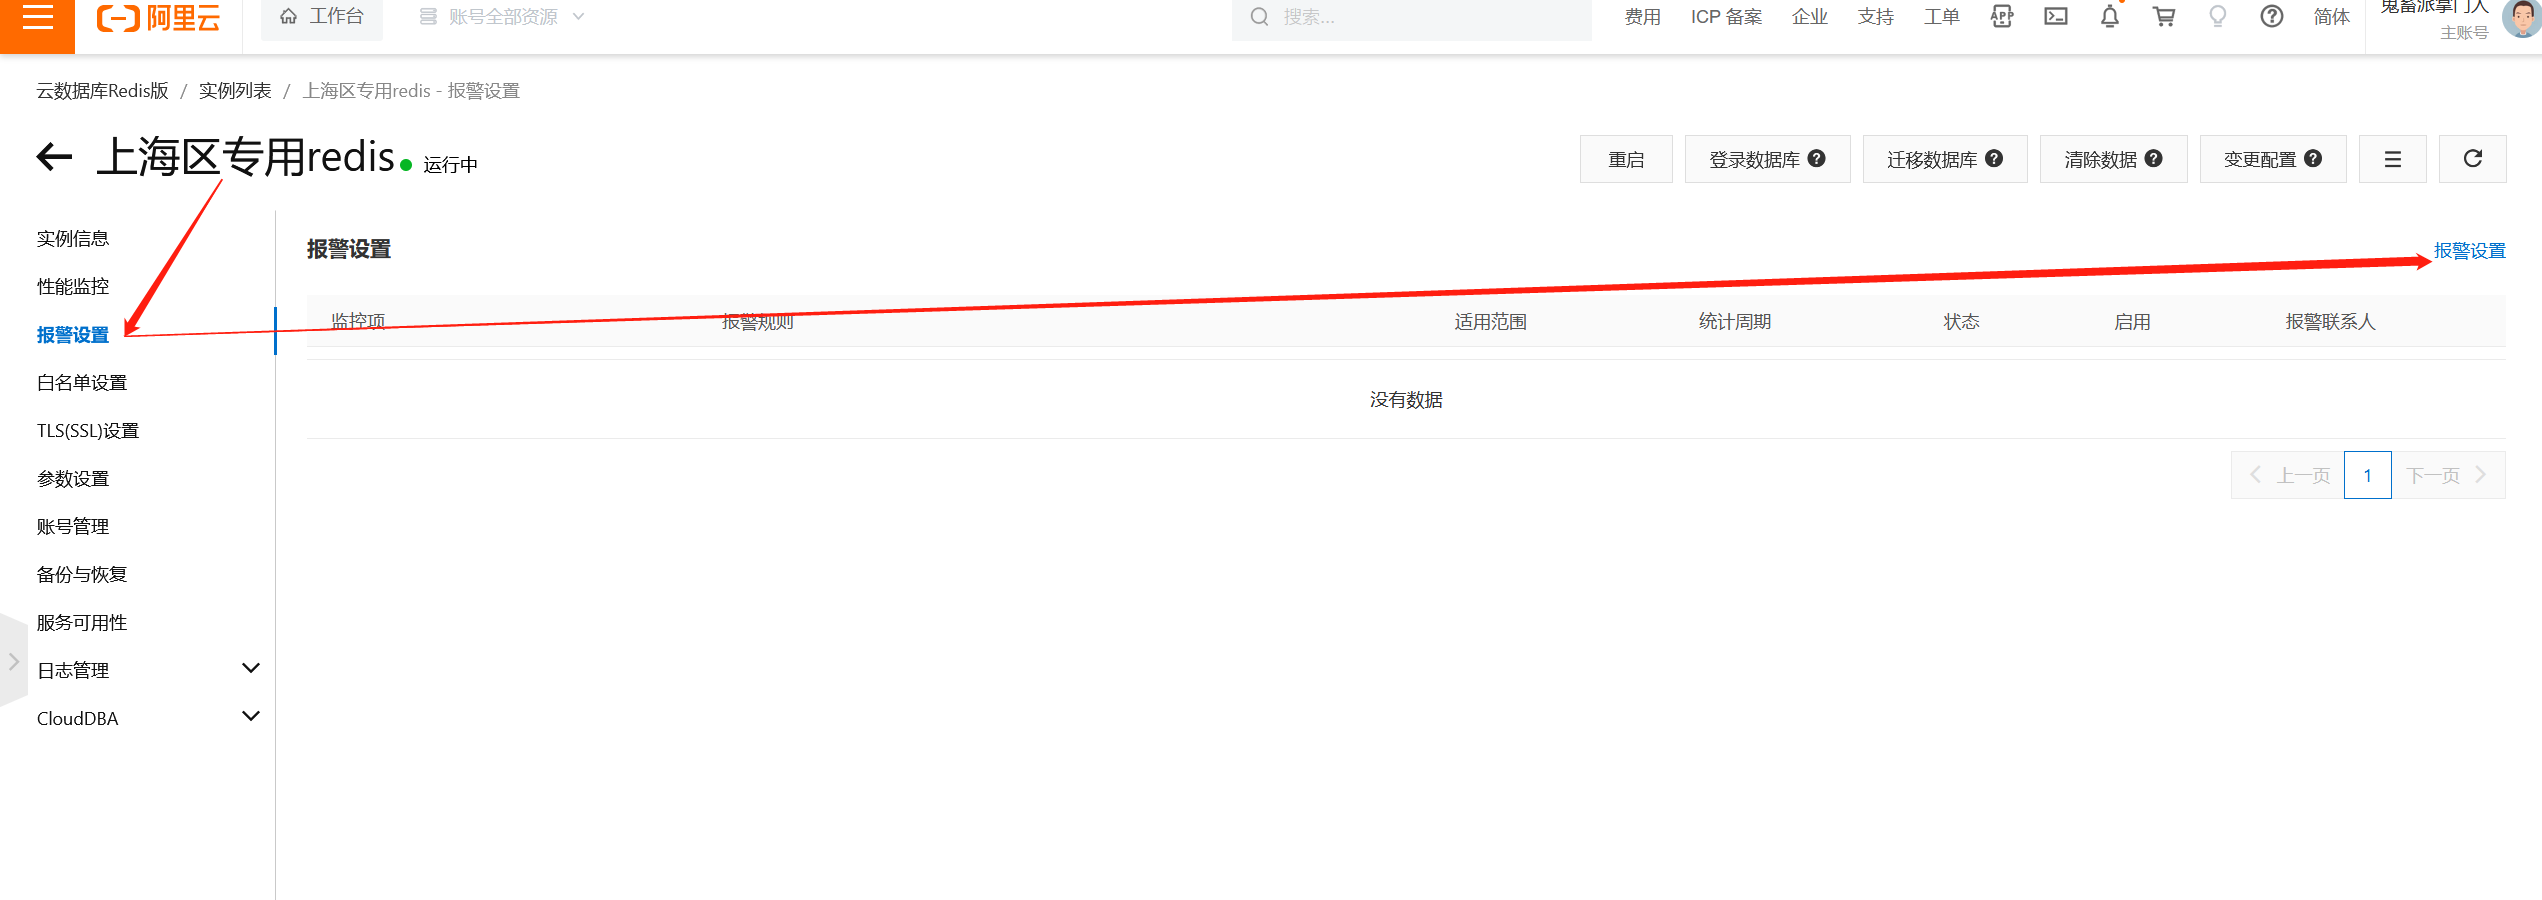
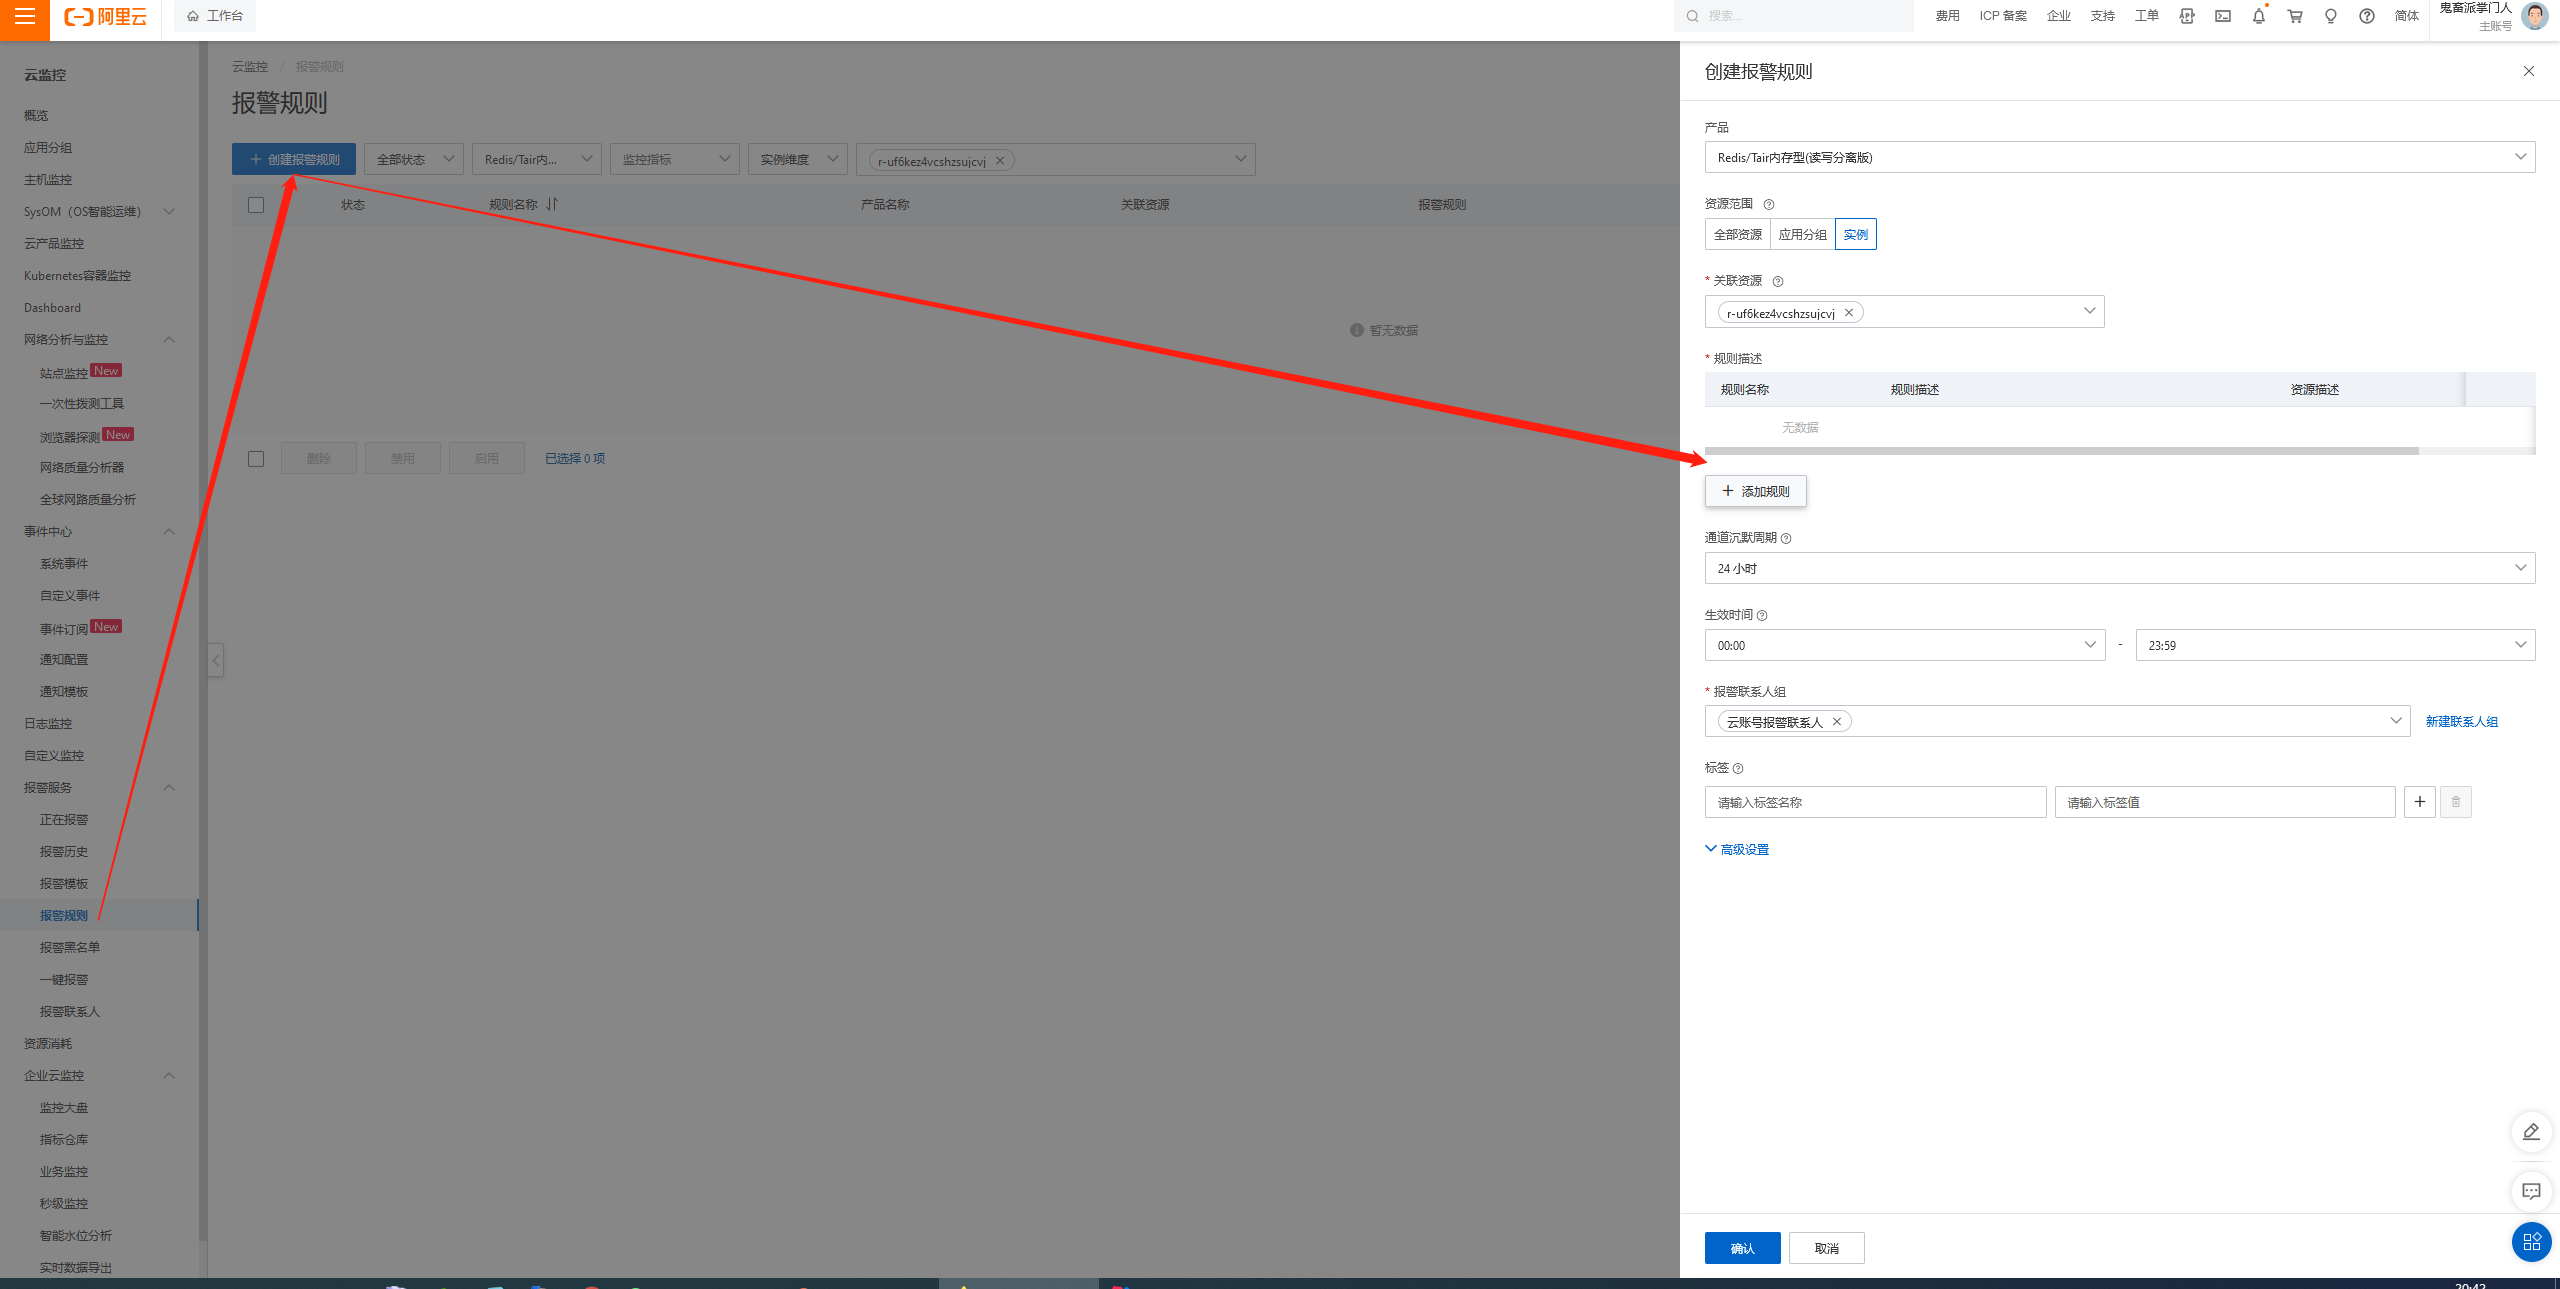
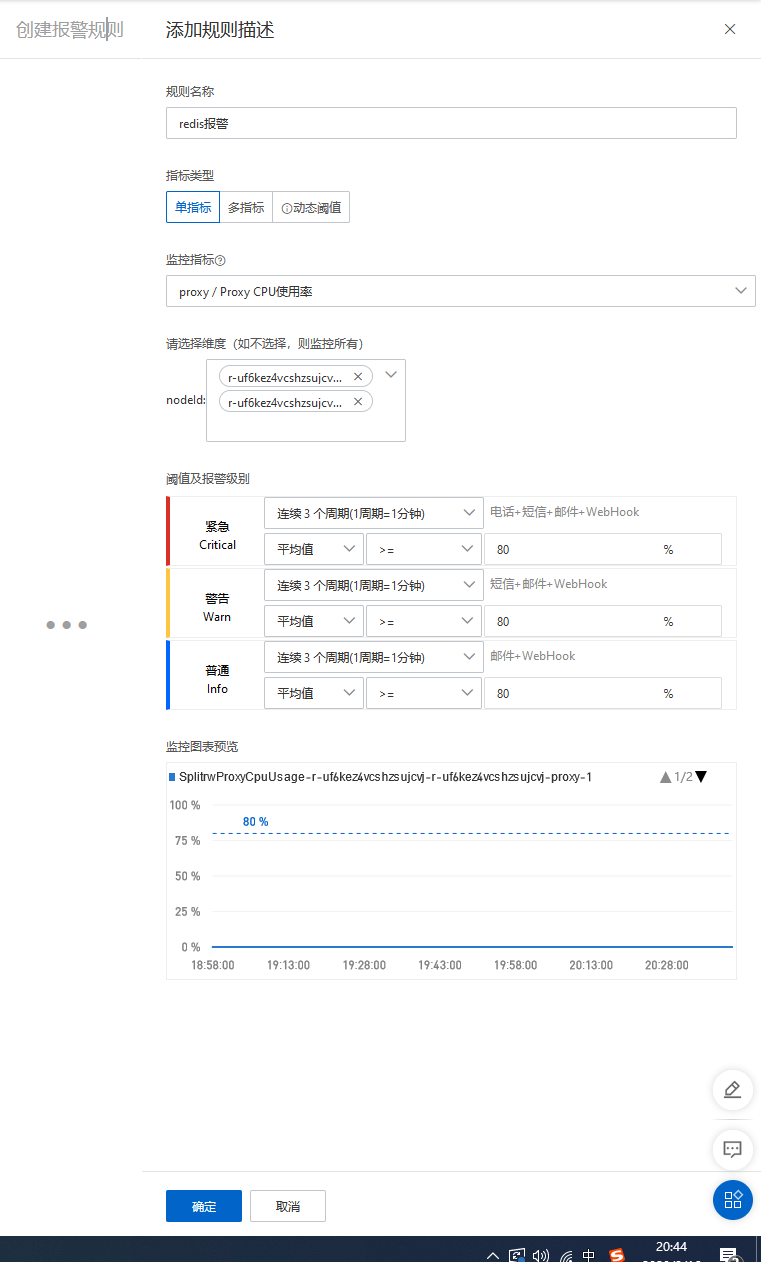
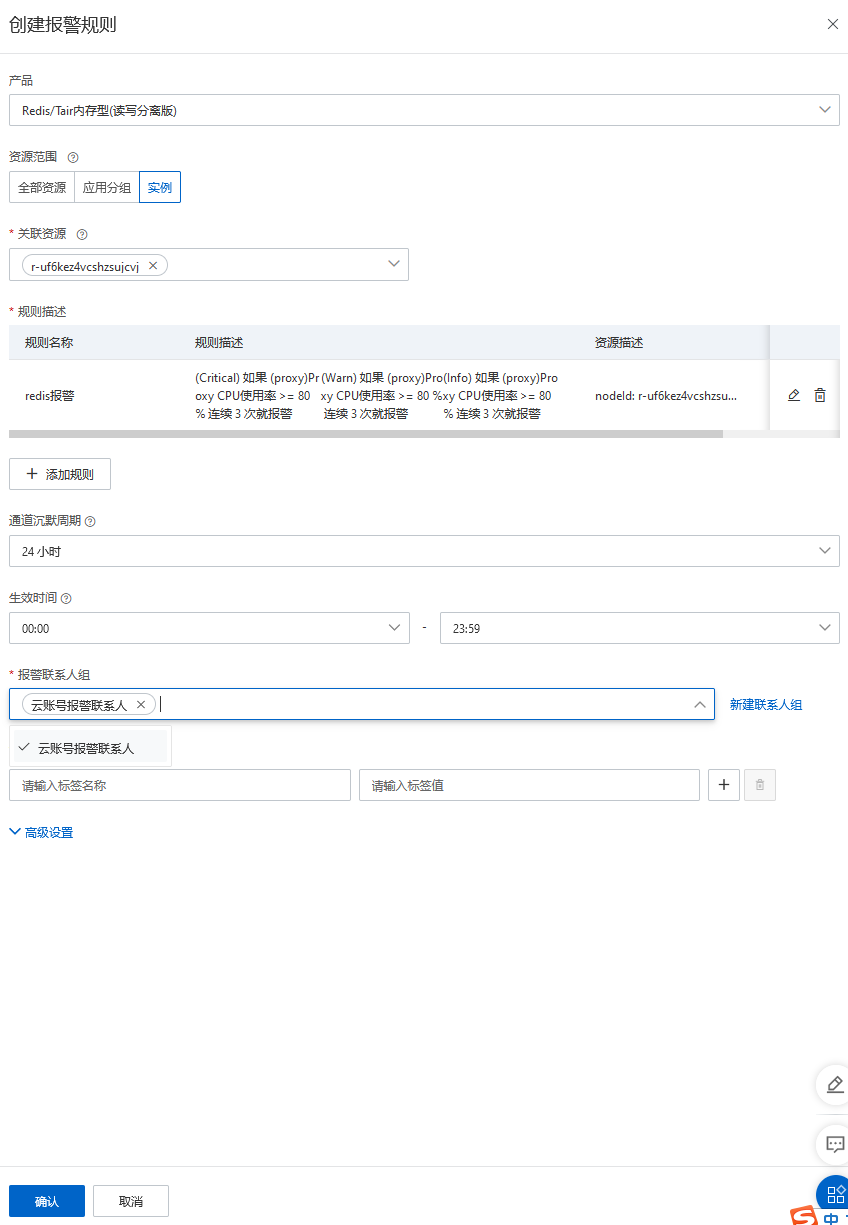
redis的报警规则

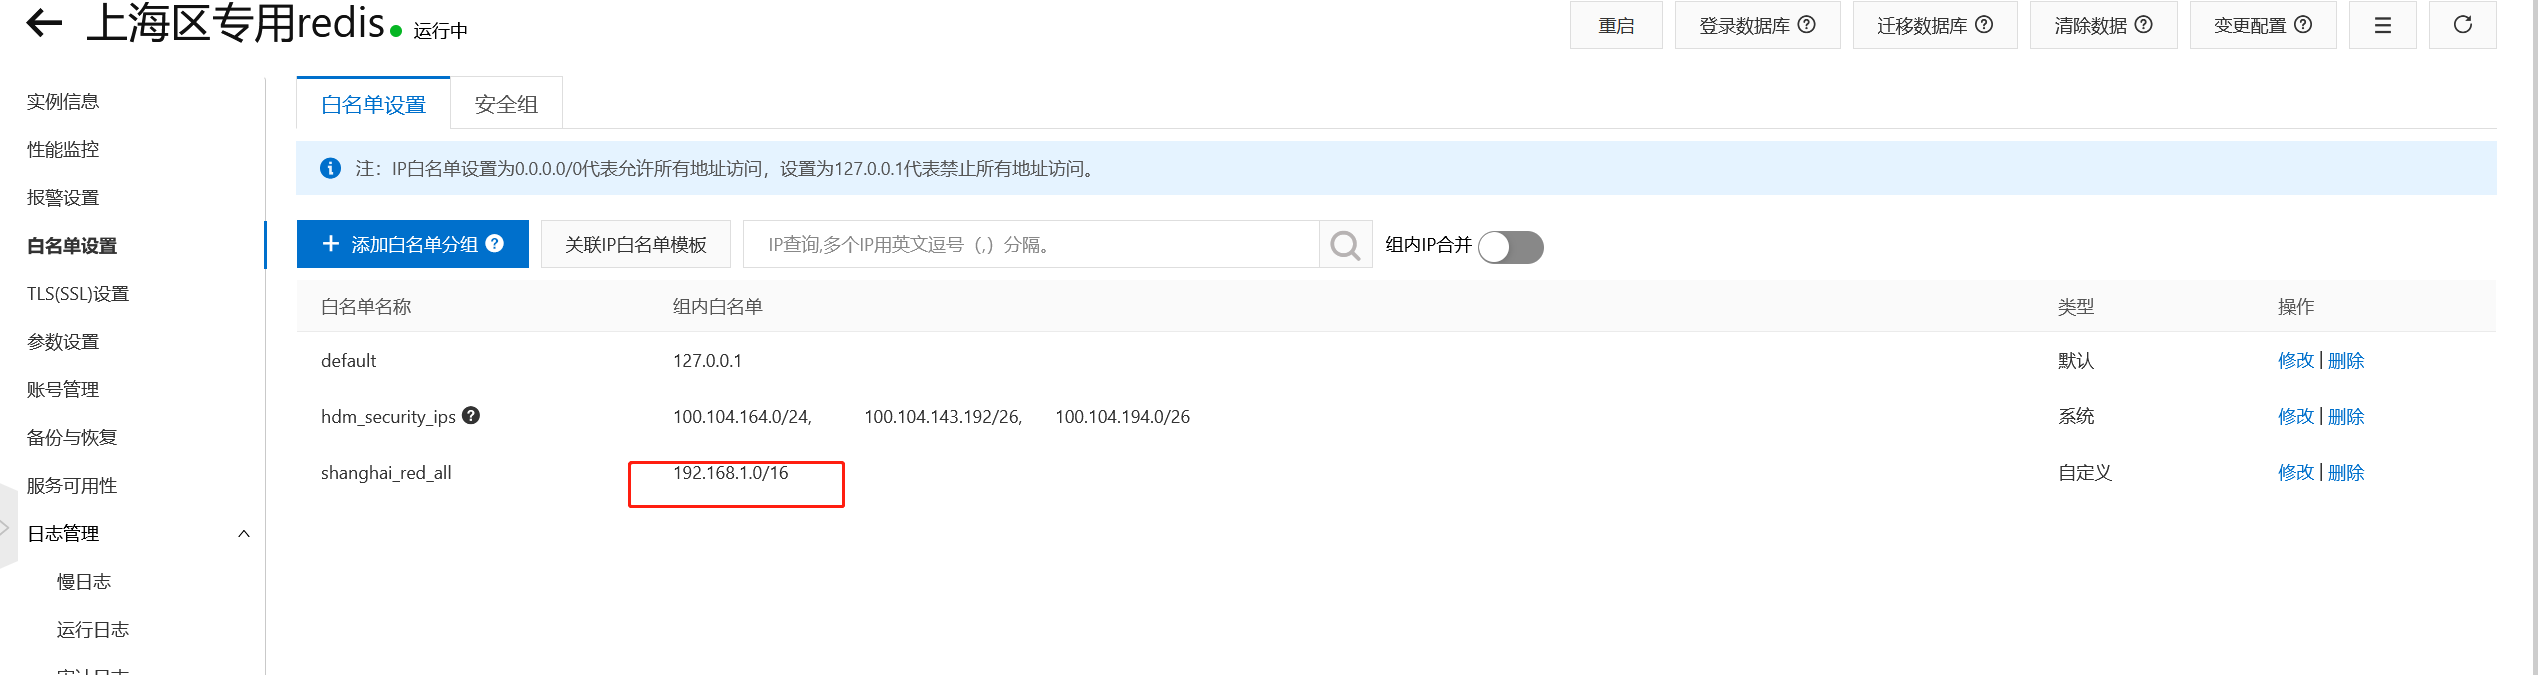
白名单
这里设置和云服务器的一样,可以在同一个网络访问,其他ip即便知道用户名密码和主机ip也无法访问。
1. LAMP 环境
LAMP: Linux + Apache + MySQL + PHP;是php网站开发的基础环境。
前置:
- 1、开通ecs
- 2、centos7.9版本
- 3、可访问公网
- 4、安全组放行 80,3306 端口
1. 安装Apache+PHP
# 安装 Apache
yum install -y httpd
# 启动 Apache 服务 & 设置开机启动
systemctl start httpd# 安装 php5.6。
rpm -Uvh https://mirror.webtatic.com/yum/el7/epel-release.rpm
rpm -Uvh https://mirror.webtatic.com/yum/el7/webtatic-release.rpm
yum install -y php56w.x86_64 php56w-cli.x86_64 php56w-common.x86_64 php56w-gd.x86_64 php56w-imap.x86_64 php56w-ldap.x86_64 php56w-mysql.x86_64 php56w-pdo.x86_64 php56w-odbc.x86_64 php56w-process.x86_64 php56w-xml.x86_64 php56w-xmlrpc.x86_64#重启httpd服务
systemctl restart httpd
如果搭配Nginx + PHP 则可以安装php7.3;
# 安装php7.3
## 运行以下命令,添加EPEL源。
yum install -y https://rpms.remirepo.net/enterprise/remi-release-7.rpm
yum install -y --enablerepo=remi-php73 php php-fpm php-mysqlnd php-cli
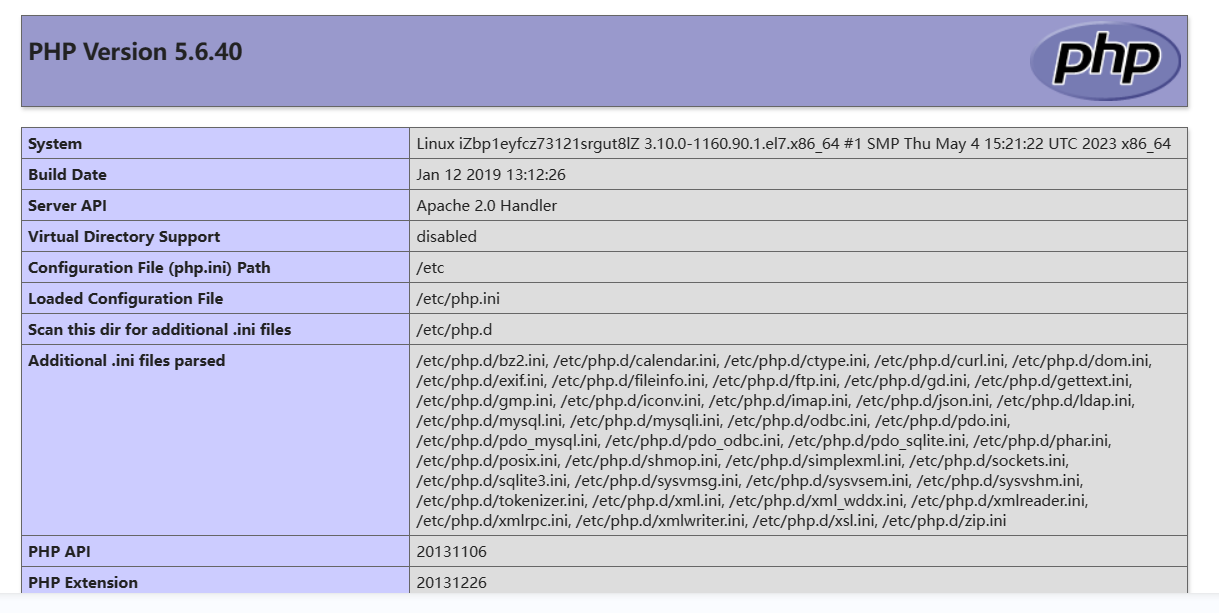
测试PHP是否安装成功
vim /var/www/html/info.php
#内容如下
<?php
phpinfo();
?>#重启服务器
systemctl restart httpd#访问 http://你的ip/info.php; 出现下面页面则代表php安装成功
2. 安装MySQL
#准备目录
mkdir -p /opt/db
cd /opt/db/### 安装 MySQL 5.6:
wget http://repo.mysql.com/mysql-community-release-el6-5.noarch.rpm
rpm -ivh mysql-community-release-el6-5.noarch.rpm
yum repolist all | grep mysql
yum install mysql-community-server -y#启动mysql
systemctl start mysqld#初始化mysql,一路yes即可,要记住自己新设置的密码
mysql_secure_installation#创建初始数据库&授予权限
mysql -uroot -p
create database db_wordpress character set utf8 collate utf8_bin;
grant all on db_wordpress.* to user_wp@'localhost' identified by '123456';
grant all on db_wordpress.* to user_wp@'%' identified by '123456';
3. WordPress安装
#下载
mkdir -p /opt/WP
cd /opt/WP
wget https://cn.wordpress.org/latest-zh_CN.tar.gz
tar -xzvf latest-zh_CN.tar.gz#把word_press代码复制到 /var/www/html 下,/var/www/html是php的网站目录
cd /var/www/html
cp -rf /opt/WP/wordpress/* /var/www/html/###########配置 wordpress 访问 MYSQL
cd /var/www/html/
cp wp-config-sample.php wp-config.php
vim wp-config.php##内容如下,注意修改为自己之前安装的MySQL的账号密码以及端口号
<?php
/*** The base configuration for WordPress** The wp-config.php creation script uses this file during the installation.* You don't have to use the web site, you can copy this file to "wp-config.php"* and fill in the values.** This file contains the following configurations:** * Database settings* * Secret keys* * Database table prefix* * ABSPATH** @link https://wordpress.org/documentation/article/editing-wp-config-php/** @package WordPress*/// ** Database settings - You can get this info from your web host ** //
/** The name of the database for WordPress */
define( 'DB_NAME', 'db_wordpress' );/** Database username */
define( 'DB_USER', 'user_wp' );/** Database password */
define( 'DB_PASSWORD', '123456' );/** Database hostname */
define( 'DB_HOST', 'localhost' );/** Database charset to use in creating database tables. */
define( 'DB_CHARSET', 'utf8mb4' );/** The database collate type. Don't change this if in doubt. */
define( 'DB_COLLATE', '' );/**#@+* Authentication unique keys and salts.** Change these to different unique phrases! You can generate these using* the {@link https://api.wordpress.org/secret-key/1.1/salt/ WordPress.org secret-key service}.** You can change these at any point in time to invalidate all existing cookies.* This will force all users to have to log in again.** @since 2.6.0*/
define( 'AUTH_KEY',         ' ,kh+tKQ!*XlrMd)M)3}nn(i(Y+Kke[3KuaTMmuz B($EzqUix_v6X)Cn7QI{]+q' );
define( 'SECURE_AUTH_KEY',  'LiK0-P)]}09@hK%M#9Guiu}Q3]{c{3OTep9r8GFT4lH1tVL7hKQ4f4)YKna~L~Z8' );
define( 'LOGGED_IN_KEY',    'HQAx9M`N<lRusI8]MFDis$}K4)ek-YhK{tN%|Nlh&?:_JGDuU:],hxC}gB}8`7h(' );
define( 'NONCE_KEY',        '$.2`/+0)K#jaZ)V=wVW9j<?NbuCf3xQt*Hsv<|1ShflY:`zi,q{QUdE{A-8r. _m' );
define( 'AUTH_SALT',        'wWMitjd2mt&5P;H+&w_U6!r*3+fh8V[1#}^@km;xVoD7sr1W<k:%O@=Kbr=y&a2 ' );
define( 'SECURE_AUTH_SALT', 'u&!>mA2hpl%}7P%M!*=xHQ*x)XN|dVBJCUQz[wQNyhT}mmk+3-`h(!.].B3ZOkwK' );
define( 'LOGGED_IN_SALT',   '6h:Qh U@ME,-putJ}ViEi{#m=R9~j(YbzihIU)8lL3=@Q$V,<u#+HZ_*t)z7C[ra' );
define( 'NONCE_SALT',       'G.wRp$]0)lOlHc(_&BiB>f~2BcLpM}kIjqU[ fDT|?|B]W3=Ez,:RZT%)v&W@w_>' );/**#@-*//*** WordPress database table prefix.** You can have multiple installations in one database if you give each* a unique prefix. Only numbers, letters, and underscores please!*/
$table_prefix = 'wp_';/*** For developers: WordPress debugging mode.** Change this to true to enable the display of notices during development.* It is strongly recommended that plugin and theme developers use WP_DEBUG* in their development environments.** For information on other constants that can be used for debugging,* visit the documentation.** @link https://wordpress.org/documentation/article/debugging-in-wordpress/*/
define( 'WP_DEBUG', false );/* Add any custom values between this line and the "stop editing" line. *//* That's all, stop editing! Happy publishing. *//** Absolute path to the WordPress directory. */
if ( ! defined( 'ABSPATH' ) ) {define( 'ABSPATH', __DIR__ . '/' );
}/** Sets up WordPress vars and included files. */
require_once ABSPATH . 'wp-settings.php';
访问:http://47.99.217.185 初始化WordPress;
后台地址:http://47.99.217.185/wp-login.php
博客地址:http://47.99.217.185
4. Docker安装
1. 安装
#卸载旧版本Docker
sudo yum remove docker \docker-client \docker-client-latest \docker-common \docker-latest \docker-latest-logrotate \docker-logrotate \docker-engine#配置docker源
sudo yum install -y yum-utils
sudo yum-config-manager --add-repo https://download.docker.com/linux/centos/docker-ce.repo#安装新版Docker,  docker compose; 允许写一个yaml配置文件,写清楚用哪些镜像启动哪些容器。
sudo yum install -y docker-ce docker-ce-cli containerd.io docker-buildx-plugin docker-compose-plugin#启动 & 开机自启
sudo systemctl enable docker --now#配置镜像加速
sudo mkdir -p /etc/docker
sudo tee /etc/docker/daemon.json <<-'EOF'
{"registry-mirrors": ["https://82m9ar63.mirror.aliyuncs.com"]
}
EOF
sudo systemctl daemon-reload
sudo systemctl restart docker
2. 常用命令
#docker常用命令
docker exec -it 容器id bash#启动
docker compose -f xxx.yaml up -d #得到volume 的具体位置
docker volume inspect 你的volume名字
#列出docker所有挂载的卷
docker volume ls
3. MySQL、Redis安装
安装MySQL和Redis的compose文件
services:mysql:image: 'mysql:latest'restart: alwaysenvironment:- 'MYSQL_DATABASE=mydatabase'- 'MYSQL_PASSWORD=secret'- 'MYSQL_ROOT_PASSWORD=verysecret'- 'MYSQL_USER=myuser'volumes:- /opt/mysql:/etc/mysql/conf.d #只要在外部的/opt/mysql目录下随便放一个 xx.cnf 文件,mysql自动把他当成配置文件ports:- '33066:3306'redis:image: redis:latestvolumes:- /opt/redis/redis.conf:/usr/local/etc/redis/redis.confcommand: redis-server /usr/local/etc/redis/redis.confrestart: alwaysports:- '7379:6379'
允许root远程访问(新版MySQL无需设置)
#mysql开启远程连接
docker exec -it 你的mysql容器id bash
mysql -uroot -p你的密码
GRANT ALL PRIVILEGES ON *.* TO 'root'@'%' WITH GRANT OPTION;
FLUSH PRIVILEGES;#修改mysql配置文件,在[mysqld]下面加上一句话
bind-address    = 0.0.0.0
#后台启动jar应用,并且把所有日志都写到 log.txt
nohup java -jar your-jar-file.jar > log.txt 2>&1 &
5. 1Panel
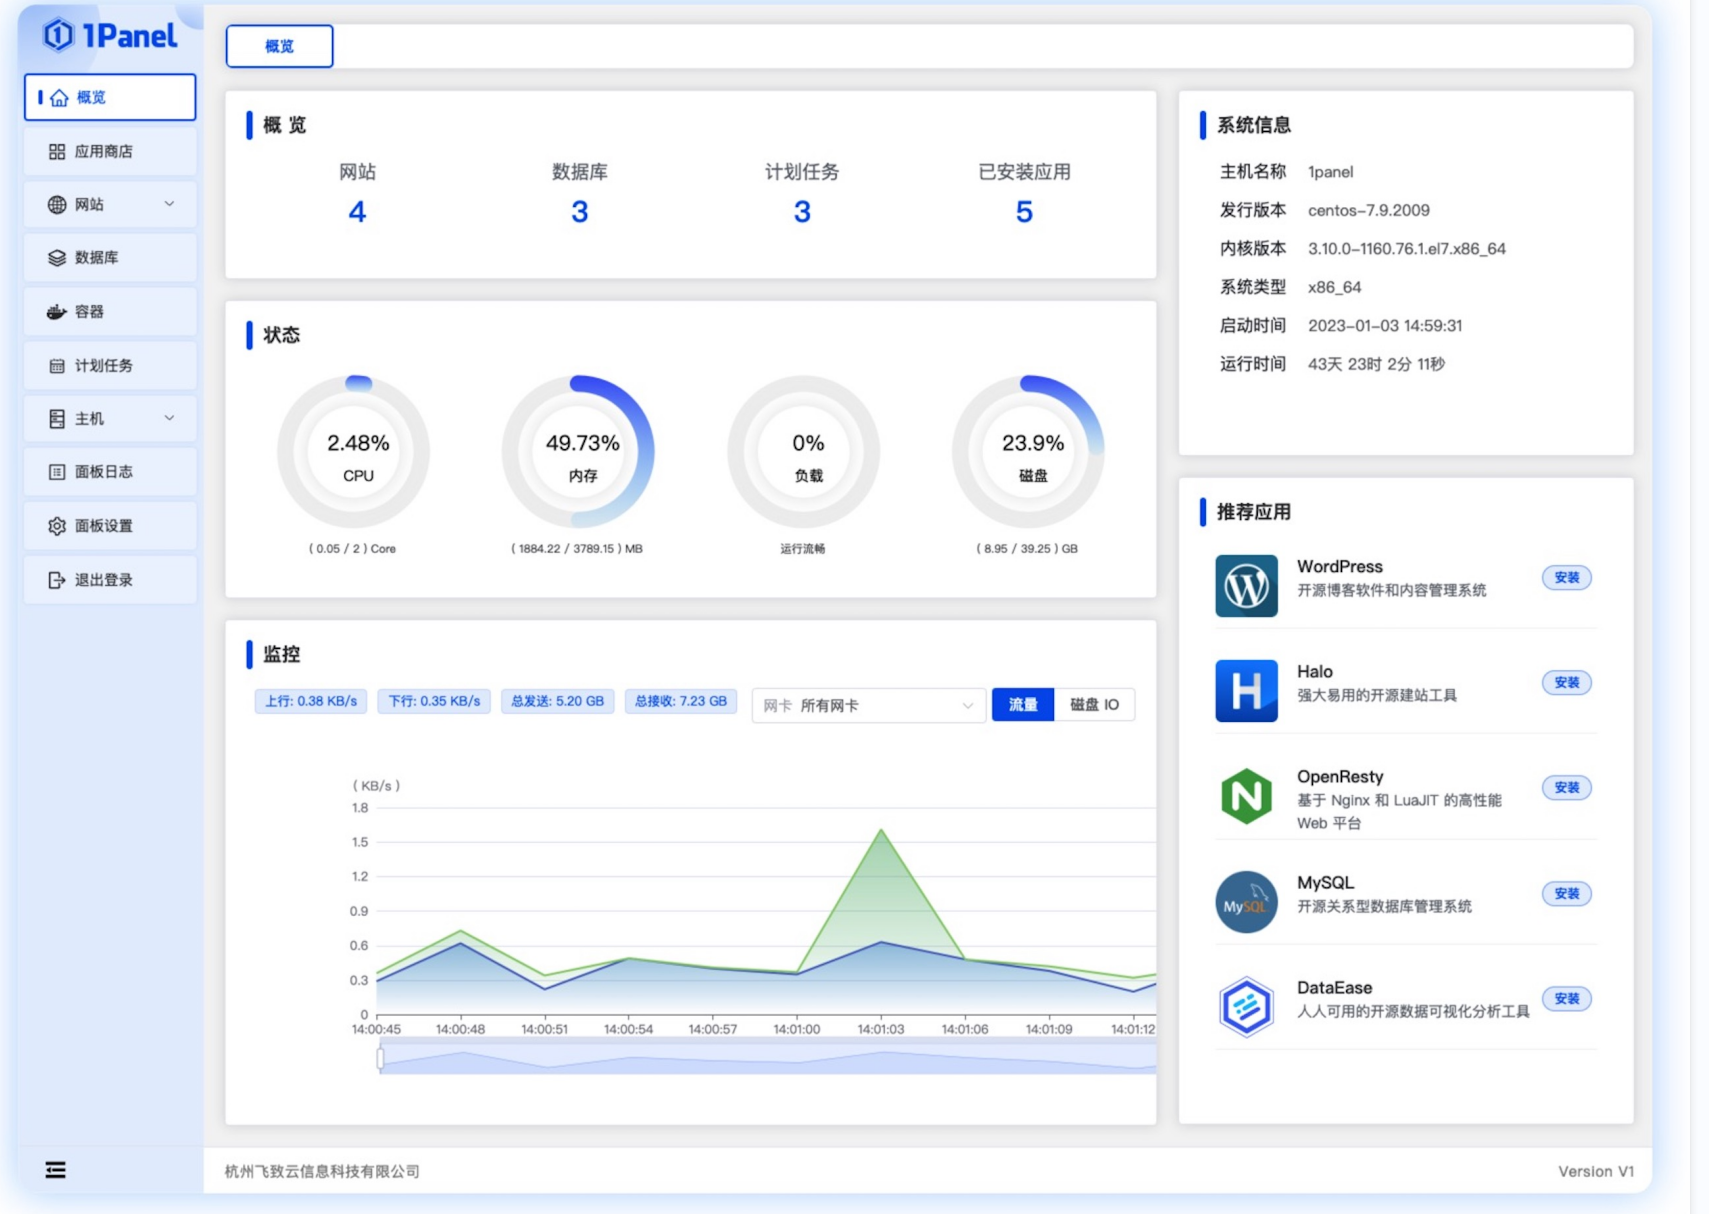
1. 简介
1Panel 是一个现代化、开源的 Linux 服务器运维管理面板。适合小型公司快速运维需求。
2. 安装
curl -sSL https://resource.fit2cloud.com/1panel/package/quick_start.sh -o quick_start.sh && sh quick_start.sh
根据引导创建,安装完成后记得放行防火墙