模版营销型网站怎么做seo优化交流
目录
- 前言
- 1 安装依赖
- 2 安装MySQL
- 3 安装redis
- 4 编译ZLMediaKit
- 代码及依赖下载
- 编译
- 运行(如果要运行wvp整个项目,这步可以先不执行)
- 5 编译wvp-pro
- 下载源码(建议从github上下载,gitee上维护有时候不是很同步)
- 编译前端界面
- 打包项目, 生成可执行jar
- 6 创建wvp数据库
- 7 配置文件修改
- ZLMediaKit
- WVP配置文件
- 8 启动服务
- 启动ZML
- wvp服务启动
- 验证服务
前言
本文基于ZMLMediaKit+WVP-PRO进行编译部署GB28181平台,网上教程也比较多,都大同小异,实际操作过程中容易出错的地方也比较多:redis安装服务密码,mysql安装后密码的修改以及wvp数据可的创建,配置文件侧修改,尤其是和端口相关的项,再就是运行服务时各种错误需要注意,常见的错误已经做了汇总,遇到问题大家不要怕,找到报错的地方查看定位即可。
1 安装依赖
| 依赖 | 版本 | 用途 | 开发环境需要 | 生产环境需要 |
|---|---|---|---|---|
| jdk | >=1.8 | 运行与编译java代码 | 是 | 是 |
| maven | >=3.3 | 管理java代码依赖 | 否 | 否 |
| git | 下载/更新/提交代码 | 否 | 否 | |
| nodejs | 编译于运行前端文件 | 否 | 否 | |
| npm | 管理前端文件依赖 | 否 | 否 |
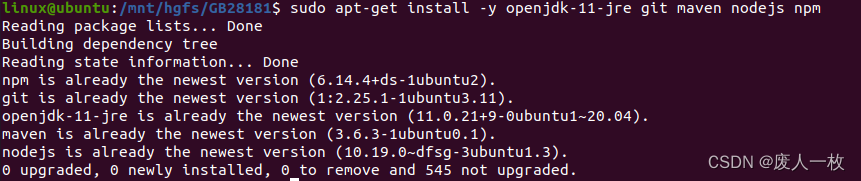
ubuntu环境:
sudo apt-get install -y openjdk-11-jre git maven nodejs npm cmake
centos环境:
yum install -y java-1.8.0-openjdk.x86_64 git maven nodejs npm
2 安装MySQL
在终端执行以下命令:
#安装MySQL服务器 在安装过程中,系统将提示您创建root密码。选择一个安全的,并确保记住它,因为后面需要用到这个密码
sudo apt-get install mysql-server#安装MySQL客户端
sudo apt-get install mysql-client
#运行MySQL初始化安全脚本
sudo mysql_secure_installation
初始化安全脚本参考以下:
linux@ubuntu:/mnt/hgfs/GB28181$ sudo mysql_secure_installationSecuring the MySQL server deployment.Connecting to MySQL using a blank password.VALIDATE PASSWORD COMPONENT can be used to test passwords
and improve security. It checks the strength of password
and allows the users to set only those passwords which are
secure enough. Would you like to setup VALIDATE PASSWORD component?Press y|Y for Yes, any other key for No: y
There are three levels of password validation policy:LOW    Length >= 8
MEDIUM Length >= 8, numeric, mixed case, and special characters
STRONG Length >= 8, numeric, mixed case, special characters and dictionary                  filePlease enter 0 = LOW, 1 = MEDIUM and 2 = STRONG: 0Skipping password set for root as authentication with auth_socket is used by default.
If you would like to use password authentication instead, this can be done with the "ALTER_USER" command.
See https://dev.mysql.com/doc/refman/8.0/en/alter-user.html#alter-user-password-management for more information.By default, a MySQL installation has an anonymous user,
allowing anyone to log into MySQL without having to have
a user account created for them. This is intended only for
testing, and to make the installation go a bit smoother.
You should remove them before moving into a production
environment.Remove anonymous users? (Press y|Y for Yes, any other key for No) : y
Success.Normally, root should only be allowed to connect from
'localhost'. This ensures that someone cannot guess at
the root password from the network.Disallow root login remotely? (Press y|Y for Yes, any other key for No) : n... skipping.
By default, MySQL comes with a database named 'test' that
anyone can access. This is also intended only for testing,
and should be removed before moving into a production
environment.Remove test database and access to it? (Press y|Y for Yes, any other key for No) : y- Dropping test database...
Success.- Removing privileges on test database...
Success.Reloading the privilege tables will ensure that all changes
made so far will take effect immediately.Reload privilege tables now? (Press y|Y for Yes, any other key for No) : y
Success.All done!
查看数据库运行状态
linux@ubuntu:/mnt/hgfs/GB28181$ systemctl status mysql.service
运行结果如下:
● mysql.service - MySQL Community ServerLoaded: loaded (/lib/systemd/system/mysql.service; enabled; vendor preset: enabled)Active: active (running) since Sun 2024-02-25 00:18:58 PST; 12min agoMain PID: 20851 (mysqld)Status: "Server is operational"Tasks: 38 (limit: 2227)Memory: 364.0MCGroup: /system.slice/mysql.service└─20851 /usr/sbin/mysqldFeb 25 00:18:58 ubuntu systemd[1]: Starting MySQL Community Server...
Feb 25 00:18:58 ubuntu systemd[1]: Started MySQL Community Server.
设置密码:这里我设置为 12345678
sudo mysql
ALTER USER ‘root’@‘localhost’ IDENTIFIED WITH mysql_native_password BY ‘12345678’;

3 安装redis
参见【Redis】安装与部署-Ubuntu
4 编译ZLMediaKit
代码及依赖下载
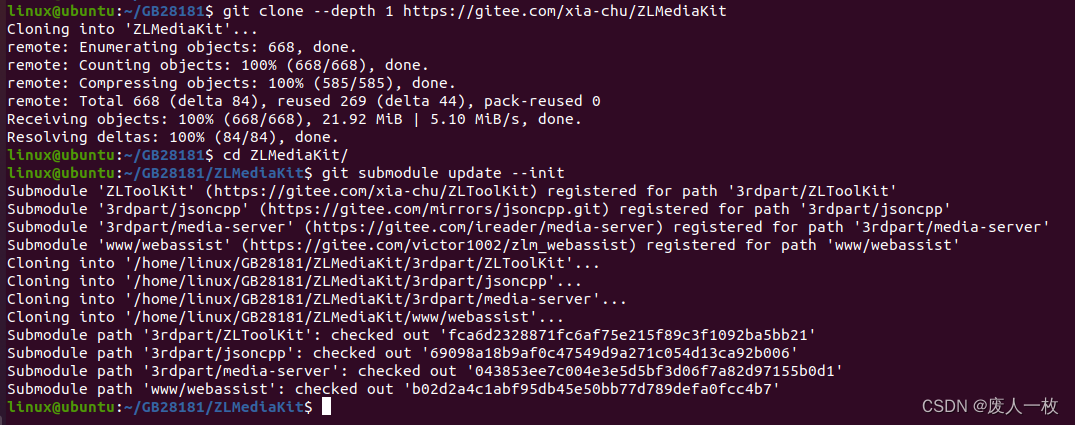
注意:务必使用git克隆ZLMediaKit的代码,因为ZLMediaKit依赖于第三方代码,zip包不会下载第三方依赖源码
# 国内用户推荐从同步镜像网站gitee下载
git clone --depth 1 https://gitee.com/xia-chu/ZLMediaKit
cd ZLMediaKit
# 千万不要忘记执行这句命令
git submodule update --init
编译
mkdir build
cd build
cmake ..
make -j4

编译成功后,生成的可执行文件路径在release目录下

运行(如果要运行wvp整个项目,这步可以先不执行)
cd ZLMediaKit/release/linux/Debug
./MediaServer
5 编译wvp-pro
下载源码(建议从github上下载,gitee上维护有时候不是很同步)
从gitee克隆
git clone https://gitee.com/pan648540858/wvp-GB28181-pro.git
从github克隆
git clone https://github.com/648540858/wvp-GB28181-pro.git
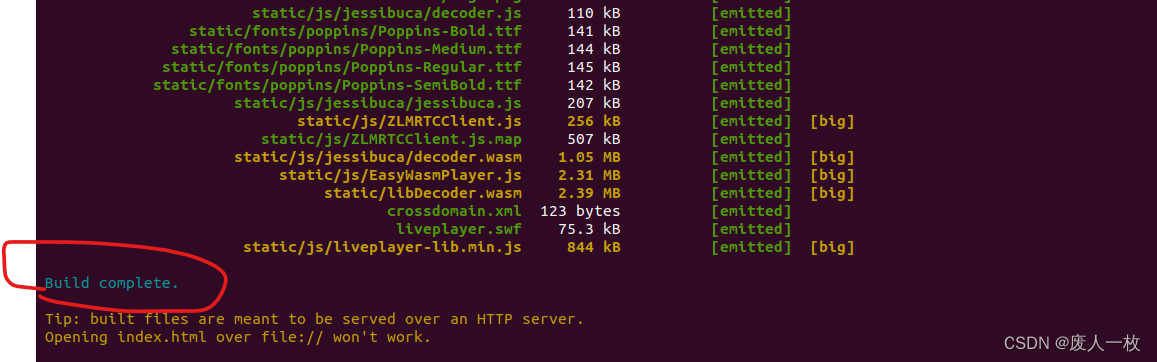
编译前端界面
cd wvp-GB28181-pro/web_src/
npm --registry=https://registry.npm.taobao.org install
npm run build
ps报错:
一般都是网络问题, 导致的依赖包下载失败, --registry=https://registry.npmmirror.com install 重新尝试
成功:

打包项目, 生成可执行jar
在wvp-GB28181-pro目录下执行
cd wvp-GB28181-pro
mvn package

编译如果报错, 一般都是网络问题, 导致的依赖包下载失败
编译完成后在target目录下出现wvp-pro-***.jar文件即可

6 创建wvp数据库
在MySql中创建一个名字为wvp的数据库,并在wvp数据库中执行wvp-GB28181-pro/sql/下的mysql.sql脚本创建表结构
连接mysql数据库,输入密码:
mysql -u root -p
新建一个名字为wvp的数据库:
mysql>CREATE DATABASE wvp;
这里可以用以下命令查看数据库:
mysql>show databases;
使用这个数据库:
mysql>use wvp;
执行数据库脚本
这里按照自己的路径进行修改
mysql>source /home/linux/GB28181/wvp-GB28181-pro/数据库/初始化-mysql.sql

查看表是否生成

7 配置文件修改
ZLMediaKit
文件位置:/home/linux/GB28181/ZLMediaKit/release/linux/Debug/config.ini

记录下http port和mediaServerId,这里原本的mediaServerId=your_server_id,将其修改为自己的id即可,可以随意命名,但是需要和后面wvp配置文件中的media中的id保持一致。这里采用的的是wvp配置文件application.yml中默认的id。http port也可以自定义更改。同理,conf文件和application文件中要保持一致。
[http]
port=8088
[general]
mediaServerId=wvp_server

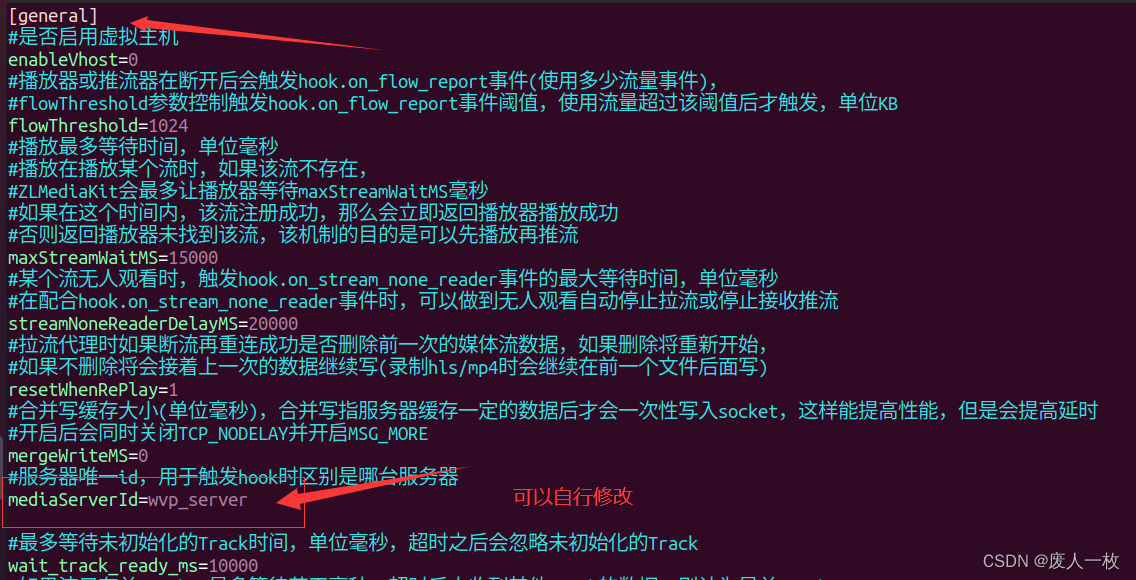
完整配置文件参考:
; auto-generated by mINI class {[api]
apiDebug=1
defaultSnap=./www/logo.png
downloadRoot=./www
secret=qVE5Hxl8N7OtLL6J5TGRImztPcP9kkka
snapRoot=./www/snap/[cluster]
origin_url=
retry_count=3
timeout_sec=15[ffmpeg]
bin=/usr/bin/ffmpeg
cmd=%s -re -i %s -c:a aac -strict -2 -ar 44100 -ab 48k -c:v libx264 -f flv %s
log=./ffmpeg/ffmpeg.log
restart_sec=0
snap=%s -i %s -y -f mjpeg -frames:v 1 -an %s[general]
check_nvidia_dev=1
enableVhost=0
enable_ffmpeg_log=0
flowThreshold=1024
maxStreamWaitMS=15000
mediaServerId=wvp_server
mergeWriteMS=0
resetWhenRePlay=1
streamNoneReaderDelayMS=20000
unready_frame_cache=100
wait_add_track_ms=3001
wait_track_ready_ms=10000[hls]
broadcastRecordTs=0
deleteDelaySec=10
fastRegister=0
fileBufSize=65536
segDelay=0
segDur=2
segKeep=0
segNum=3
segRetain=5[hook]
alive_interval=10.0
enable=0
on_flow_report=
on_http_access=
on_play=
on_publish=
on_record_mp4=
on_record_ts=
on_rtp_server_timeout=
on_rtsp_auth=
on_rtsp_realm=
on_send_rtp_stopped=
on_server_exited=
on_server_keepalive=
on_server_started=
on_shell_login=
on_stream_changed=
on_stream_none_reader=
on_stream_not_found=
retry=1
retry_delay=3.0
stream_changed_schemas=rtsp/rtmp/fmp4/ts/hls/hls.fmp4
timeoutSec=10[http]
allow_cross_domains=1
allow_ip_range=::1,127.0.0.1,172.16.0.0-172.31.255.255,192.168.0.0-192.168.255.255,10.0.0.0-10.255.255.255
charSet=utf-8
dirMenu=1
forbidCacheSuffix=
forwarded_ip_header=
keepAliveSecond=30
maxReqSize=40960
notFound=<html><head><title>404 Not Found</title></head><body bgcolor="white"><center><h1>您访问的资源不存在!</h1></center><hr><center>ZLMediaKit(git hash:87cb488/2024-02-19T11:54:13+08:00,branch:master,build time:2024-02-25T00:46:44)</center></body></html>
port=8088
rootPath=./www
sendBufSize=65536
sslport=443
virtualPath=[multicast]
addrMax=239.255.255.255
addrMin=239.0.0.0
udpTTL=64[protocol]
add_mute_audio=1
auto_close=0
continue_push_ms=15000
enable_audio=1
enable_fmp4=1
enable_hls=1
enable_hls_fmp4=0
enable_mp4=0
enable_rtmp=1
enable_rtsp=1
enable_ts=1
fmp4_demand=0
hls_demand=0
hls_save_path=./www
modify_stamp=2
mp4_as_player=0
mp4_max_second=3600
mp4_save_path=./www
paced_sender_ms=0
rtmp_demand=0
rtsp_demand=0
ts_demand=0[record]
appName=record
fastStart=0
fileBufSize=65536
fileRepeat=0
sampleMS=500[rtc]
externIP=
max_bitrate=0
min_bitrate=0
port=8000
preferredCodecA=PCMU,PCMA,opus,mpeg4-generic
preferredCodecV=H264,H265,AV1,VP9,VP8
rembBitRate=0
start_bitrate=0
tcpPort=8000
timeoutSec=15[rtmp]
directProxy=1
enhanced=0
handshakeSecond=15
keepAliveSecond=15
port=1935
sslport=0[rtp]
audioMtuSize=600
h264_stap_a=1
lowLatency=0
rtpMaxSize=10
videoMtuSize=1400[rtp_proxy]
dumpDir=
gop_cache=1
h264_pt=98
h265_pt=99
opus_pt=100
port=10000
port_range=30000-35000
ps_pt=96
timeoutSec=15[rtsp]
authBasic=0
directProxy=1
handshakeSecond=15
keepAliveSecond=15
lowLatency=0
port=554
rtpTransportType=-1
sslport=0[shell]
maxReqSize=1024
port=0[srt]
latencyMul=4
pktBufSize=8192
port=9000
timeoutSec=5; } ---
WVP配置文件
WVP配置文件位置
wvp-GB28181-pro/src/main/resources/application-dev.yml
拷贝至target目录下
cp …/src/main/resources/application-dev.yml application.yml

application.yml配置文件的修改
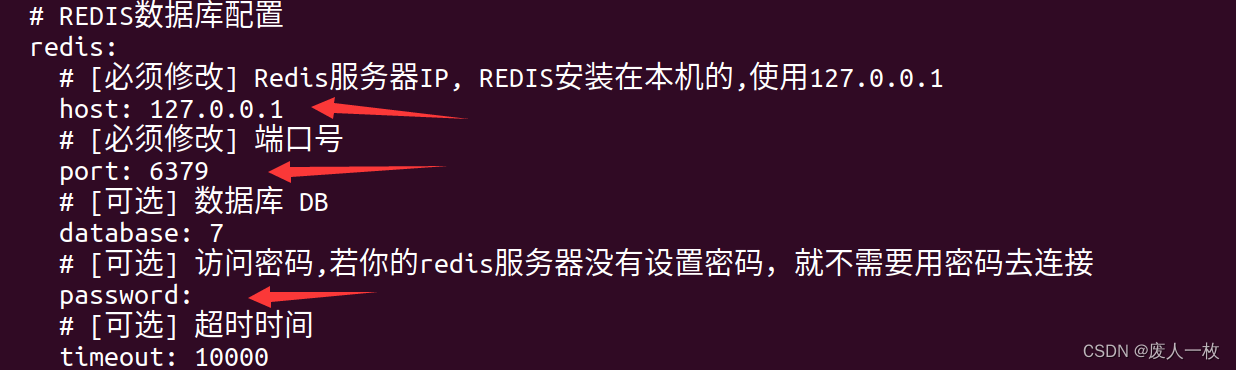
修改redis配置,密码为空
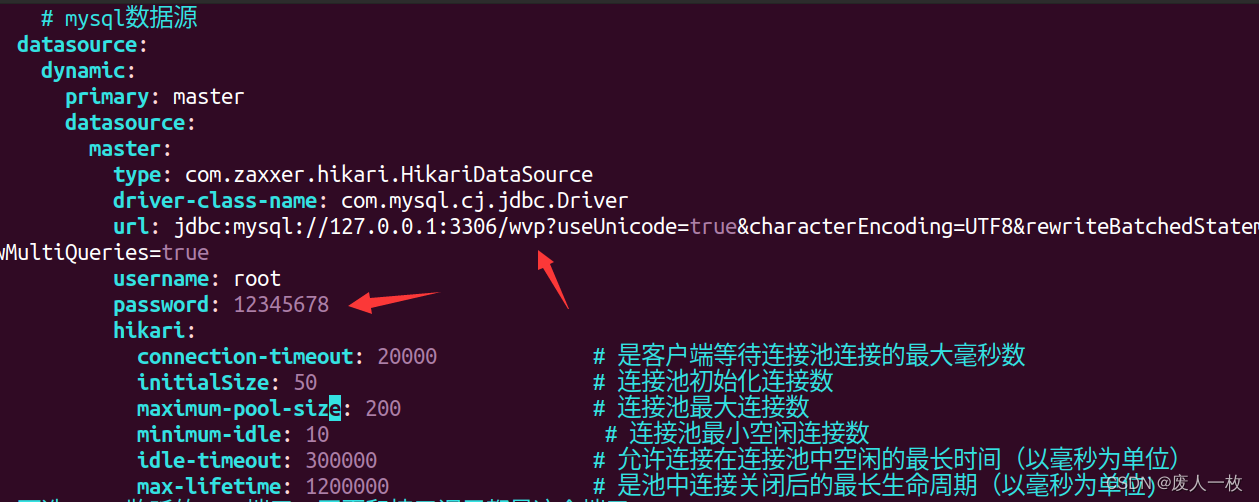
修改MySQL数据库中使用的数据库,即刚刚创建的wvp数据库,修改root密码
修改sip的配置
ip地址为自己虚拟机的ip地址

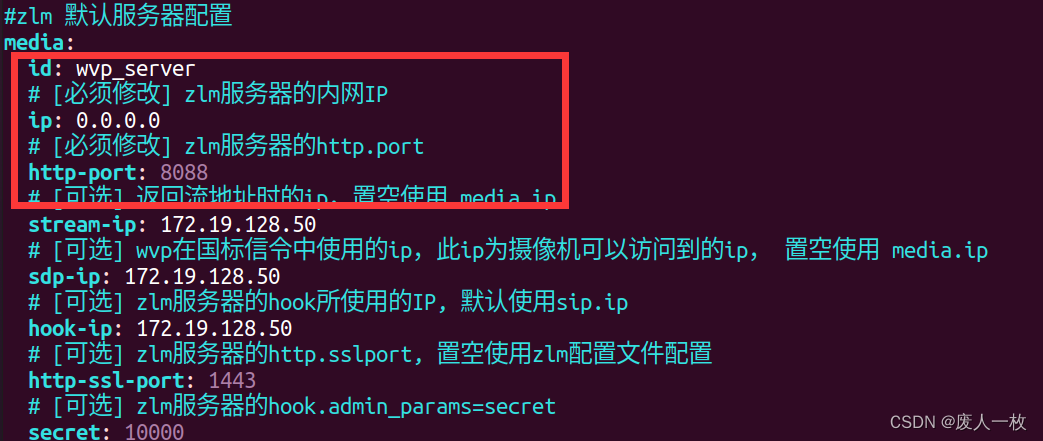
配置ZLMediaKit连接信息
id必须与之前config.ini中的名称一致
ip修改为本虚拟机的IP地址
http的端口号同样与之前config.ini中的端口号一致
完整application.yml 配置参考:
spring:# 设置接口超时时间mvc:async:request-timeout: 20000thymeleaf:cache: false# [可选]上传文件大小限制servlet:multipart:max-file-size: 10MBmax-request-size: 100MB# REDIS数据库配置redis:# [必须修改] Redis服务器IP, REDIS安装在本机的,使用127.0.0.1host: 127.0.0.1# [必须修改] 端口号port: 6379# [可选] 数据库 DBdatabase: 7# [可选] 访问密码,若你的redis服务器没有设置密码,就不需要用密码去连接password: # [可选] 超时时间timeout: 10000# mysql数据源datasource:dynamic:primary: masterdatasource:master:type: com.zaxxer.hikari.HikariDataSourcedriver-class-name: com.mysql.cj.jdbc.Driverurl: jdbc:mysql://127.0.0.1:3306/wvp?useUnicode=true&characterEncoding=UTF8&rewriteBatchedStatements=true&serverTimezone=PRC&useSSL=false&allowMultiQueries=trueusername: rootpassword: 12345678hikari:connection-timeout: 20000             # 是客户端等待连接池连接的最大毫秒数initialSize: 50                       # 连接池初始化连接数maximum-pool-size: 200                # 连接池最大连接数minimum-idle: 10                       # 连接池最小空闲连接数idle-timeout: 300000                  # 允许连接在连接池中空闲的最长时间(以毫秒为单位)max-lifetime: 1200000                 # 是池中连接关闭后的最长生命周期(以毫秒为单位)
#[可选] WVP监听的HTTP端口, 网页和接口调用都是这个端口
server:port: 8080# [可选] HTTPS配置, 默认不开启ssl:# [可选] 是否开启HTTPS访问enabled: false# [可选] 证书文件路径,放置在resource/目录下即可,修改xxx为文件名key-store: classpath:test.monitor.89iot.cn.jks# [可选] 证书密码key-store-password: gpf64qmw# [可选] 证书类型, 默认为jks,根据实际修改key-store-type: JKS# 作为28181服务器的配置
sip:# [必须修改] 本机的IP,对应你的网卡,监听什么ip就是使用什么网卡,# 如果要监听多张网卡,可以使用逗号分隔多个IP, 例如: 192.168.1.4,10.0.0.4# 如果不明白,就使用0.0.0.0,大部分情况都是可以的# 请不要使用127.0.0.1,任何包括localhost在内的域名都是不可以的。ip: 0.0.0.0# [可选] 28181服务监听的端口port: 8116# 根据国标6.1.2中规定,domain宜采用ID统一编码的前十位编码。国标附录D中定义前8位为中心编码(由省级、市级、区级、基层编号组成,参照GB/T 2260-2007)# 后两位为行业编码,定义参照附录D.3# 3701020049标识山东济南历下区 信息行业接入# [可选]domain: 4101050000# [可选]id: 41010500002000000001# [可选] 默认设备认证密码,后续扩展使用设备单独密码, 移除密码将不进行校验password: bajiuwulian1006# 是否存储alarm信息alarm: true#zlm 默认服务器配置
media:id: wvp_server# [必须修改] zlm服务器的内网IPip: 0.0.0.0# [必须修改] zlm服务器的http.porthttp-port: 8088# [可选] 返回流地址时的ip,置空使用 media.ipstream-ip: 172.19.128.50# [可选] wvp在国标信令中使用的ip,此ip为摄像机可以访问到的ip, 置空使用 media.ipsdp-ip: 172.19.128.50# [可选] zlm服务器的hook所使用的IP, 默认使用sip.iphook-ip: 172.19.128.50# [可选] zlm服务器的http.sslport, 置空使用zlm配置文件配置http-ssl-port: 1443# [可选] zlm服务器的hook.admin_params=secretsecret: 10000# 启用多端口模式, 多端口模式使用端口区分每路流,兼容性更好。 单端口使用流的ssrc区分, 点播超时建议使用多端口测试rtp:# [可选] 是否启用多端口模式, 开启后会在portRange范围内选择端口用于媒体流传输enable: true# [可选] 在此范围内选择端口用于媒体流传输, 必须提前在zlm上配置该属性,不然自动配置此属性可能不成功port-range: 50000,50300 # 端口范围# [可选] 国标级联在此范围内选择端口发送媒体流,send-port-range: 50000,50300 # 端口范围# 录像辅助服务, 部署此服务可以实现zlm录像的管理与下载, 0 表示不使用record-assist-port: 18081
# [根据业务需求配置]
user-settings:# 点播/录像回放 等待超时时间,单位:毫秒play-timeout: 180000# [可选] 自动点播, 使用固定流地址进行播放时,如果未点播则自动进行点播, 需要rtp.enable=trueauto-apply-play: true# 设备/通道状态变化时发送消息device-status-notify: true
# [可选] 日志配置, 一般不需要改
logging:config: logback-spring.xml
8 启动服务
启动ZML
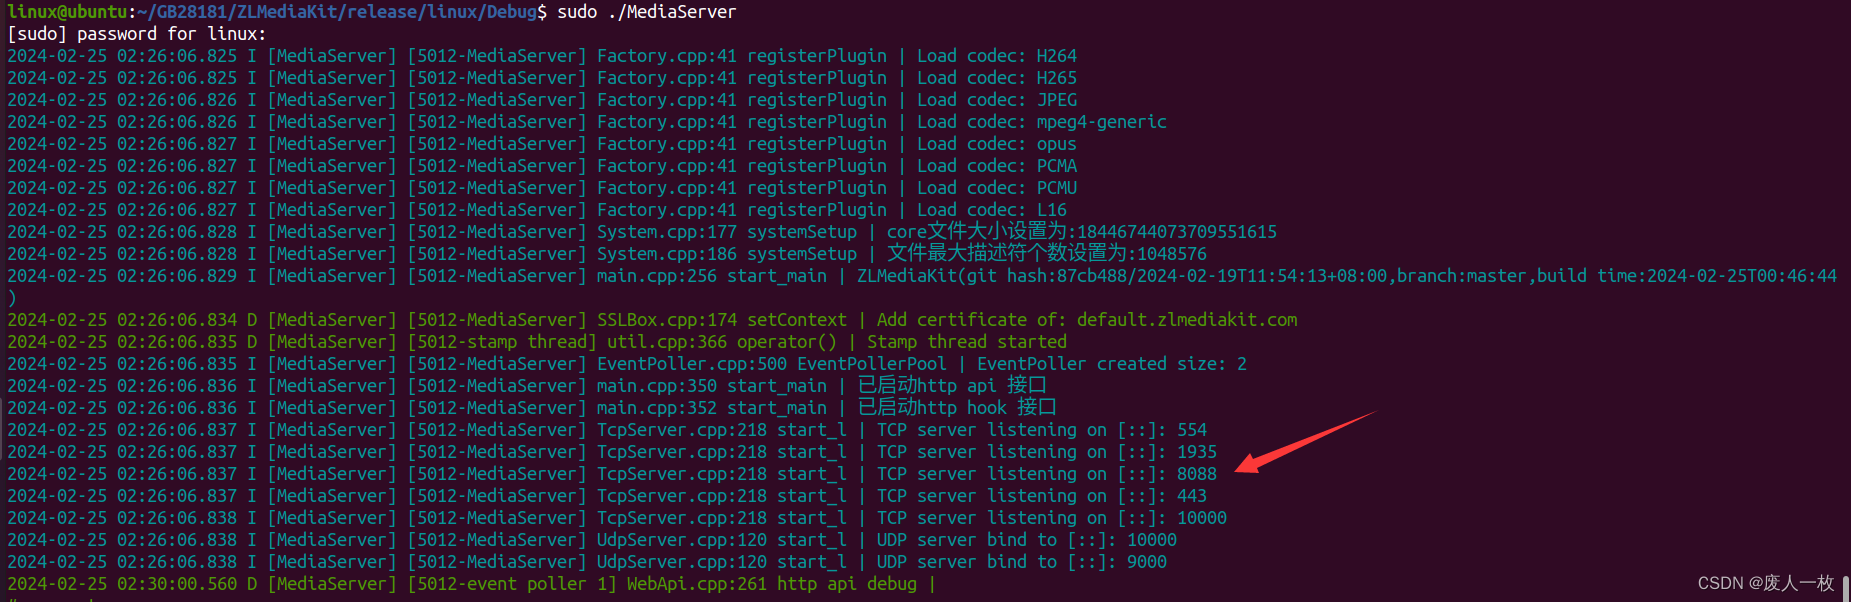
进入~/GB28181/ZLMediaKit/release/linux/Debug下,执行命令
linux@ubuntu:~/GB28181/ZLMediaKit/release/linux/Debug$ sudo ./MediaServer
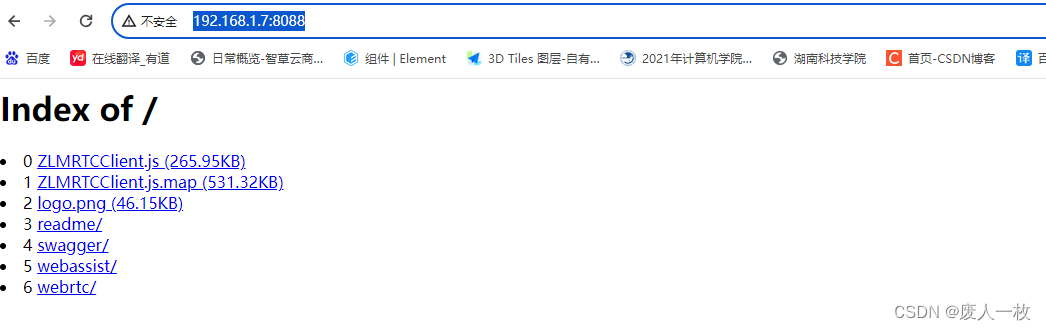
服务启动成功:
浏览器输入:http://192.168.1.7:8088/
wvp服务启动
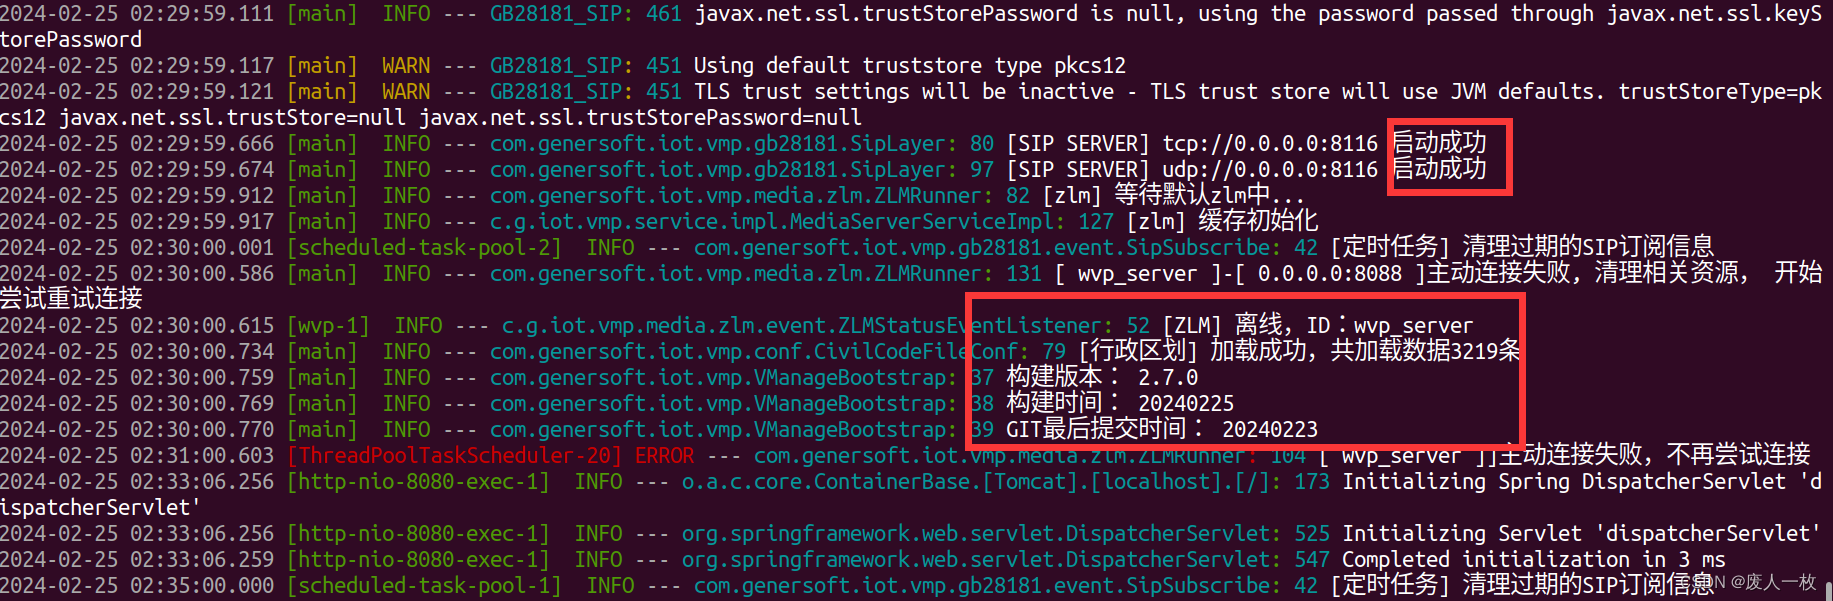
java -jar wvp-pro-2.7.0-02250919.jar
运行错误参考:【GB28181】wvp-gb28181-Pro 运行错误汇总避坑大全
运行成功后:

验证服务
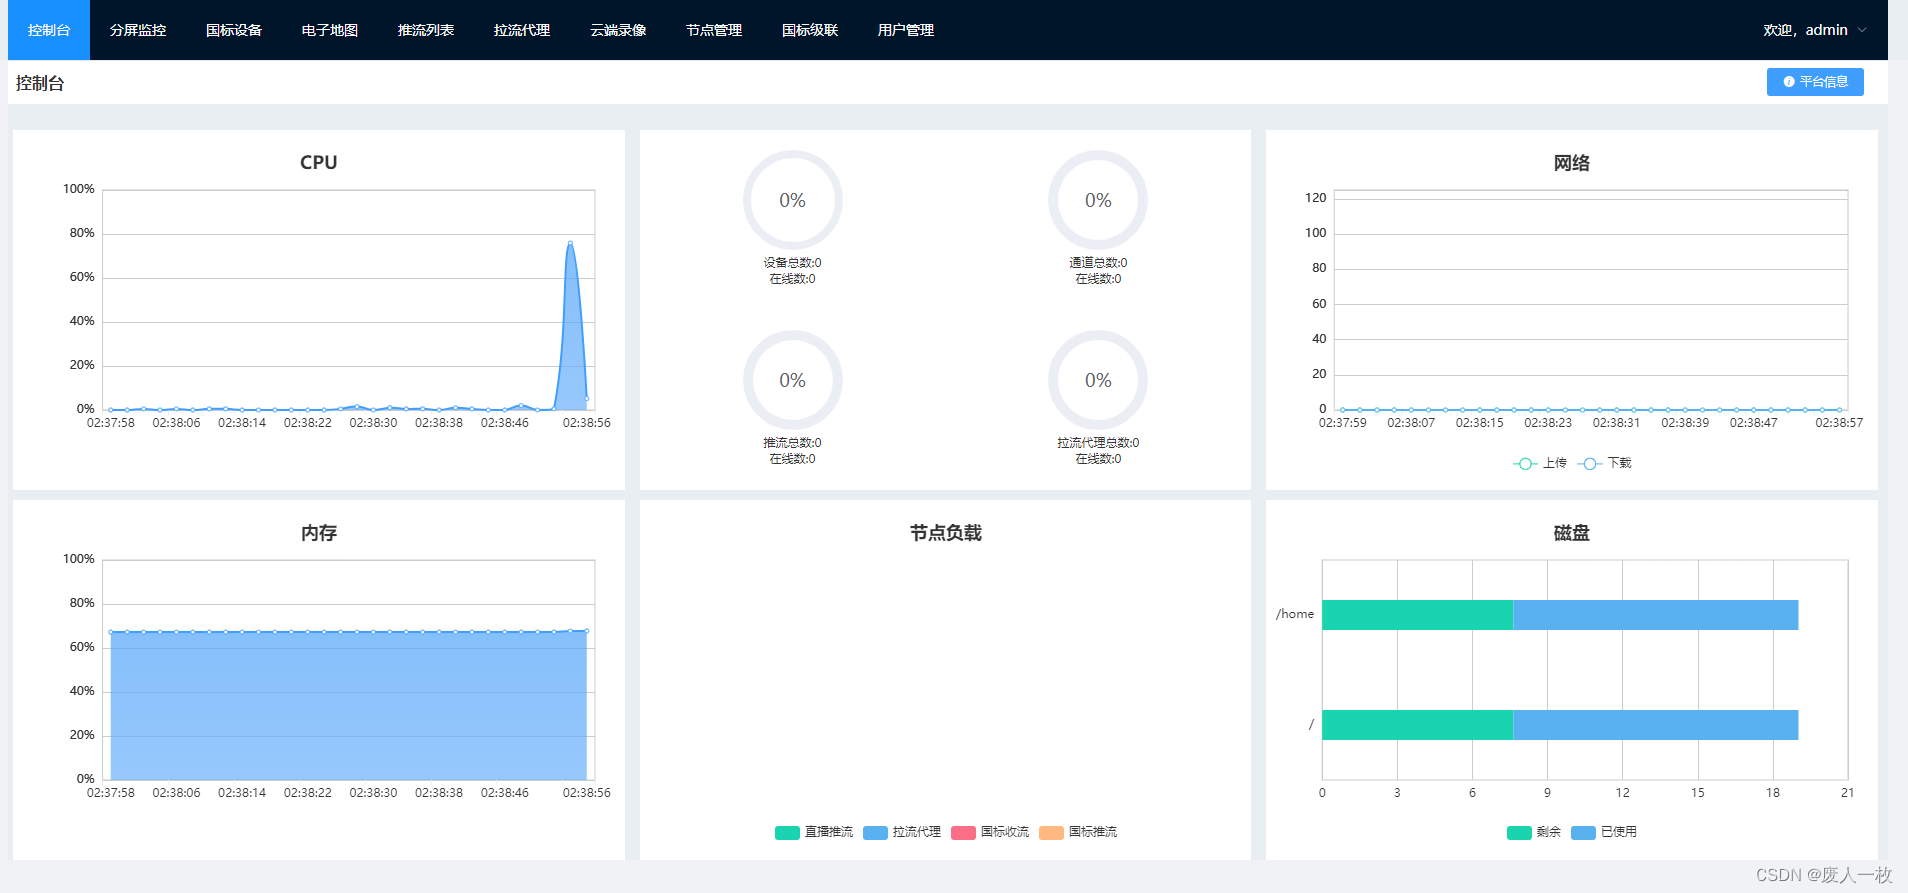
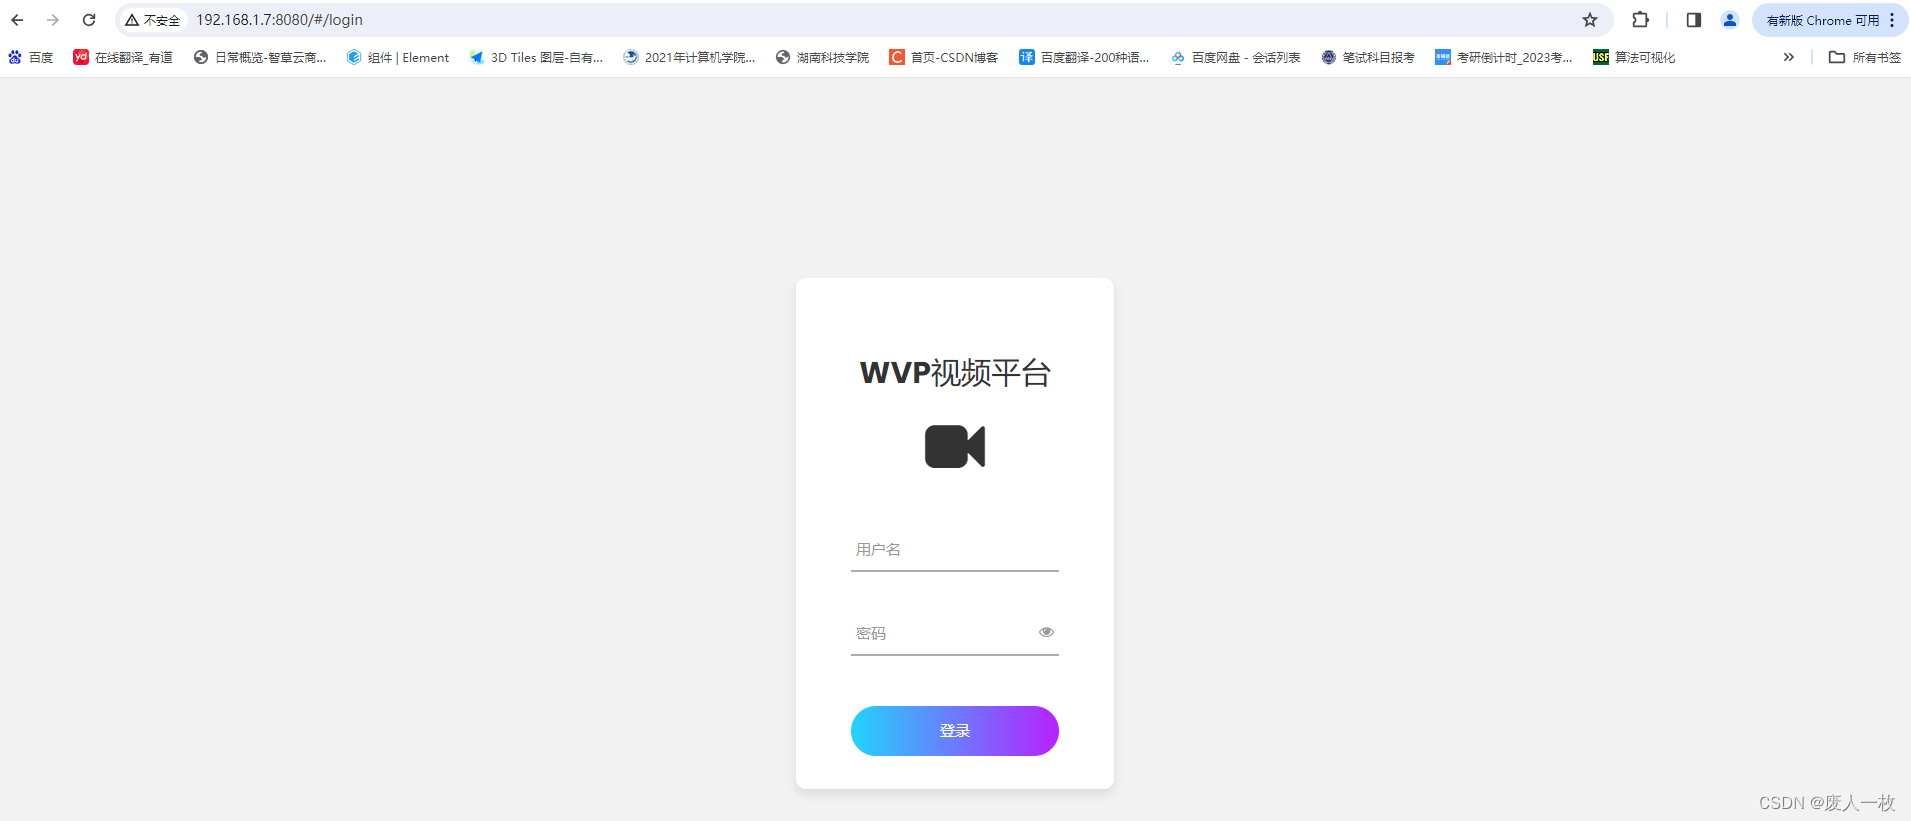
打开浏览器输入虚拟机ip+wvp监听的http端口例如:192.168.1.7:8080/即可看到登录界面。
用户名:admin 密码:admin
登录成功后