网页小游戏点击即玩网络营销seo优化
手势识别是一种人机交互技术,通过识别人的手势动作,从而实现对计算机、智能手机、智能电视等设备的操作和控制。
1. opencv实现手部追踪(定位手部关键点)
2.opencv实战项目 实现手势跟踪并返回位置信息(封装调用)
3.opencv实战项目 手势识别-手势控制鼠标
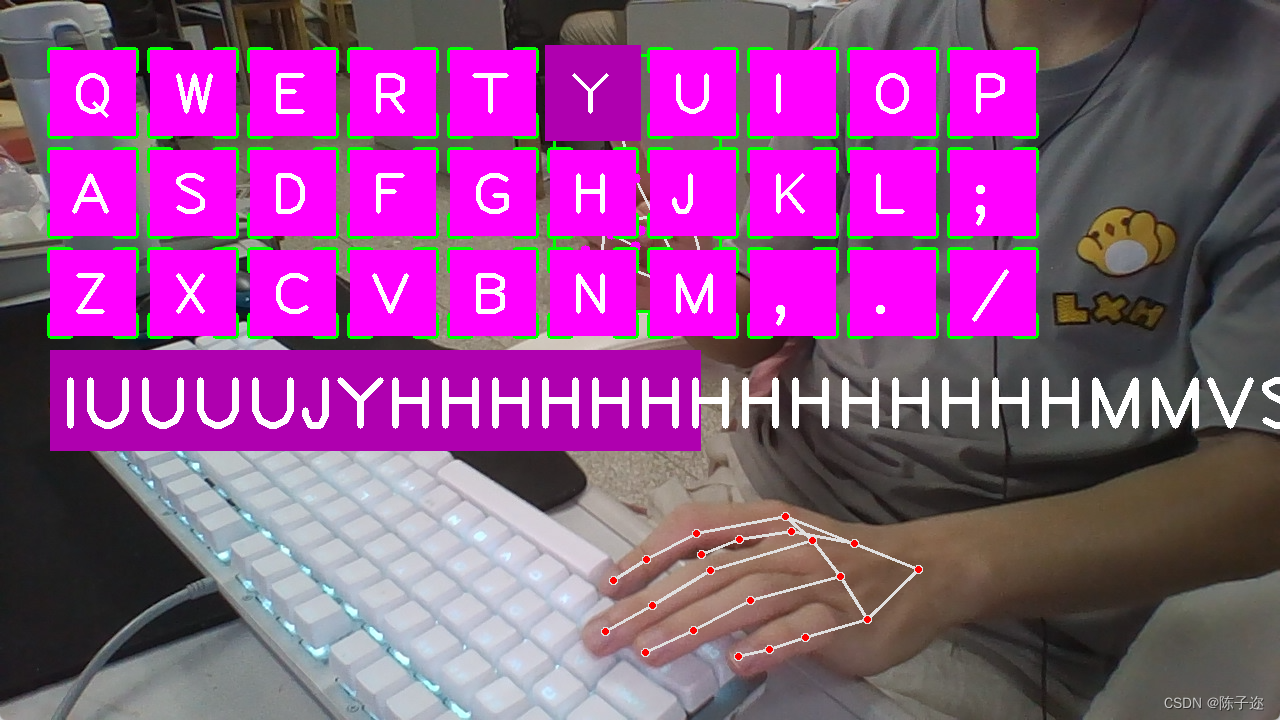
4.opencv实战项目 手势识别-手势控制键盘
未完待续
本专栏记录作者的学习之旅会一直更新下去,欢迎订阅一起学习进步
本项目是使用了谷歌开源的框架mediapipe,里面有非常多的模型提供给我们使用,例如面部检测,身体检测,手部检测等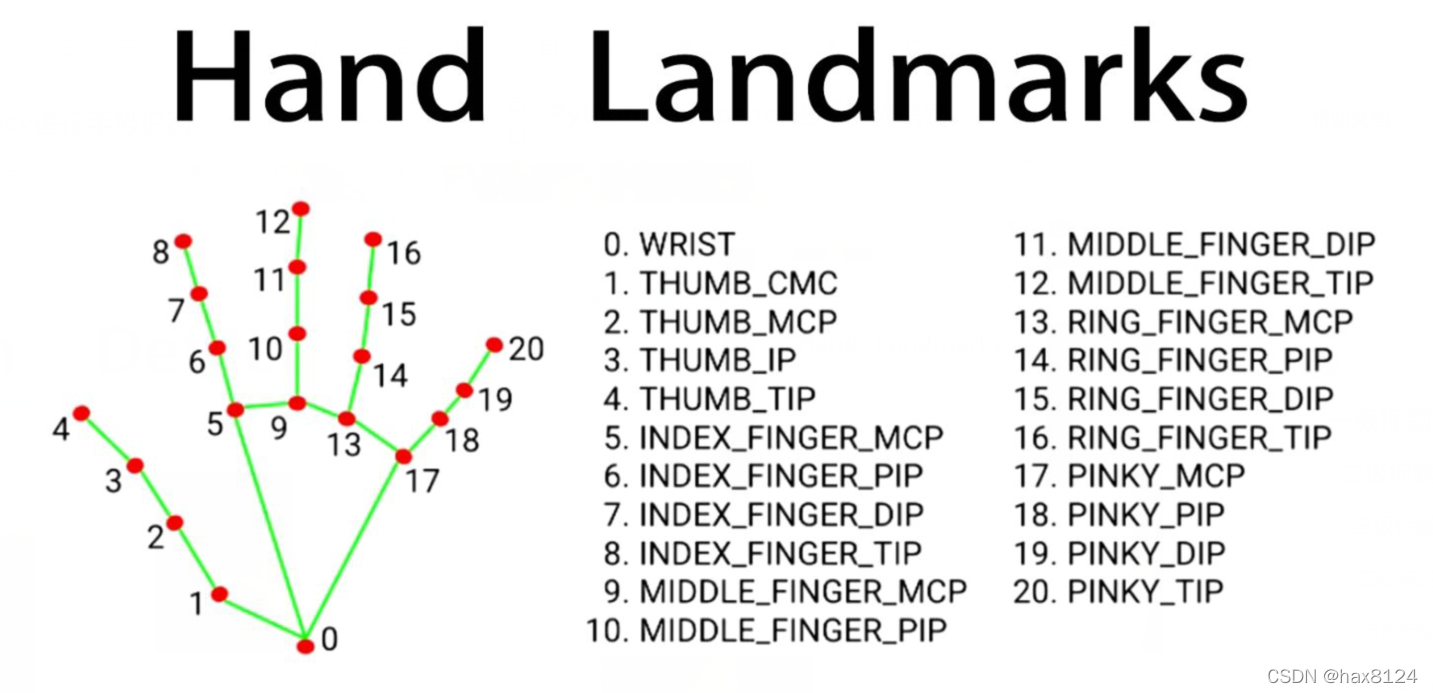
代码需要用到opencv HandTraqckModule模块 mediapipe模块和一个键盘控制模块pynput,cvzone模块
一、HandTraqckModule模块
前面的文章中有封装手部检测模块的教程,这边简单的介绍一下,有新增加的模块可以简单学习一下
import cv2
import mediapipe as mp
import mathclass HandDetector:"""Finds Hands using the mediapipe library. Exports the landmarksin pixel format. Adds extra functionalities like finding howmany fingers are up or the distance between two fingers. Alsoprovides bounding box info of the hand found."""def __init__(self, mode=False, maxHands=2, detectionCon=0.5, minTrackCon=0.5):""":param mode: In static mode, detection is done on each image: slower:param maxHands: Maximum number of hands to detect:param detectionCon: Minimum Detection Confidence Threshold:param minTrackCon: Minimum Tracking Confidence Threshold"""self.mode = modeself.maxHands = maxHandsself.detectionCon = detectionConself.minTrackCon = minTrackConself.mpHands = mp.solutions.handsself.hands = self.mpHands.Hands(self.mode, self.maxHands,self.detectionCon, self.minTrackCon)self.mpDraw = mp.solutions.drawing_utilsself.tipIds = [4, 8, 12, 16, 20]self.fingers = []self.lmList = []def findHands(self, img, draw=True):"""Finds hands in a BGR image.:param img: Image to find the hands in.:param draw: Flag to draw the output on the image.:return: Image with or without drawings"""imgRGB = cv2.cvtColor(img, cv2.COLOR_BGR2RGB)self.results = self.hands.process(imgRGB)if self.results.multi_hand_landmarks:for handLms in self.results.multi_hand_landmarks:if draw:self.mpDraw.draw_landmarks(img, handLms,self.mpHands.HAND_CONNECTIONS)return imgdef findPosition(self, img, handNo=0, draw=True):"""Finds landmarks of a single hand and puts them in a listin pixel format. Also finds the bounding box around the hand.:param img: main image to find hand in:param handNo: hand id if more than one hand detected:param draw: Flag to draw the output on the image.:return: list of landmarks in pixel format; bounding box"""xList = []yList = []bbox = []bboxInfo = []self.lmList = []if self.results.multi_hand_landmarks:myHand = self.results.multi_hand_landmarks[handNo]for id, lm in enumerate(myHand.landmark):h, w, c = img.shapepx, py = int(lm.x * w), int(lm.y * h)xList.append(px)yList.append(py)self.lmList.append([px, py])if draw:cv2.circle(img, (px, py), 5, (255, 0, 255), cv2.FILLED)xmin, xmax = min(xList), max(xList)ymin, ymax = min(yList), max(yList)boxW, boxH = xmax - xmin, ymax - yminbbox = xmin, ymin, boxW, boxHcx, cy = bbox[0] + (bbox[2] // 2), \bbox[1] + (bbox[3] // 2)bboxInfo = {"id": id, "bbox": bbox, "center": (cx, cy)}if draw:cv2.rectangle(img, (bbox[0] - 20, bbox[1] - 20),(bbox[0] + bbox[2] + 20, bbox[1] + bbox[3] + 20),(0, 255, 0), 2)return self.lmList, bboxInfodef fingersUp(self):"""Finds how many fingers are open and returns in a list.Considers left and right hands separately:return: List of which fingers are up"""if self.results.multi_hand_landmarks:myHandType = self.handType()fingers = []# Thumbif myHandType == "Right":if self.lmList[self.tipIds[0]][0] > self.lmList[self.tipIds[0] - 1][0]:fingers.append(1)else:fingers.append(0)else:if self.lmList[self.tipIds[0]][0] < self.lmList[self.tipIds[0] - 1][0]:fingers.append(1)else:fingers.append(0)# 4 Fingersfor id in range(1, 5):if self.lmList[self.tipIds[id]][1] < self.lmList[self.tipIds[id] - 2][1]:fingers.append(1)else:fingers.append(0)return fingersdef findDistance(self, p1, p2, img, draw=True):"""Find the distance between two landmarks based on theirindex numbers.:param p1: Point1 - Index of Landmark 1.:param p2: Point2 - Index of Landmark 2.:param img: Image to draw on.:param draw: Flag to draw the output on the image.:return: Distance between the pointsImage with output drawnLine information"""if self.results.multi_hand_landmarks:x1, y1 = self.lmList[p1][0], self.lmList[p1][1]x2, y2 = self.lmList[p2][0], self.lmList[p2][1]cx, cy = (x1 + x2) // 2, (y1 + y2) // 2if draw:cv2.circle(img, (x1, y1), 15, (255, 0, 255), cv2.FILLED)cv2.circle(img, (x2, y2), 15, (255, 0, 255), cv2.FILLED)cv2.line(img, (x1, y1), (x2, y2), (255, 0, 255), 3)cv2.circle(img, (cx, cy), 15, (255, 0, 255), cv2.FILLED)length = math.hypot(x2 - x1, y2 - y1)return length, img, [x1, y1, x2, y2, cx, cy]def handType(self):"""Checks if the hand is left or right:return: "Right" or "Left""""if self.results.multi_hand_landmarks:if self.lmList[17][0] < self.lmList[5][0]:return "Right"else:return "Left"def main():cap = cv2.VideoCapture(0)detector = HandDetector(detectionCon=0.8, maxHands=1)while True:# Get image framesuccess, img = cap.read()# Find the hand and its landmarksimg = detector.findHands(img)lmList, bboxInfo = detector.findPosition(img)print(detector.handType())# Displaycv2.imshow("Image", img)cv2.waitKey(1)if __name__ == "__main__":main()-
导入库:导入了必要的库,包括 OpenCV (
cv2) 用于图像处理和显示,Mediapipe (mediapipe) 用于手部检测和跟踪,以及数学库 (math)。 -
HandDetector类:这是主要的手势检测器类,提供了多个方法来处理手部检测和分析手势。-
__init__方法:初始化检测器的参数,例如检测模式、最大检测手数、检测和跟踪的置信度阈值等。 -
findHands方法:在给定的图像中寻找手部,可以选择是否绘制检测结果。 -
findPosition方法:找到单个手部的关键点位置(landmarks)并将它们存储在像素格式的列表中,同时计算手部的边界框信息。 -
fingersUp方法:确定手势中有多少个手指打开,将结果以列表形式返回。 -
findDistance方法:计算两个指定关键点之间的距离,并在图像上绘制结果。 -
handType方法:确定手的类型是左手还是右手。
-
具体就不展开讲了
这个函数在有一个专门的包叫做cvzone里有,但是不知道是不是版本的问题,少了一些东西,运行不起来,只能自己手撸检测模块。
下面是主函数的代码
import cv2
from cvzone.HandTrackingModule import HandDetector
from HandTrackingModule import *
from time import sleep
import numpy as np
import cvzone
from pynput.keyboard import Controllercap = cv2.VideoCapture(0)
cap.set(3, 1280)
cap.set(4, 720)detector =HandDetector(detectionCon=0.5)
keys = [["Q", "W", "E", "R", "T", "Y", "U", "I", "O", "P"],["A", "S", "D", "F", "G", "H", "J", "K", "L", ";"],["Z", "X", "C", "V", "B", "N", "M", ",", ".", "/"]]
finalText = ""keyboard = Controller()def drawAll(img, buttonList):for button in buttonList:x, y = button.posw, h = button.sizecvzone.cornerRect(img, (button.pos[0], button.pos[1], button.size[0], button.size[1]),20, rt=0)cv2.rectangle(img, button.pos, (x + w, y + h), (255, 0, 255), cv2.FILLED)cv2.putText(img, button.text, (x + 20, y + 65),cv2.FONT_HERSHEY_PLAIN, 4, (255, 255, 255), 4)return img#
# def drawAll(img, buttonList):
#     imgNew = np.zeros_like(img, np.uint8)
#     for button in buttonList:
#         x, y = button.pos
#         cvzone.cornerRect(imgNew, (button.pos[0], button.pZXos[1], button.size[0], button.size[1]),
#                           20, rt=0)
#         cv2.rectangle(imgNew, button.pos, (x + button.size[0], y + button.size[1]),
#                       (255, 0, 255), cv2.FILLED)
#         cv2.putText(imgNew, button.text, (x + 40, y + 60),
#                     cv2.FONT_HERSHEY_PLAIN, 2, (255, 255, 255), 3)
#
#     out = img.copy()
#     alpha = 0.5
#     mask = imgNew.astype(bool)
#     print(mask.shape)
#     out[mask] = cv2.addWeighted(img, alpha, imgNew, 1 - alpha, 0)[mask]
#     return outclass Button():def __init__(self, pos, text, size=[85, 85]):self.pos = posself.size = sizeself.text = textbuttonList = []
for i in range(len(keys)):for j, key in enumerate(keys[i]):buttonList.append(Button([100 * j + 50, 100 * i + 50], key))while True:success, img = cap.read()img = detector.findHands(img)lmList, bboxInfo = detector.findPosition(img)img = drawAll(img, buttonList)if lmList:for button in buttonList:x, y = button.posw, h = button.sizeif x < lmList[8][0] < x + w and y < lmList[8][1] < y + h:cv2.rectangle(img, (x - 5, y - 5), (x + w + 5, y + h + 5), (175, 0, 175), cv2.FILLED)cv2.putText(img, button.text, (x + 20, y + 65),cv2.FONT_HERSHEY_PLAIN, 4, (255, 255, 255), 4)l, _, _ = detector.findDistance(8, 12, img, draw=False)print(l)## when clickedif l < 30:keyboard.press(button.text)cv2.rectangle(img, button.pos, (x + w, y + h), (0, 255, 0), cv2.FILLED)cv2.putText(img, button.text, (x + 20, y + 65),cv2.FONT_HERSHEY_PLAIN, 4, (255, 255, 255), 4)finalText += button.textsleep(0.15)cv2.rectangle(img, (50, 350), (700, 450), (175, 0, 175), cv2.FILLED)cv2.putText(img, finalText, (60, 430),cv2.FONT_HERSHEY_PLAIN, 5, (255, 255, 255), 5)cv2.imshow("Image", img)cv2.waitKey(1)
-
导入库:导入了需要的库,包括 OpenCV (
cv2) 用于图像处理和显示,Mediapipe 中的 HandDetector 用于手部检测,cvzone用于绘制按钮外观,numpy用于数组处理,pynput.keyboard中的 Controller 用于模拟键盘输入,time用于延时。 -
设置摄像头参数:通过 OpenCV 设置摄像头的分辨率为 1280x720。
-
创建 HandDetector 实例:使用 HandDetector 类创建一个手势检测器实例,设置检测的置信度阈值为 0.5。
-
创建按钮列表:创建了一个包含虚拟键盘按钮信息的列表,按键布局通过嵌套列表
keys定义。 -
创建
Button类:用于创建虚拟按钮的类,每个按钮包含位置、文本内容和大小。 -
主循环:进入一个无限循环,用于处理实时的摄像头捕获图像帧。
-
读取图像帧:从摄像头捕获图像帧。
-
手部检测:使用手势检测器找出图像中的手部和关键点。
-
绘制按钮:调用
drawAll函数在图像上绘制虚拟按钮。 -
遍历按钮列表:对每个按钮进行检查,看是否有手指触摸到按钮。
-
如果手指在按钮范围内,绘制高亮效果。
-
计算手指触摸点与按钮中心的距离,如果小于一定阈值,则模拟键盘按下并记录输入。
-
-
绘制已输入的文本:在图像上绘制已输入的文本。
-
显示图像:通过 OpenCV 显示处理后的图像。
-
等待键盘输入:等待 1 毫秒,以便保持图像窗口的响应性。
-
-
运行主程序:执行主循环,处理实时的摄像头捕获和手势识别。
如果有遇到问题可以评论区留言,大家一起相互学习!