一个网站开发流程泰州seo外包公司
Qt编程指南 VX:hao541022348
- ■ 将C++对象注册到 QML中,在QML使用C++对象
- ■ C++对象注册到元对象系统
- ■ Q_INVOKABLE 宏定义是将C++ 的 函数(方法)声明为元对象系统可调用的函数
- ■ 演示步骤
- ■ 将 C++类注册到 QML,并在QML声明一个对象并进行访问
- ■ qmlRegisterType函数(将c++类注册到qml中)
- ■ QML暴露对象给 C++ 进行交互
- ■
- ■
- ■
- ■ C++ 创建 QML 对象并进行交互
- ■
- ■
- ■ C++ 对象与 QML 通过信号槽进行交互
- ■
- ■
■ 将C++对象注册到 QML中,在QML使用C++对象
在 C++ 里定义了一个对象,然后将这个对象注册到 QML 里面。在 QML 里面访问的就是 C++ 定义的对象。
■ C++对象注册到元对象系统
QQmlApplicationEngine::rootContext()->setContextProperty()
■ Q_INVOKABLE 宏定义是将C++ 的 函数(方法)声明为元对象系统可调用的函数
Q_INVOKABLE
Q_INVOKABLE 是个宏定义,这个宏将 函数 声明为元对象系统可调用的函数
- Q_INVOKABLE 是个宏定义
- 这个宏定义 针对的是 函数, 不是变量
- 经过Q_INVOKABLE 声明过得函数 可以被元对象系统调用
- QtQuick 也在元对象系统内,所以在 QML 中也可以访问这个被声明了的函数
■ 演示步骤
- 新建qml工程,里面只有一个main.cpp 与一个默认的 main.qml
- 创建一个C++ 的类 MyQmlClass 来与 QML 进行交互(重点关注 函数 Q_INVOKABLE宏 )
- 将 C++ 的对象,注册到 QML中去 QQmlApplicationEngine::rootContext()->setContextProperty()
- 做完了这两步,我们就做了 C++ 的工作,在 QML 中 就可以 直接拿到对象 myQmlImp 来调用使用 Q_INVOKABLE 定义的方法了。
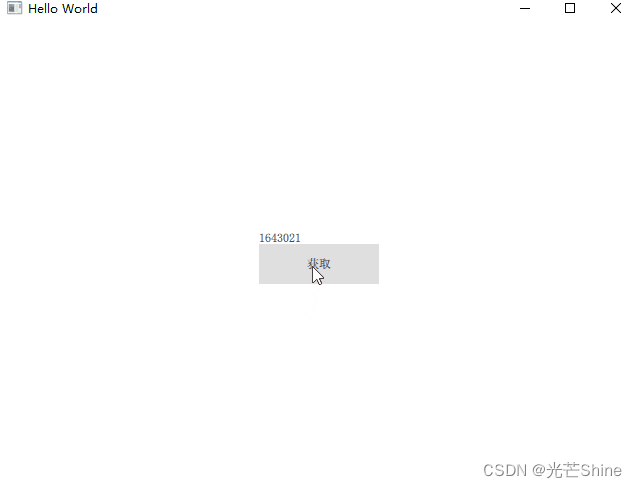
- 改造 QML (定义一个“获取”的 Button 与 显示获取值得 Label, 点击 Button 就会获取 C++ 中的 m_value 值, 在 Lable 上进行展示。)
MyQmlClass.h
#ifndef MYQMLCLASS_H
#define MYQMLCLASS_H#include <QObject>
class MyQmlClass : public QObject
{Q_OBJECT
public:explicit MyQmlClass(QObject *parent = nullptr);Q_INVOKABLE void setValue(int value);    //这个宏将 函数 声明为元对象系统可调用的函数Q_INVOKABLE int getValue();   //这个宏将 函数 声明为元对象系统可调用的函数signals:private:int m_Value;
};#endif // MYQMLCLASS_H
MyQmlClass.cpp
#include "MyQmlClass.h"MyQmlClass::MyQmlClass(QObject *parent) : QObject(parent)
{}void MyQmlClass::setValue(int value)
{m_Value = value;
}int MyQmlClass::getValue()
{return m_Value;
}
打开 main.cpp ,通过 QML 引擎 QQmlApplicationEngine 进行注册。
#include <QGuiApplication>
#include <QQmlApplicationEngine>
#include <QQmlContext>#include "MyQmlClass.h"int main(int argc, char *argv[])
{QCoreApplication::setAttribute(Qt::AA_EnableHighDpiScaling); QGuiApplication app(argc, argv); QQmlApplicationEngine engine;/////声明 对象  首先定义了一个C++ 的对象 myQmlImp ,MyQmlClass myQmlImp; //将对象进行注册到QML中//key :自定义字符串,为了好记,我们这里叫做对象的名字 "myQmlImp"//value : 对象引用,对象指针,这里就是&myQmlImpengine.rootContext()->setContextProperty("myQmlImp", &myQmlImp);/// const QUrl url(QStringLiteral("qrc:/main.qml"));QObject::connect(&engine, &QQmlApplicationEngine::objectCreated,&app, [url](QObject *obj, const QUrl &objUrl) {if (!obj && url == objUrl)QCoreApplication::exit(-1);}, Qt::QueuedConnection);engine.load(url);return app.exec();
}
main.qml我们的思路很简单,就是 QML 中来调用上面 C++ 暴露出来的读写函数。所以我们在QML 中定义一个 “获取” Button ,点击它我们就来调用C++中的 getValue() 函数,然后我们需要一个Label 将获取的 C++ 的值进行展示
import QtQuick 2.12
import QtQuick.Window 2.12
import QtQuick.Controls 2.3Window {visible: truewidth: 640height: 480title: qsTr("Hello World")Label{                         //Label用于显示获取C++的值id: label                  //显示控件,唯一标识ID:labeltext: ""                   //初始化内容清空anchors.bottom: getBtn.top //显示控件的下方放到btn的上方anchors.left: getBtn.left  //显示控件的左方与btn的左侧对齐}Button{                       //Button 用于获取值id: getBtn                 //按钮控件,唯一标识ID:getBtntext: "获取"                //按钮显示文字width: 120                 //按钮宽度height: 40                 //按钮高度anchors.centerIn: parent   //按钮放到窗口中心onClicked: {               //点击按钮事件;label.text = myQmlImp.getValue()}}
}
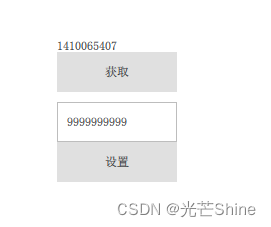
到这里,我们就在 QML 中获取了 C++ 代码中的值。可能到这里还有老师感觉不太真实,那么我们就继续进行验证,我们的思路是这样的:
- 我们增加一个 TextFiled 用于输入我们想给 。
- 再增加一个 “设置” 按钮,将 1中输入的值,给C++ 中的 m_Value 设值。
- 然后我们再点击刚才的 “获取” 按钮,将 C++ 中的 m_Value 值读取并显示出来。
这时候我们需要对原来的QML进行改造,新增加一个输入框TextField ,进行数值输入; 还需要新增加一个“设置” 按钮,点击按钮将值赋给 C++ 中的 m_Value
main.qml
import QtQuick 2.12
import QtQuick.Window 2.12
import QtQuick.Controls 2.3Window {visible: truewidth: 640height: 480title: qsTr("Hello World") Label{                         //Label用于显示获取C++的值id: label                  //显示控件,唯一标识ID:labeltext: ""                   //初始化内容清空anchors.bottom: getBtn.top //显示控件的下方放到btn的上方anchors.left: getBtn.left  //显示控件的左方与btn的左侧对齐}Button{                       //Button 用于获取值id: getBtn                 //按钮控件,唯一标识ID:getBtntext: "获取"                //按钮显示文字width: 120                 //按钮宽度height: 40                 //按钮高度anchors.centerIn: parent   //按钮放到窗口中心onClicked: {               //点击按钮事件;label.text = myQmlImp.getValue()}}TextField{                      //文字输入控件id: textField               //唯一IDwidth: getBtn.width         //也可以直接设置成120height: getBtn.height       //也可以直接设置成40anchors.top: getBtn.bottom  //放到“获取”按钮下方10个像素anchors.topMargin: 10anchors.left: getBtn.left   //与“获取”按钮左对齐}Button{id: setBtntext: "设置"width: textField.width      //可以设置成getBtn.width或者120height: textField.height    //可以设置成getBtn.height或者40anchors.top: textField.bottomanchors.left: textField.leftonClicked: {var value = textField.textmyQmlImp.setValue(value)} }
}
■ 将 C++类注册到 QML,并在QML声明一个对象并进行访问
■ qmlRegisterType函数(将c++类注册到qml中)
qmlRegisterType 就是一个函数模板。将 C++ 的类型注册到 QML 系统中,并且带有版本号,方便版本管理。 我们就把main.cpp 中的函数改造一下:
#include <QGuiApplication>
#include <QQmlApplicationEngine>
#include <QQmlContext>
#include "MyQmlClass.h"int main(int argc, char *argv[])
{QCoreApplication::setAttribute(Qt::AA_EnableHighDpiScaling); QGuiApplication app(argc, argv); QQmlApplicationEngine engine;
// 方式一:注册定义好的对象到 QML
// MyQmlClass myQmlImp;
// engine.rootContext()->setContextProperty("myQmlImp", &myQmlImp);// 方式二:注册类到 QML 对象qmlRegisterType<MyQmlClass>("com.company.myqmlclass", 1, 0, "MyQmlClass");const QUrl url(QStringLiteral("qrc:/main.qml"));QObject::connect(&engine, &QQmlApplicationEngine::objectCreated,&app, [url](QObject *obj, const QUrl &objUrl) {if (!obj && url == objUrl)QCoreApplication::exit(-1);}, Qt::QueuedConnection);engine.load(url);return app.exec();
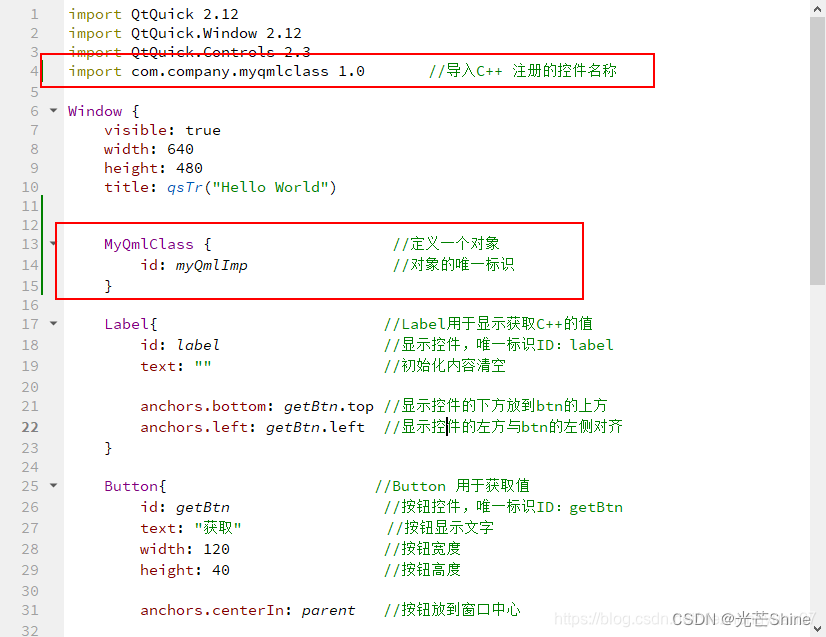
}其中:qmlRegisterType 模板函数中的 “com.company.myqmlclass” 为自定义的控件名称类似于C++中的库名称。我们在 QML 中需要 import 这个控件名, “MyQmlClass” 为 C++ 注册的类名, 1和0 为自定义版本号,方便版本管理。
import QtQuick 2.12
import QtQuick.Window 2.12
import QtQuick.Controls 2.3
import com.company.myqmlclass 1.0Window {visible: truewidth: 640height: 480title: qsTr("Hello World")MyQmlClass{id: myQmlImp}Label{                         //Label用于显示获取C++的值id: label                  //显示控件,唯一标识ID:labeltext: ""                   //初始化内容清空anchors.bottom: getBtn.top //显示控件的下方放到btn的上方anchors.left: getBtn.left  //显示控件的左方与btn的左侧对齐}Button{                       //Button 用于获取值id: getBtn                 //按钮控件,唯一标识ID:getBtntext: "获取"                //按钮显示文字width: 120                 //按钮宽度height: 40                 //按钮高度anchors.centerIn: parent   //按钮放到窗口中心onClicked: {               //点击按钮事件;label.text = myQmlImp.getValue()}}TextField{                      //文字输入控件id: textField               //唯一IDwidth: getBtn.width         //也可以直接设置成120height: getBtn.height       //也可以直接设置成40anchors.top: getBtn.bottom  //放到“获取”按钮下方10个像素anchors.topMargin: 10anchors.left: getBtn.left   //与“获取”按钮左对齐}Button{id: setBtntext: "设置"width: textField.width      //可以设置成getBtn.width或者120height: textField.height    //可以设置成getBtn.height或者40anchors.top: textField.bottomanchors.left: textField.leftonClicked: {var value = textField.textmyQmlImp.setValue(value)}}
}